Back when I launched this blog last fall I had begun a popular “What Comes In Your Free Baby Registry Bag” series where I previously looked at the free baby registry bags from Target (click here for that post), Buy Buy Baby and Babies R’ Us – the latter of which has now officially announced all their stores are closing which also sadly means the end of the BRU registry program (but click here to see that post as well), and the free pregnancy box from Noobie Box (click here for that post). It is now spring 2018 but as I just received one of the last free registry boxes I was waiting for I wanted to continue the series and thus this post will focus on what came in my free welcome baby box from Walmart! There will still be one more post to follow where I include what came in my free Amazon box as well so stay tuned for that.
If you recall from my previous posts I signed up to receive the free welcome box from Walmart back in late August/early September, and what it is for those unaware is a box that you can sign up for on Walmart’s Baby Registry page which is 100% free (no extra shipping/handling charges and no prior purchase necessary). Below is a screenshot of the page and where you can find the link to click to sign up for the box.
Screenshot from the Walmart Welcome Box page
Once you click on the part I circled that says “Welcome Box,” it redirects you to this page where you fill out your email and address and then that’s it. The page clearly states boxes are only available while supplies last and that products will vary, but one thing I will say is that I wish the form sent some sort of confirmation email to you letting you know you were signed up for the box as I never received any sort of confirmation that they had received my info and it took about 6 months for me to receive this box! That’s right – while I signed up back in August 2017 my box arrived at the tail end of February 2018 and had I not emailed Walmart a few times to confirm I was at least on the waiting list, I would have had no indication this box was even arriving. From emailing them, I learned from one of the representatives that the boxes are “a free promotion and only available while supplies lasted” and that they were now “sold out of this free promotion” but would retain my info for when supplies became available again. So that let me know that while they couldn’t give me an exact estimate of when supplies would be back in stock, it might take a “few months” and I just had to be patient…or resign to the fact that I might never receive one. What is also interesting with this box is that you don’t even need to actually register at the store as the page simply puts you on a registration sign up list and I never actually created a baby registry at Walmart myself. So keep that in mind in case you want to try to receive this box.
So here it is March 2018 that I am writing this post and I created a video unboxing as well so if you’d like to be surprised at what came in this free box, feel free to click on the video below to watch along with me as I unbox this for the first time. Otherwise keep reading below for the full list and recap.
What Came in My Free Welcome Registry Box from Walmart:
Walmart Welcome Box
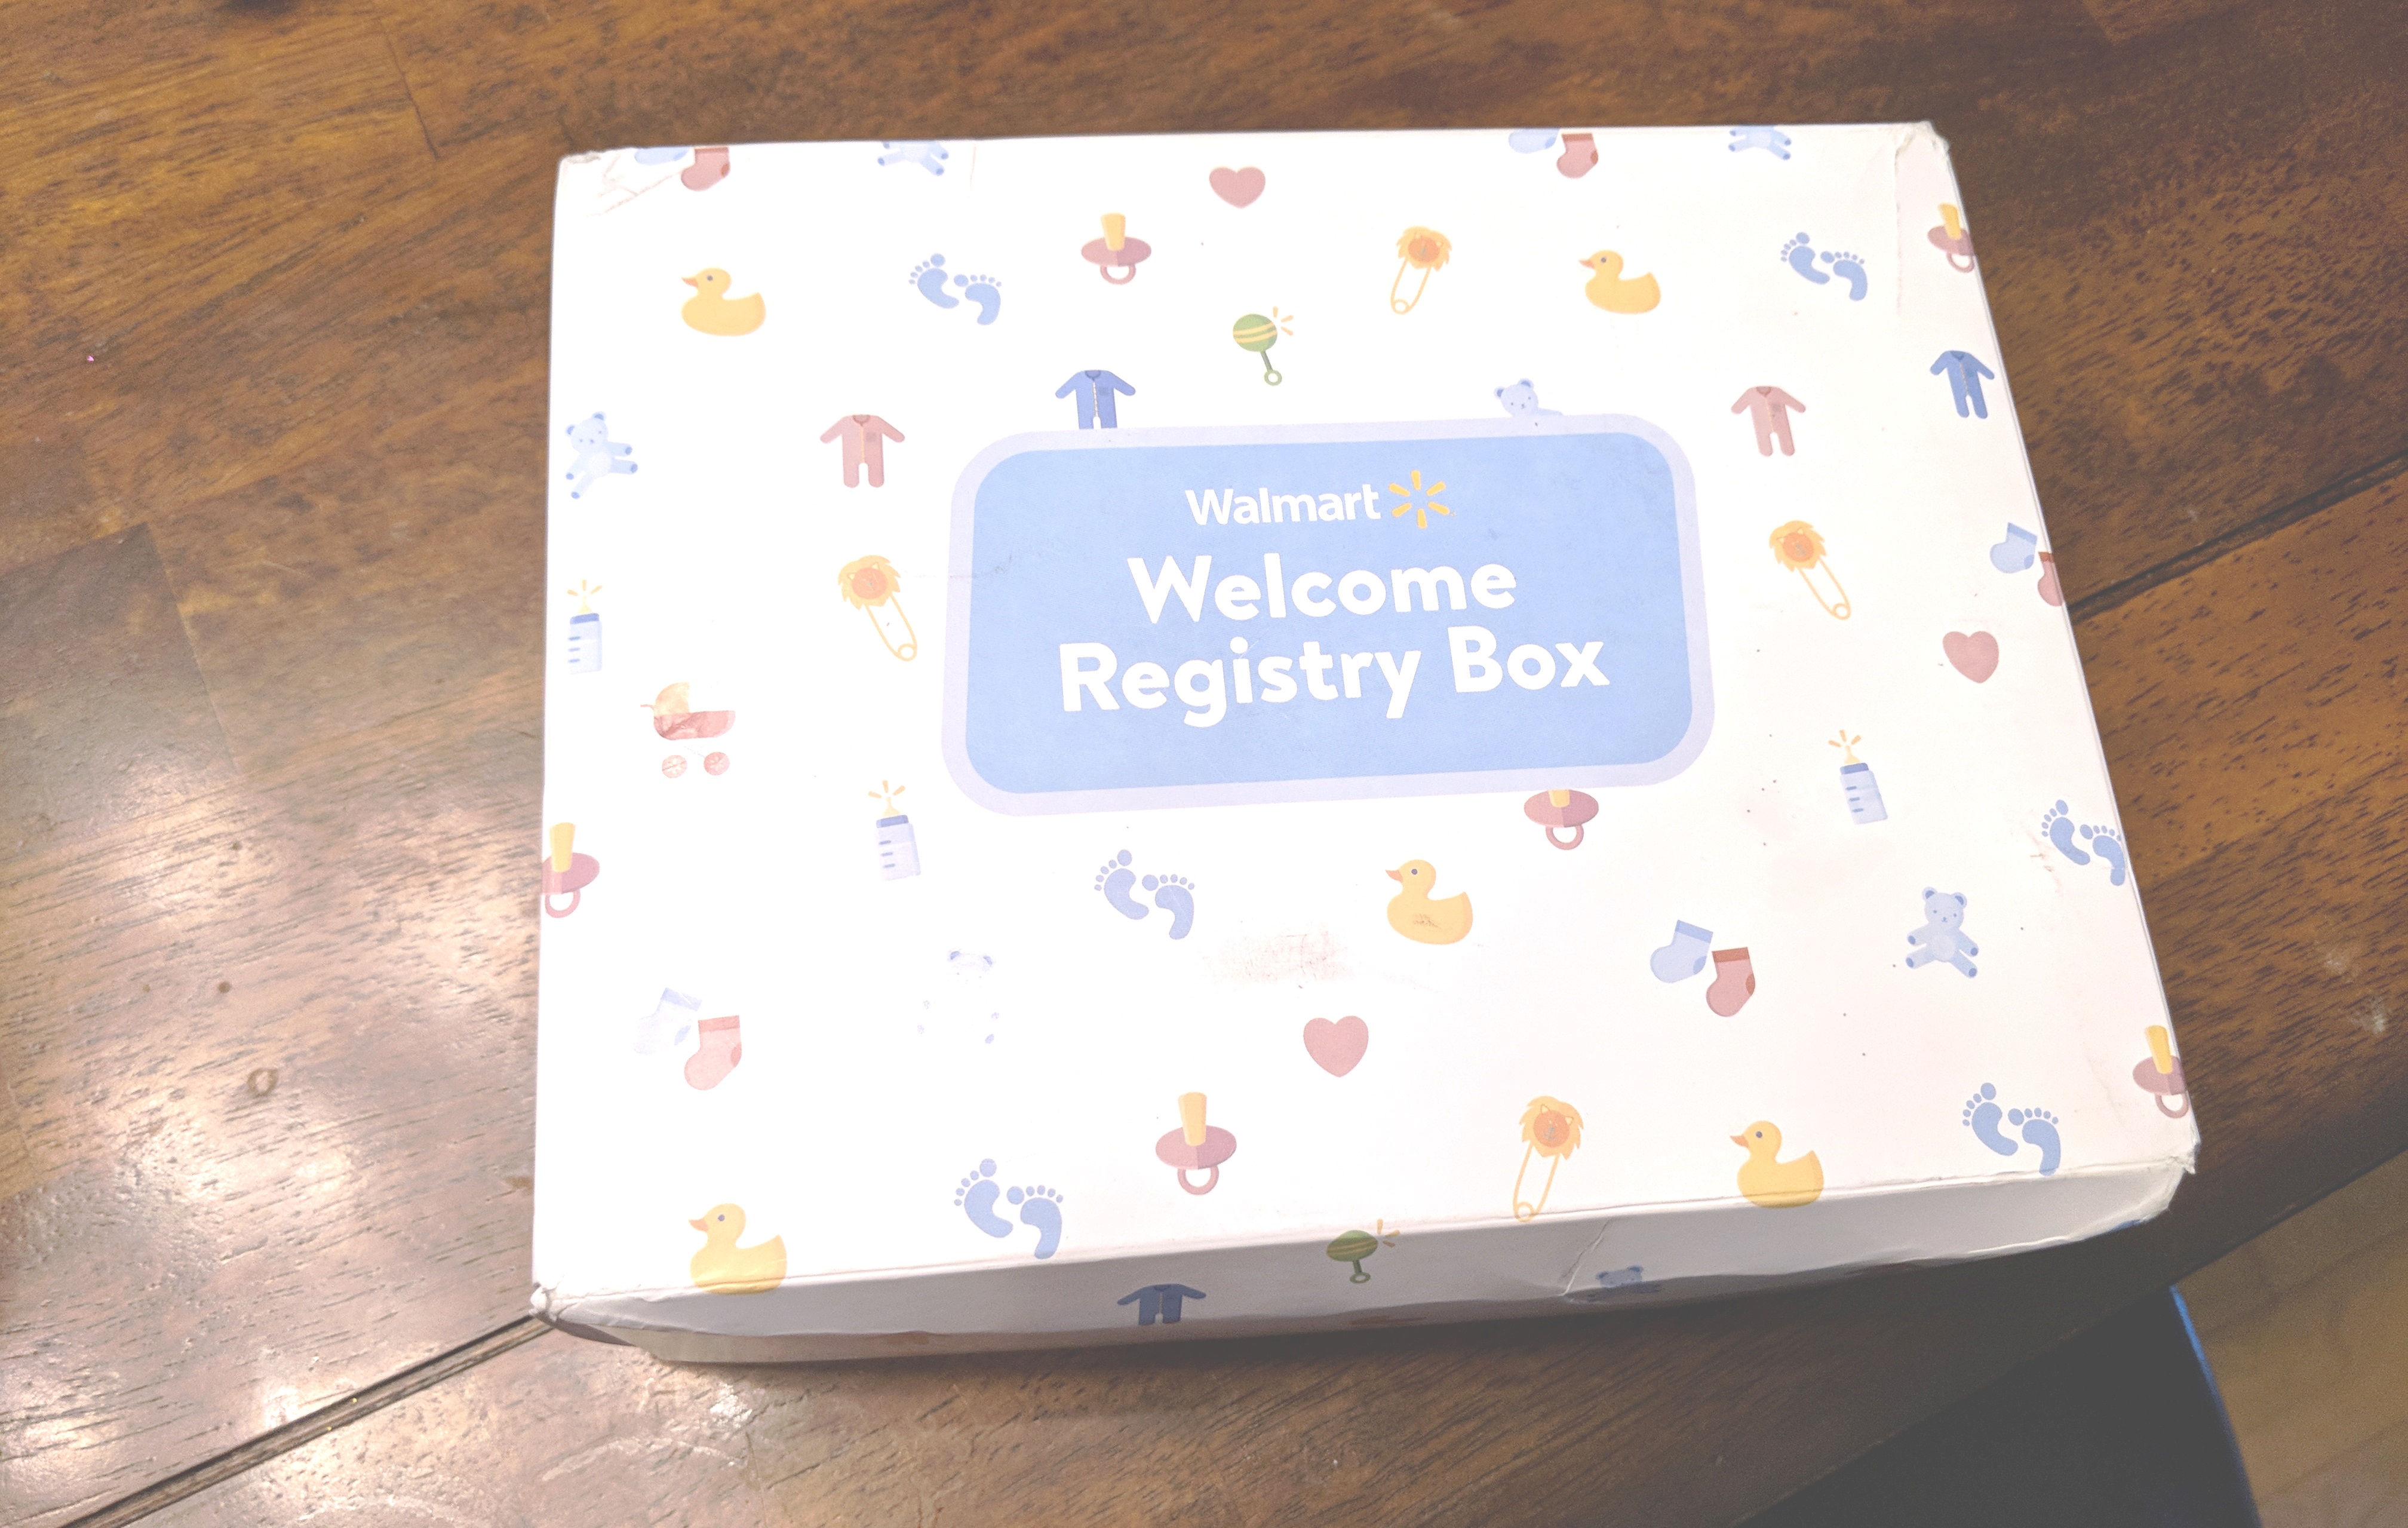
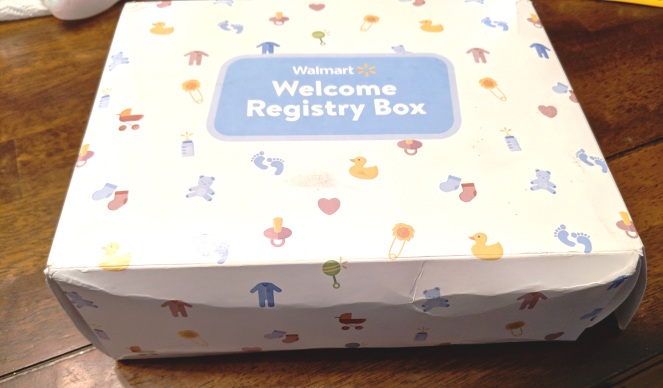
This is what the box looks like when it arrives – it says Welcome Registry Box on the front and on the side it has the label in big print that reads “FREE!” There is also a cute pattern of baby booties, pacifiers, ducks, hearts, onesies, teddy bears, bassinet strollers and little feet to let you know that the item is baby related. Very cute!
Front of Welcome Box from Walmart and How the Box Arrived in the Mail (slightly banged up)
The box itself does appear to be made of a slightly flimsy material as the edges arrived a little banged up but I did not mind, given that everything inside arrived in perfect condition.
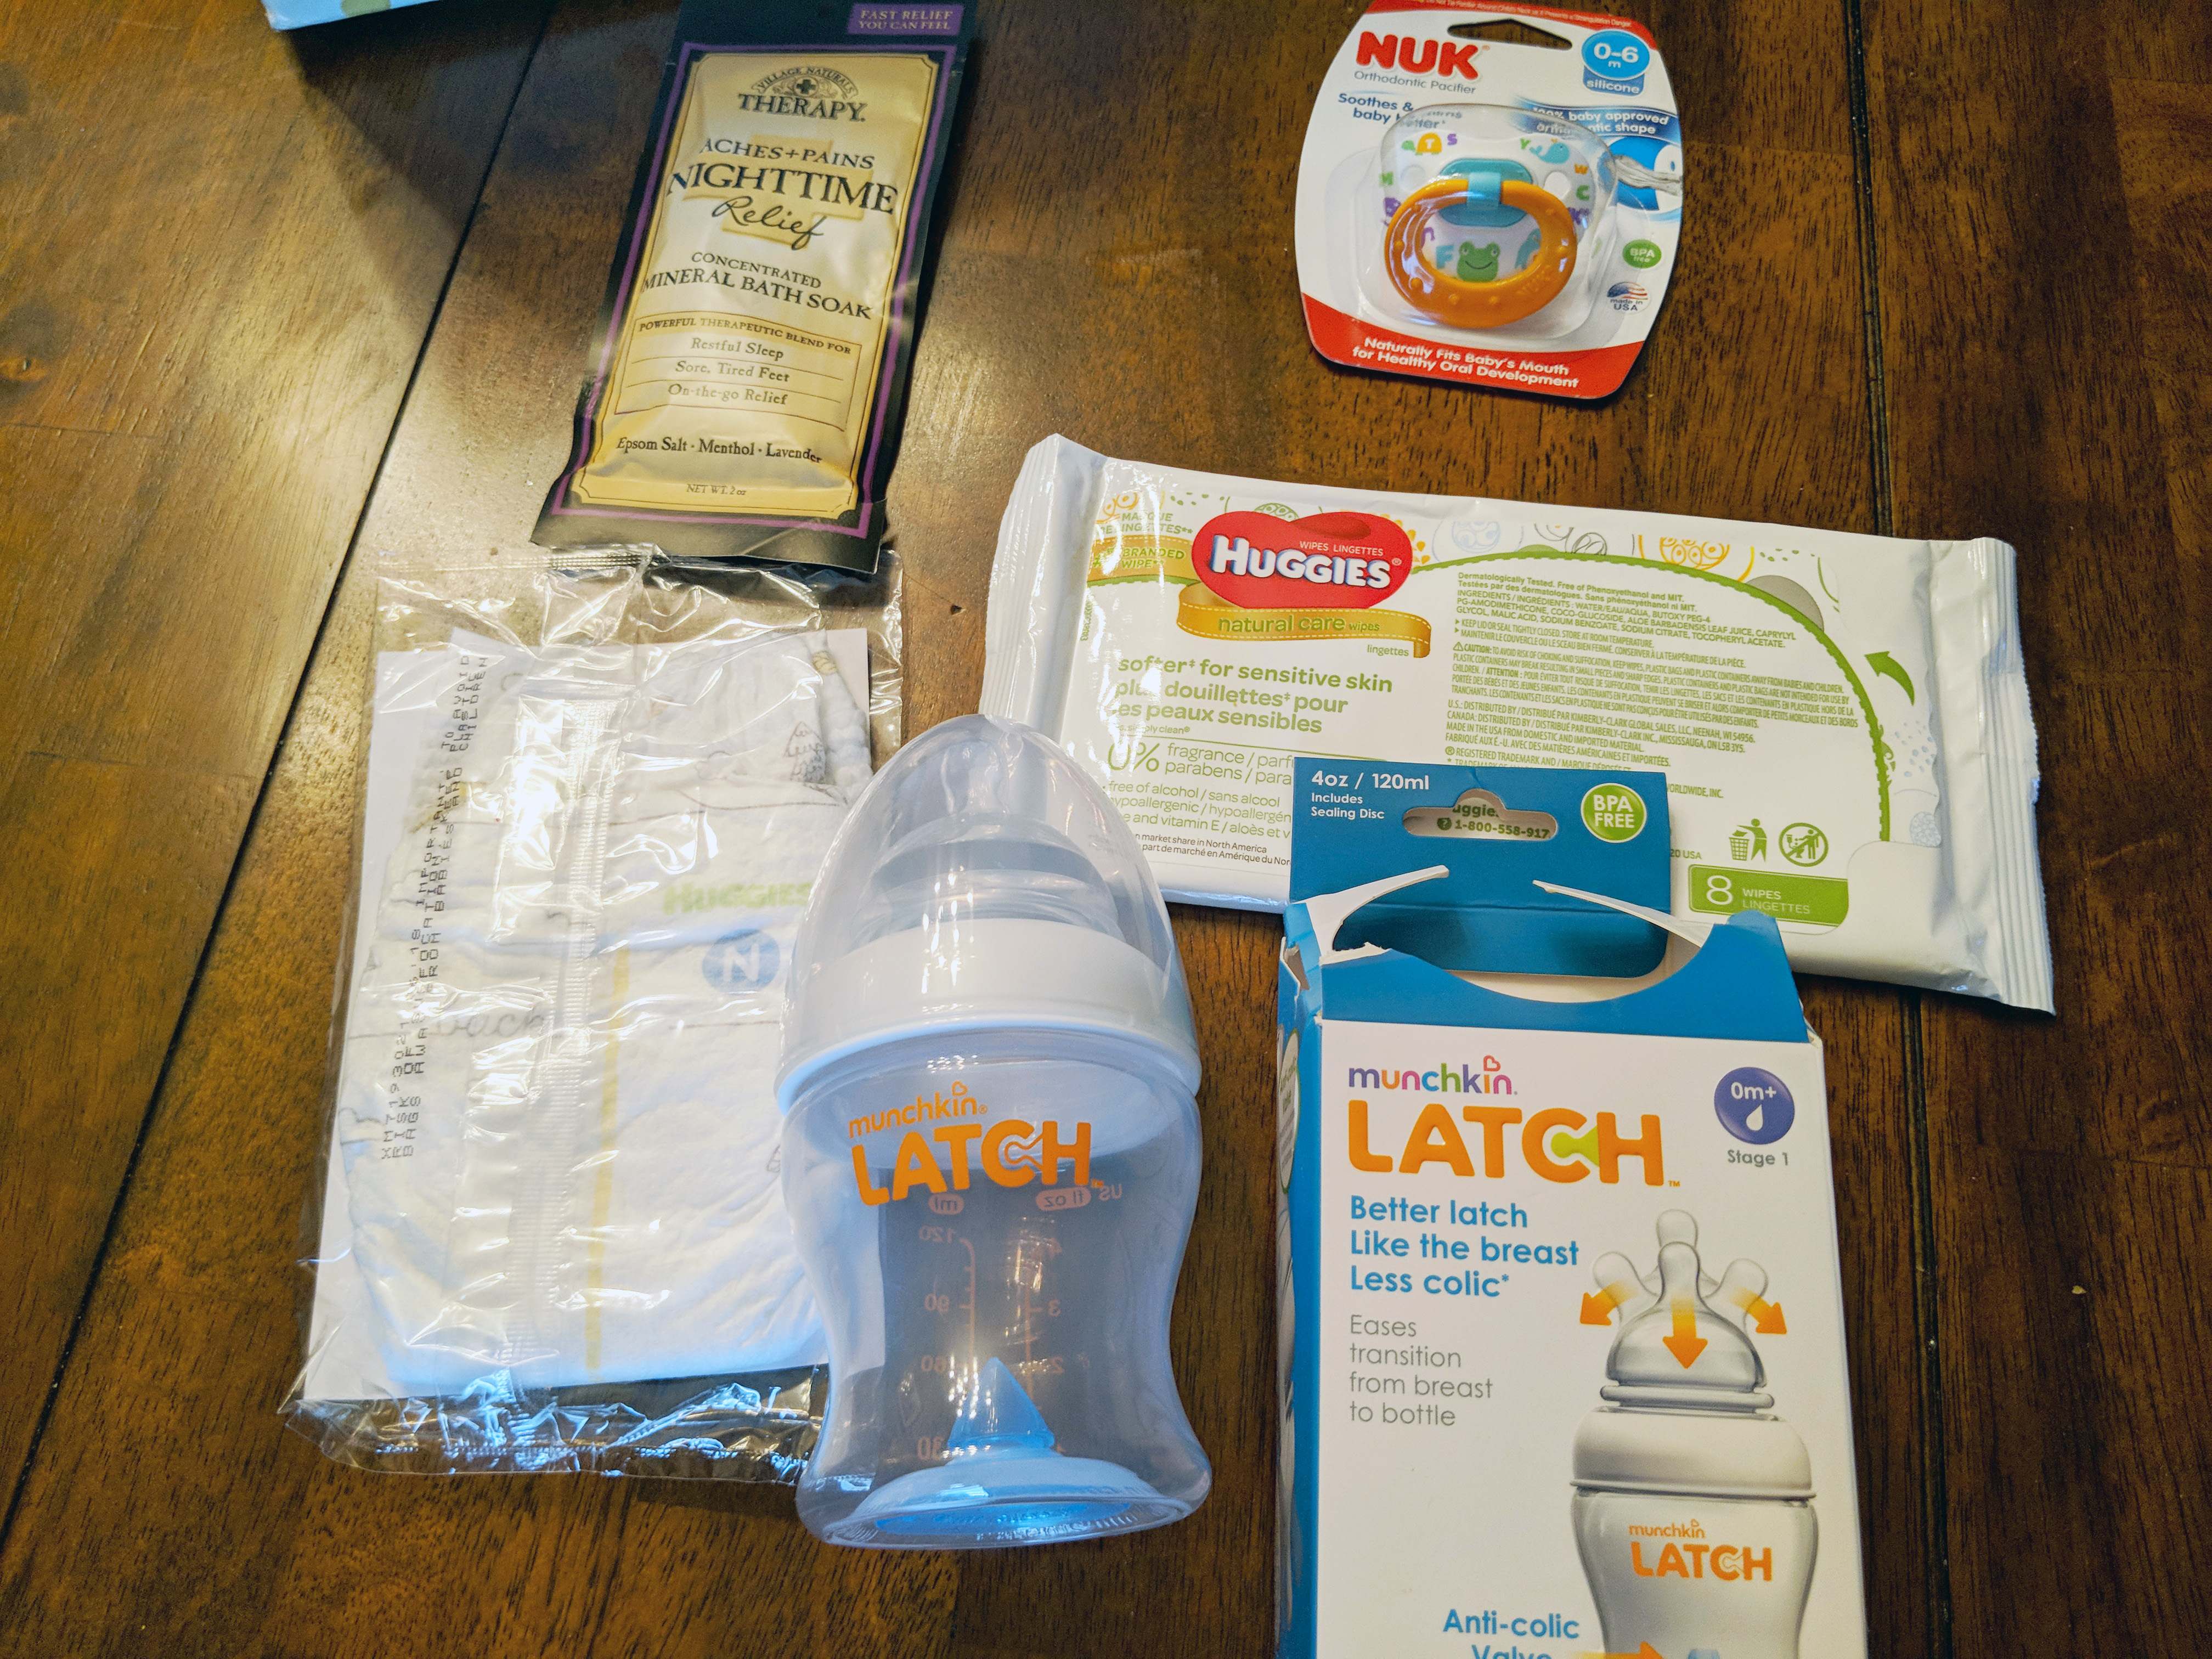
Free Samples Inside Free Welcome Box from Walmart
Inside the box I received five free sample products as well as five coupons.
The samples included:
One newborn-ready bottle from Munchkin LATCH with an anti-colic valve to prevent air from being gulped down while sucking
1 pack of 8 wipes from Huggies good for sensitive skin
1 free newborn sized diaper from Huggies Little Snugglers (because the box took awhile to arrive my son who is now three months was unable to fit in this but it has the wetness indicator line to alert new parents to when your baby has a wet diaper and needs to be changed and the diaper itself is hypoallergenic and fragrance free)
1 free orthodontic pacifier from Nuk good for zero to 6 months old
1 sample pack of Village Naturals Therapy Aches + Pains Nighttime Relief Concentrated Mineral Bath Soak infused with epsom salt, menthol and lavender with the product claim of “fast relief that you can feel”
At the time of this writing I have used the Munchkin LATCH bottle and was a fan of how it works as well as the wipes and pacifier which my son loves! I still have yet to take a bath so haven’t tried out the bath soak but the product looks promising and I am eager to give it shot. All in all, I thought for a free welcome baby box sent to me in the mail for which I paid absolutely nothing that these were all extremely useful samples for a new mom to have so I was very excited to receive this box.
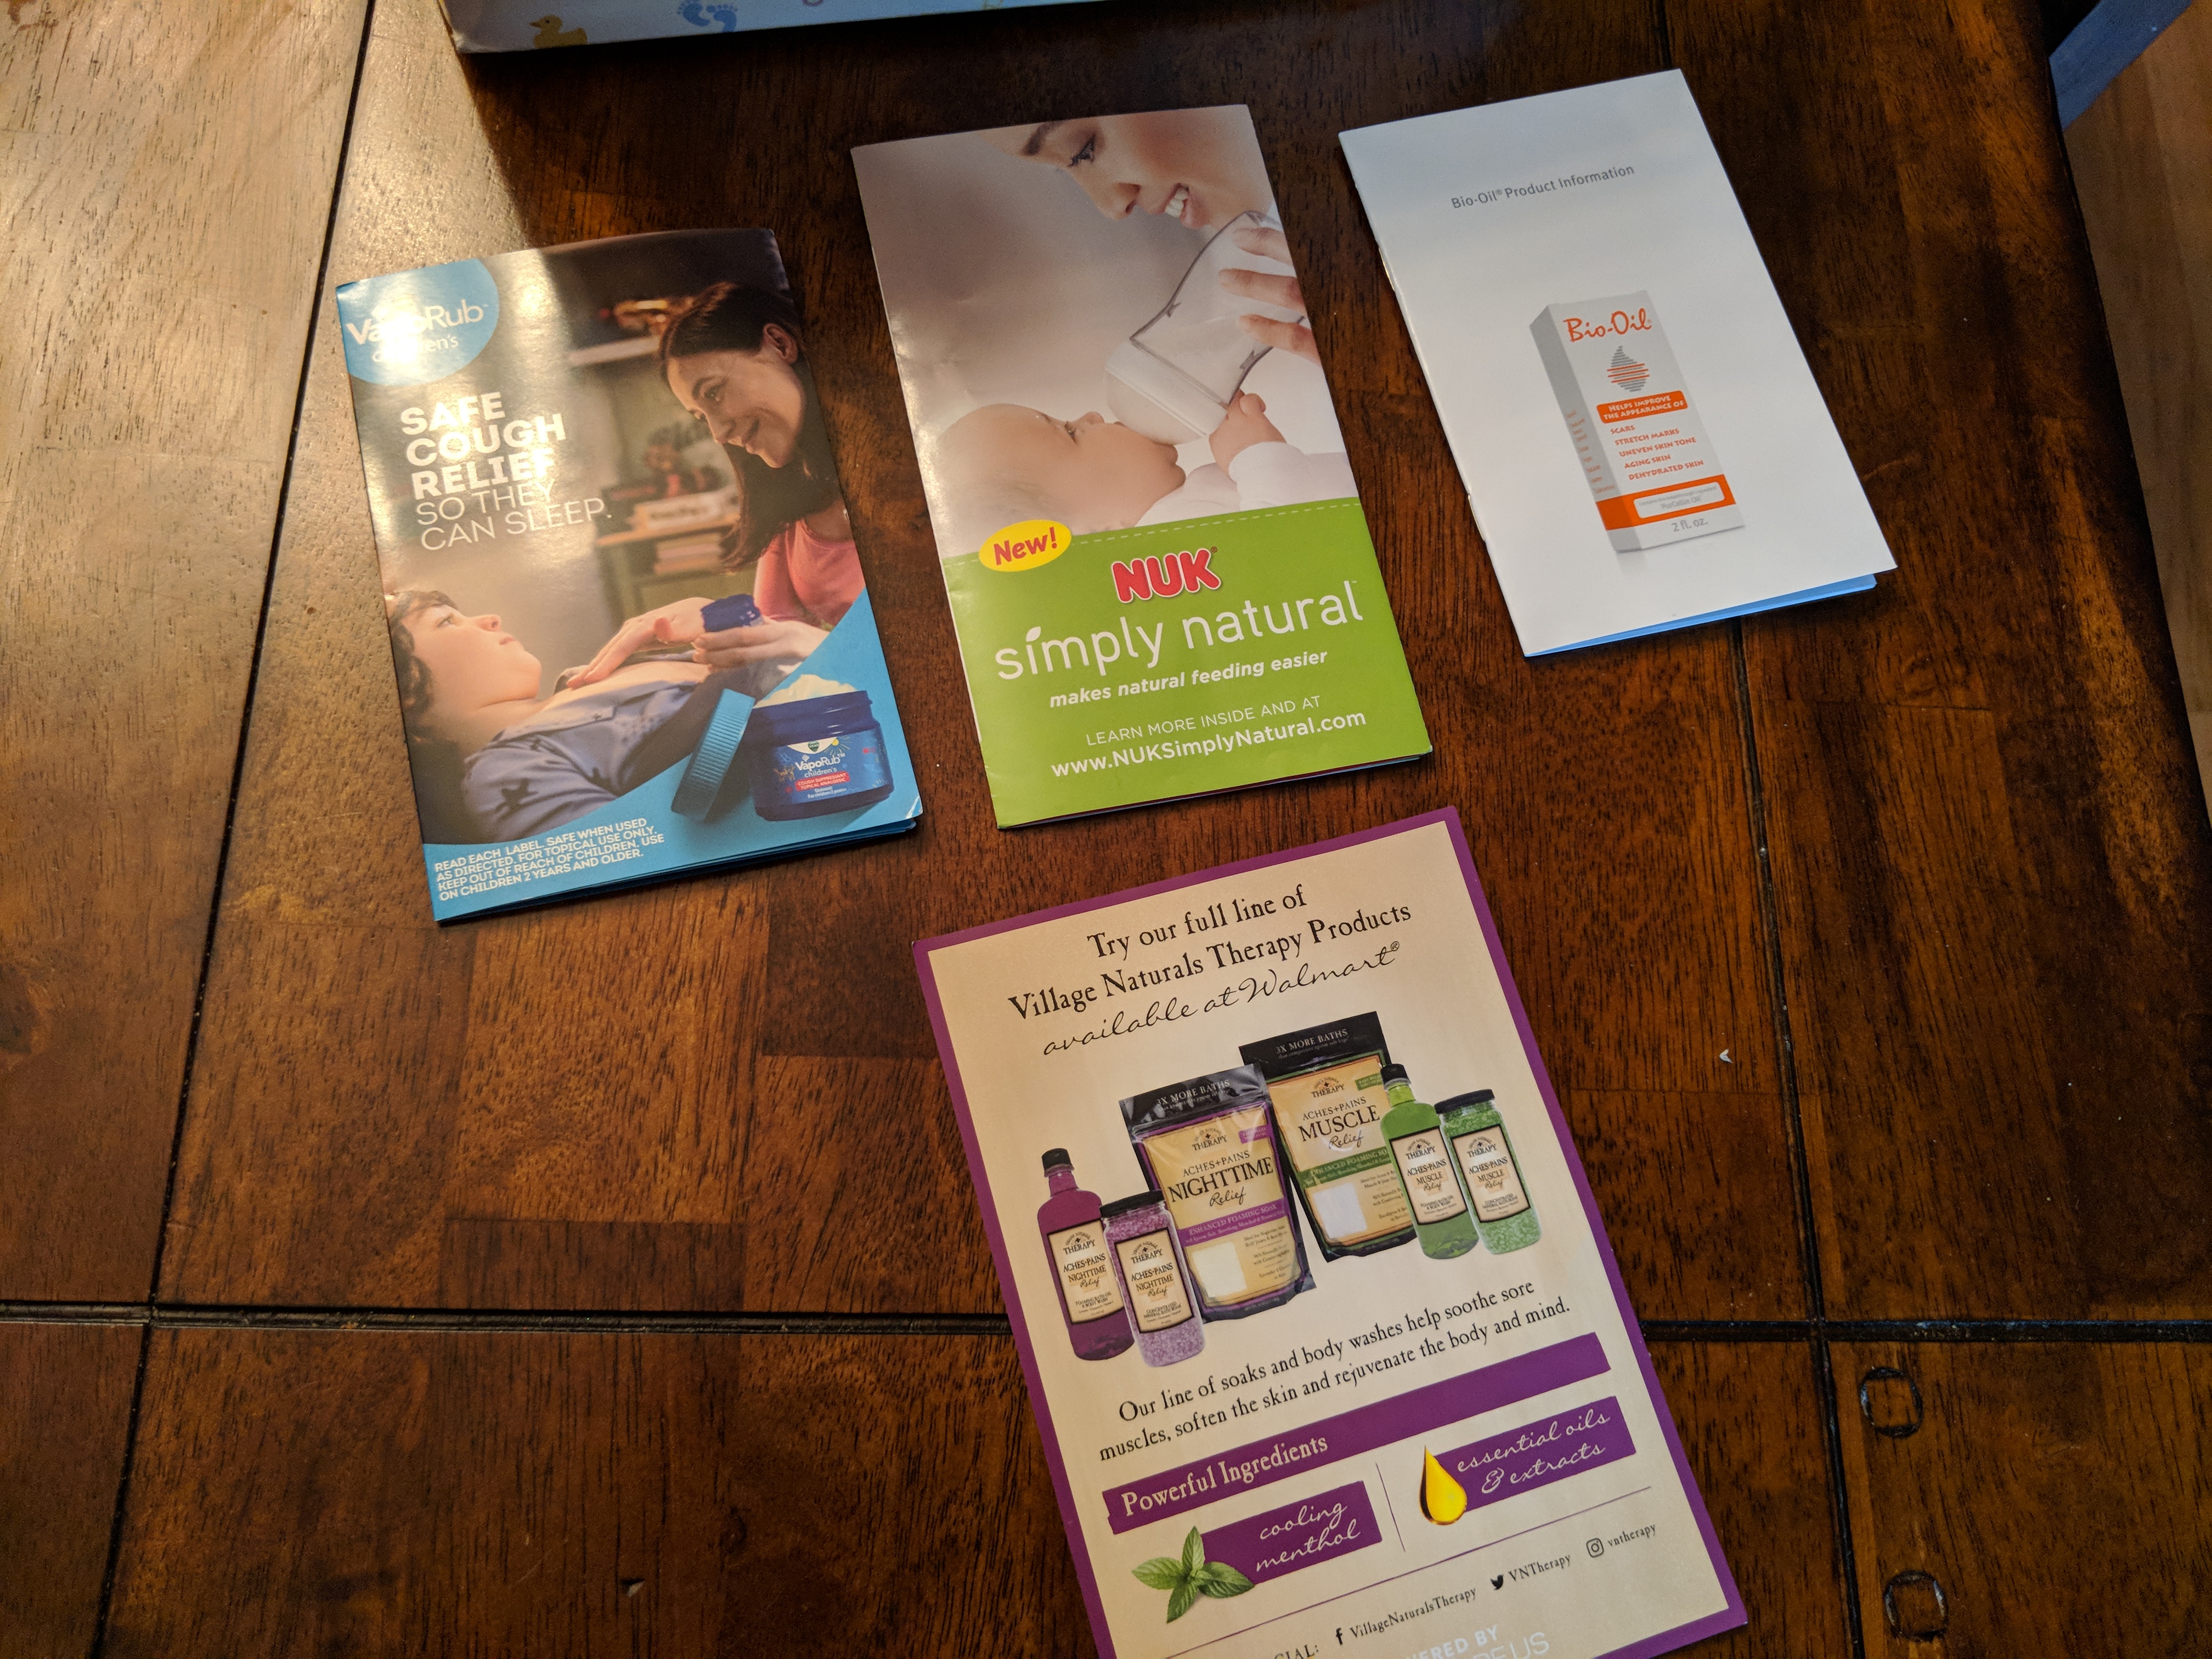
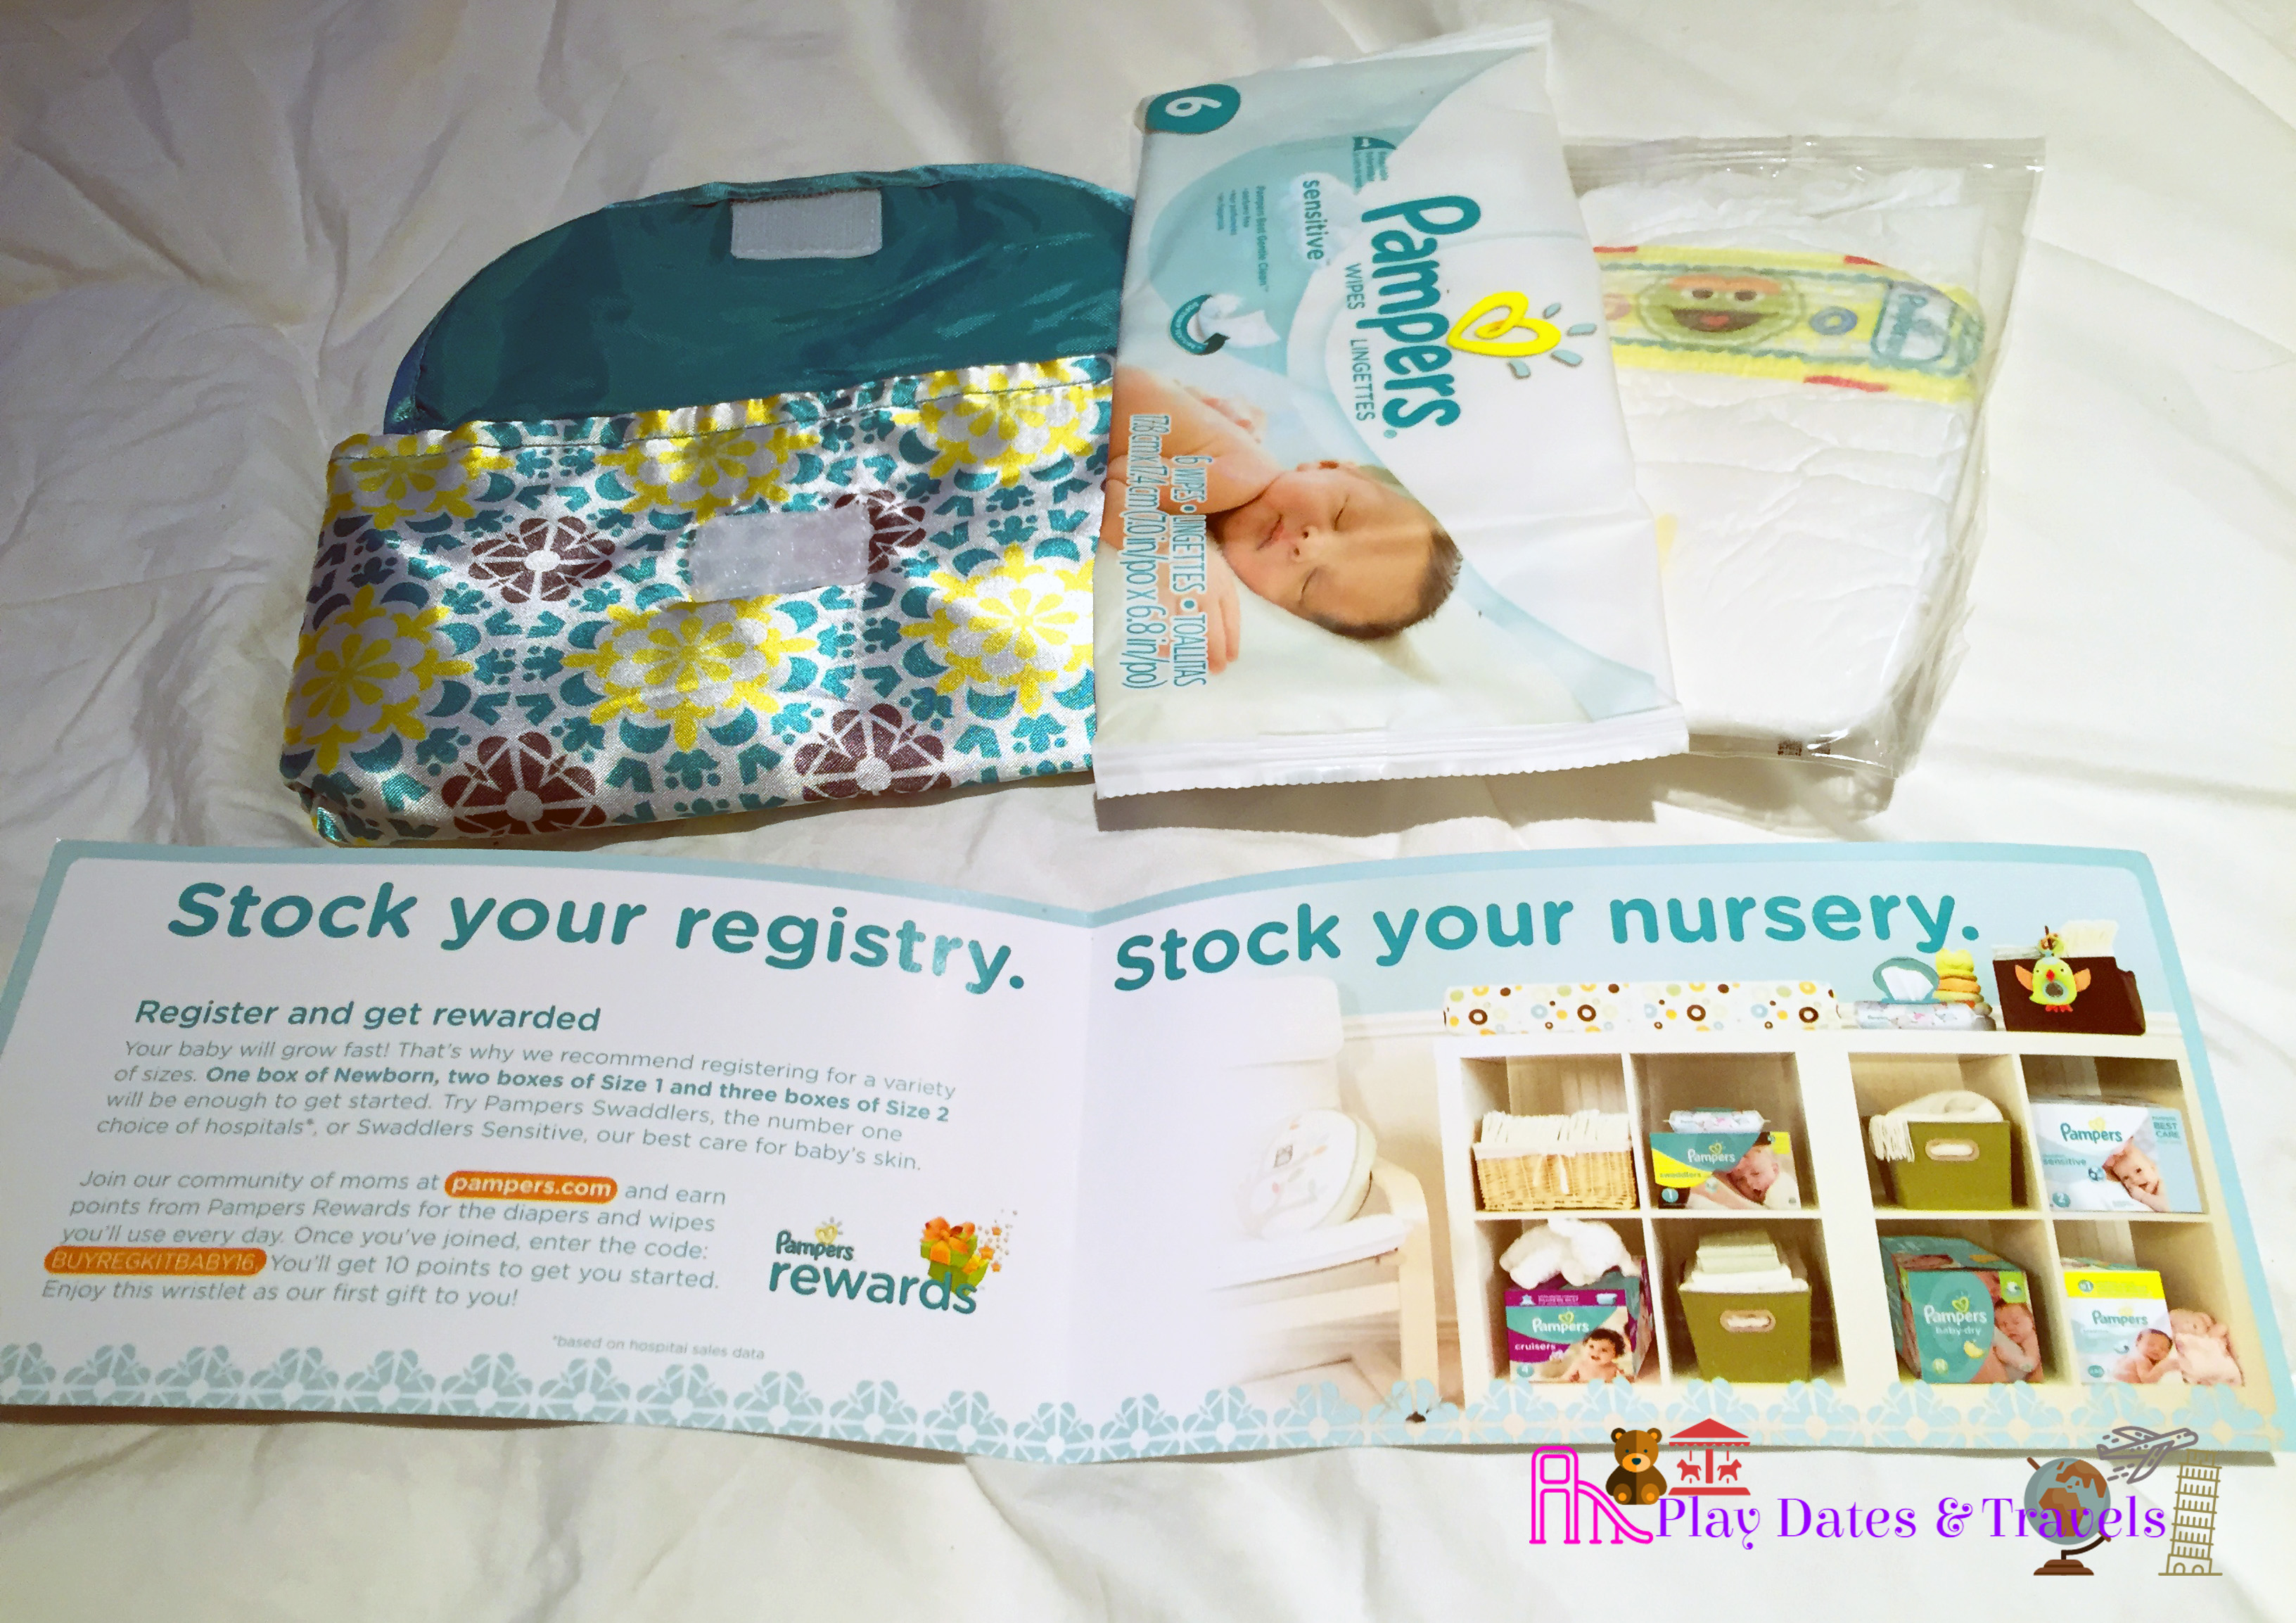
Inside the Walmart Box I received 5 coupons (photo of the Huggies coupon is missing)
The coupons inside are also very handy as they included one informational pamphlet on Village Naturals Therapy and a $1 off coupon toward a future purchase from their product line, one $3 off coupon toward Huggies Little Snugglers diapers, one pamphlet on Vick’s VapoRub for children along with a $1 off coupon inside, one informational pamphlet on Nuk’s products and one pamphlet on Bio Oil, which is a free product I received in other baby registry bags and is a lotion meant to improve the appearance of stretch marks and scars.
I really enjoyed everything in this box and the fact that it was 100% free. Leave a comment below if you have signed up for this box and are still waiting or have received completely different samples as I’d love to know what other people have received as well. Thanks everyone and stay tuned for when I close out this series and reveal what came in my Amazon box!
Happy February everyone! Can’t believe how quickly time flies. As I write this post, my son, now two months old!!!, is sitting at my side playing in his new swing. I thought he would never sit still in that thing after two months of utter disinterest and then one day last week he suddenly loves it. Yay! (Those things are not cheap) Last I checked in, I was about to give birth…now here we are two months later and my husband and I are discussing what we want to do for Valentine’s Day. Hope everyone is having a fun-filled day surrounded by loved ones. It gets a little difficult to write when you have a new little one to care for but I am slowly getting back into the swing of things and as I play catch up, I wanted to announce some upcoming posts.
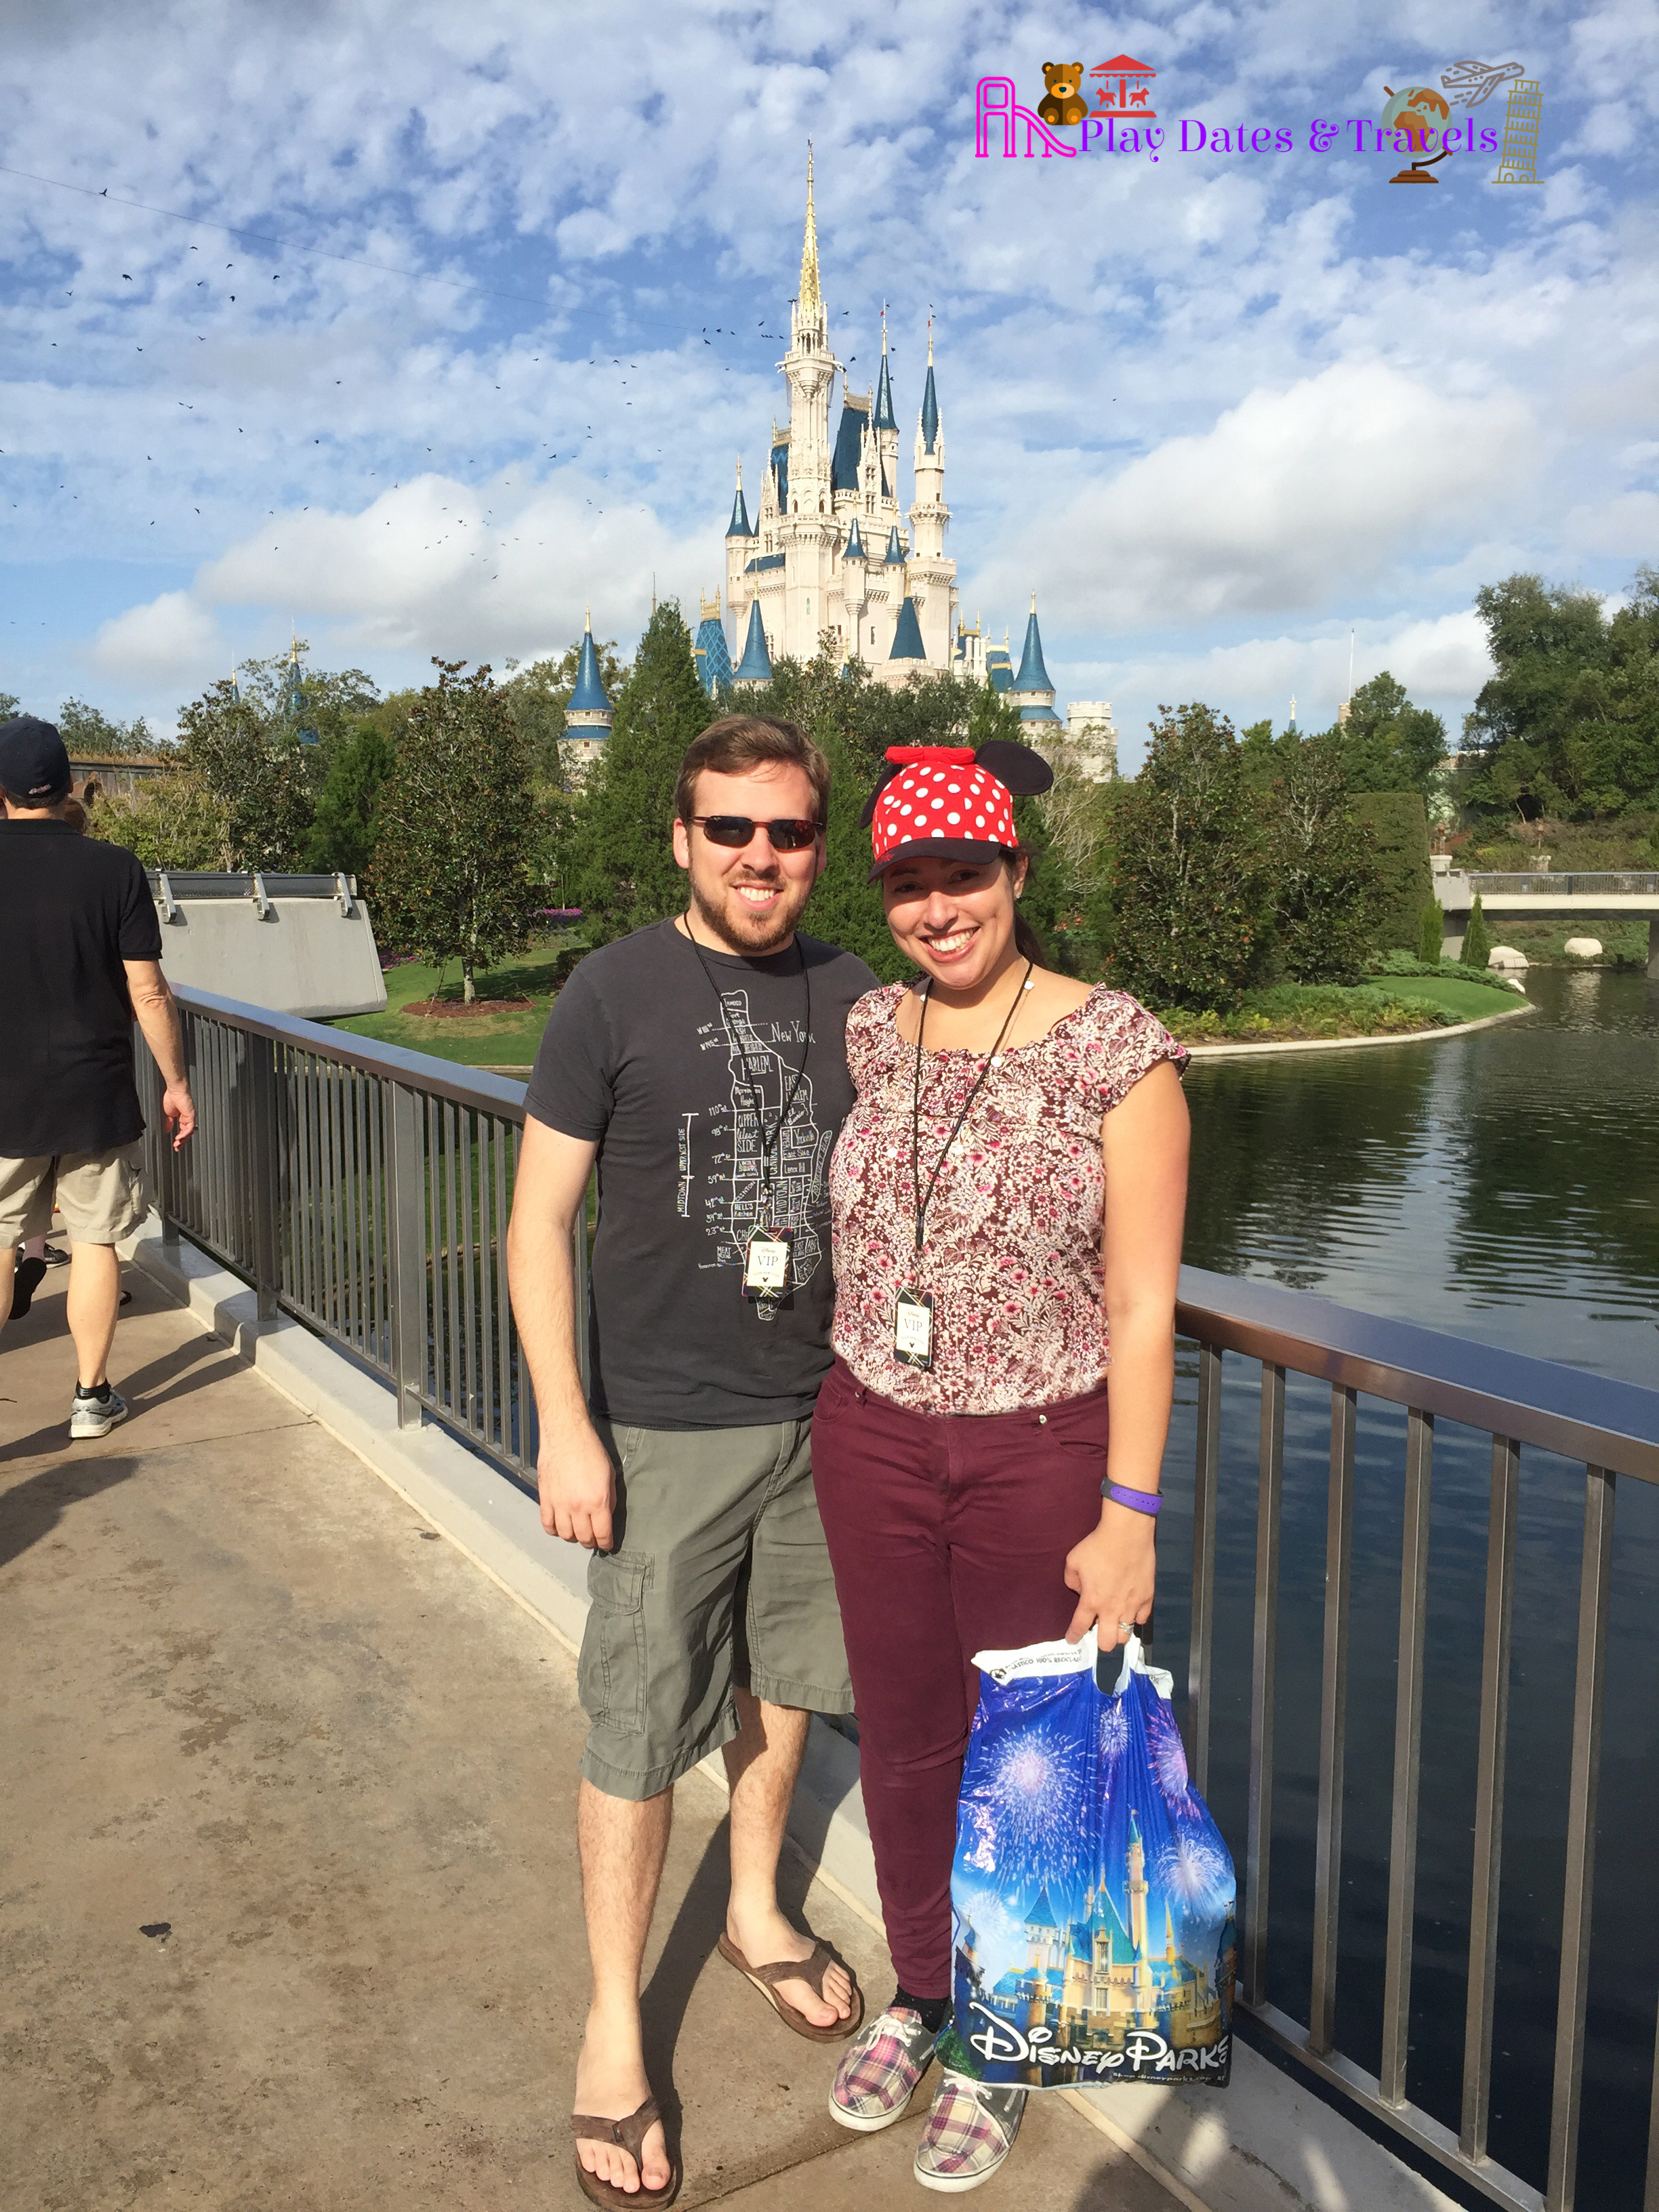
TOKYO – We visited Japan in Autumn 2016 and it was the most incredible overseas trip we have taken in a long time. I plan to do a post on the traditional Japanese ryokan (inn) we stayed in as well as our family time at the onsen (hot springs-powered spa bath), as well as our first impressions of Tokyo Disneyland and DisneySea. Stay tuned!!
GERMANY & COPENHAGEN– A few years ago, I was browsing our local mall when I stumbled upon a free event open to the public commemorating Air New Zealand’s 75th anniversary. You literally stood in a long line and when you reached the front, received a ticket that determined whether you would progress to the next step or not. If you didn’t everyone walked away with a voucher to save 10% off your next Air New Zealand booking. The process was instantaneous and when I received my entry, I learned I had proceeded to the next line where everyone was guaranteed to win a prize – you would either receive $100 or a free flight to either London, Australia or New Zealand. Only 75 total winners from that secondary line would be chosen. Well…I won a flight to London!! We decided to make a family outing out of it and used London as our gateway in and out of Europe. SO there will also be a future post on what it was like traveling to Europe with our toddler daughter and the stops we made in England, Germany and Copenhagen!!!
MY FAVORITE DISNEY SUBSCRIPTION BOXES– As many of you may be aware, I recently learned that there were subscription services you could sign up for which allow Disney lovers like me to receive items sent from the Disney Parks directly to your home on a monthly basis. Since October I have tried many different companies to see which box services really give you the best value in exchange for what you are paying — the best companies I have found tend to have boxes that range between $25 and $180. I did a video not too long ago in which I went through the basics of the then 13 different companies that were unaffiliated with Disney that offer this service (since that time, two more companies have entered the market). However, in this post I will show what I received from each and that will help determine who really does curate the best Disney box!
SPECIAL GIVEAWAY TO BLOG FOLLOWERS/CHANNEL SUBSCRIBERS – For anyone new to my blog or who was previously unaware, I launched a YouTube channel back in October, sort of as the complement to this blog with more of a focus on pregnancy-related freebies and the aforementioned Disney subscription boxes, and the page has already exceeded 100 subscribers!!! My first YouTube milestone! I vowed to myself if I ever achieved that milestone that I wanted to do my first-ever giveaway which will consist of items I have received from various Disney mystery boxes as well as items I specifically purchased just to give back to everyone who has supported me in my passion for all things Disney.
SO… for anyone who is interested in finding out how to enter read on for more details:
STEPS TO ENTER THE YOUTUBE GIVEAWAY (open to US residents only):
Subscribe to my YouTube channel which is “Play Dates and Travels” (while you’re there, feel free to hit the bell icon which will alert you every time I upload a new video)
Give the video a like by hitting the thumbs up.
Leave a comment in the video answering the following two questions: a) What is your favorite Disney Parks ride (can be from any Disney Park in the world) and why? Would love to know the story behind what made that your favorite ride. AND b) What was it specifically about Disney that made you hooked the first time you ever visited?
As a bonus entry to the giveaway, be subscribed to this blog. If you are already a subscriber, great, I should have your information! Indicate that in the comments on YouTube and you will receive a second entry to qualify. If you are new to this blog and want a bonus entry, sign up to subscribe via this website (the tab should pop up – where it says last name just put your YouTube channel name so I can give you the double entry credit) or on the far right column of this page you should see a place to enter your email. Do that (and check your email to confirm you want to be subscribed) and then let me know in your YouTube comment which email you signed up so I can give you a double entry.
Here is the video to see what items are being included and to leave a comment to enter. Don’t forget to follow all the above steps to qualify. Entries will be valid until February 28, 2018.
That’s all for this post but let me know in the comments below if you’re a fan of giveaways and would like to see something else featured on this blog or the YouTube channel in the future. Thanks all!
Hi everyone! This blog is looong overdue for an update it seems. I can’t believe, as I type, it’s been about a month since I last checked in with you all and for that I deeply apologize. This past month has been a busy one to say the least but mainly I have been busy keeping busy with all the last minute preparations for baby #2 to arrive, both mentally and physically.
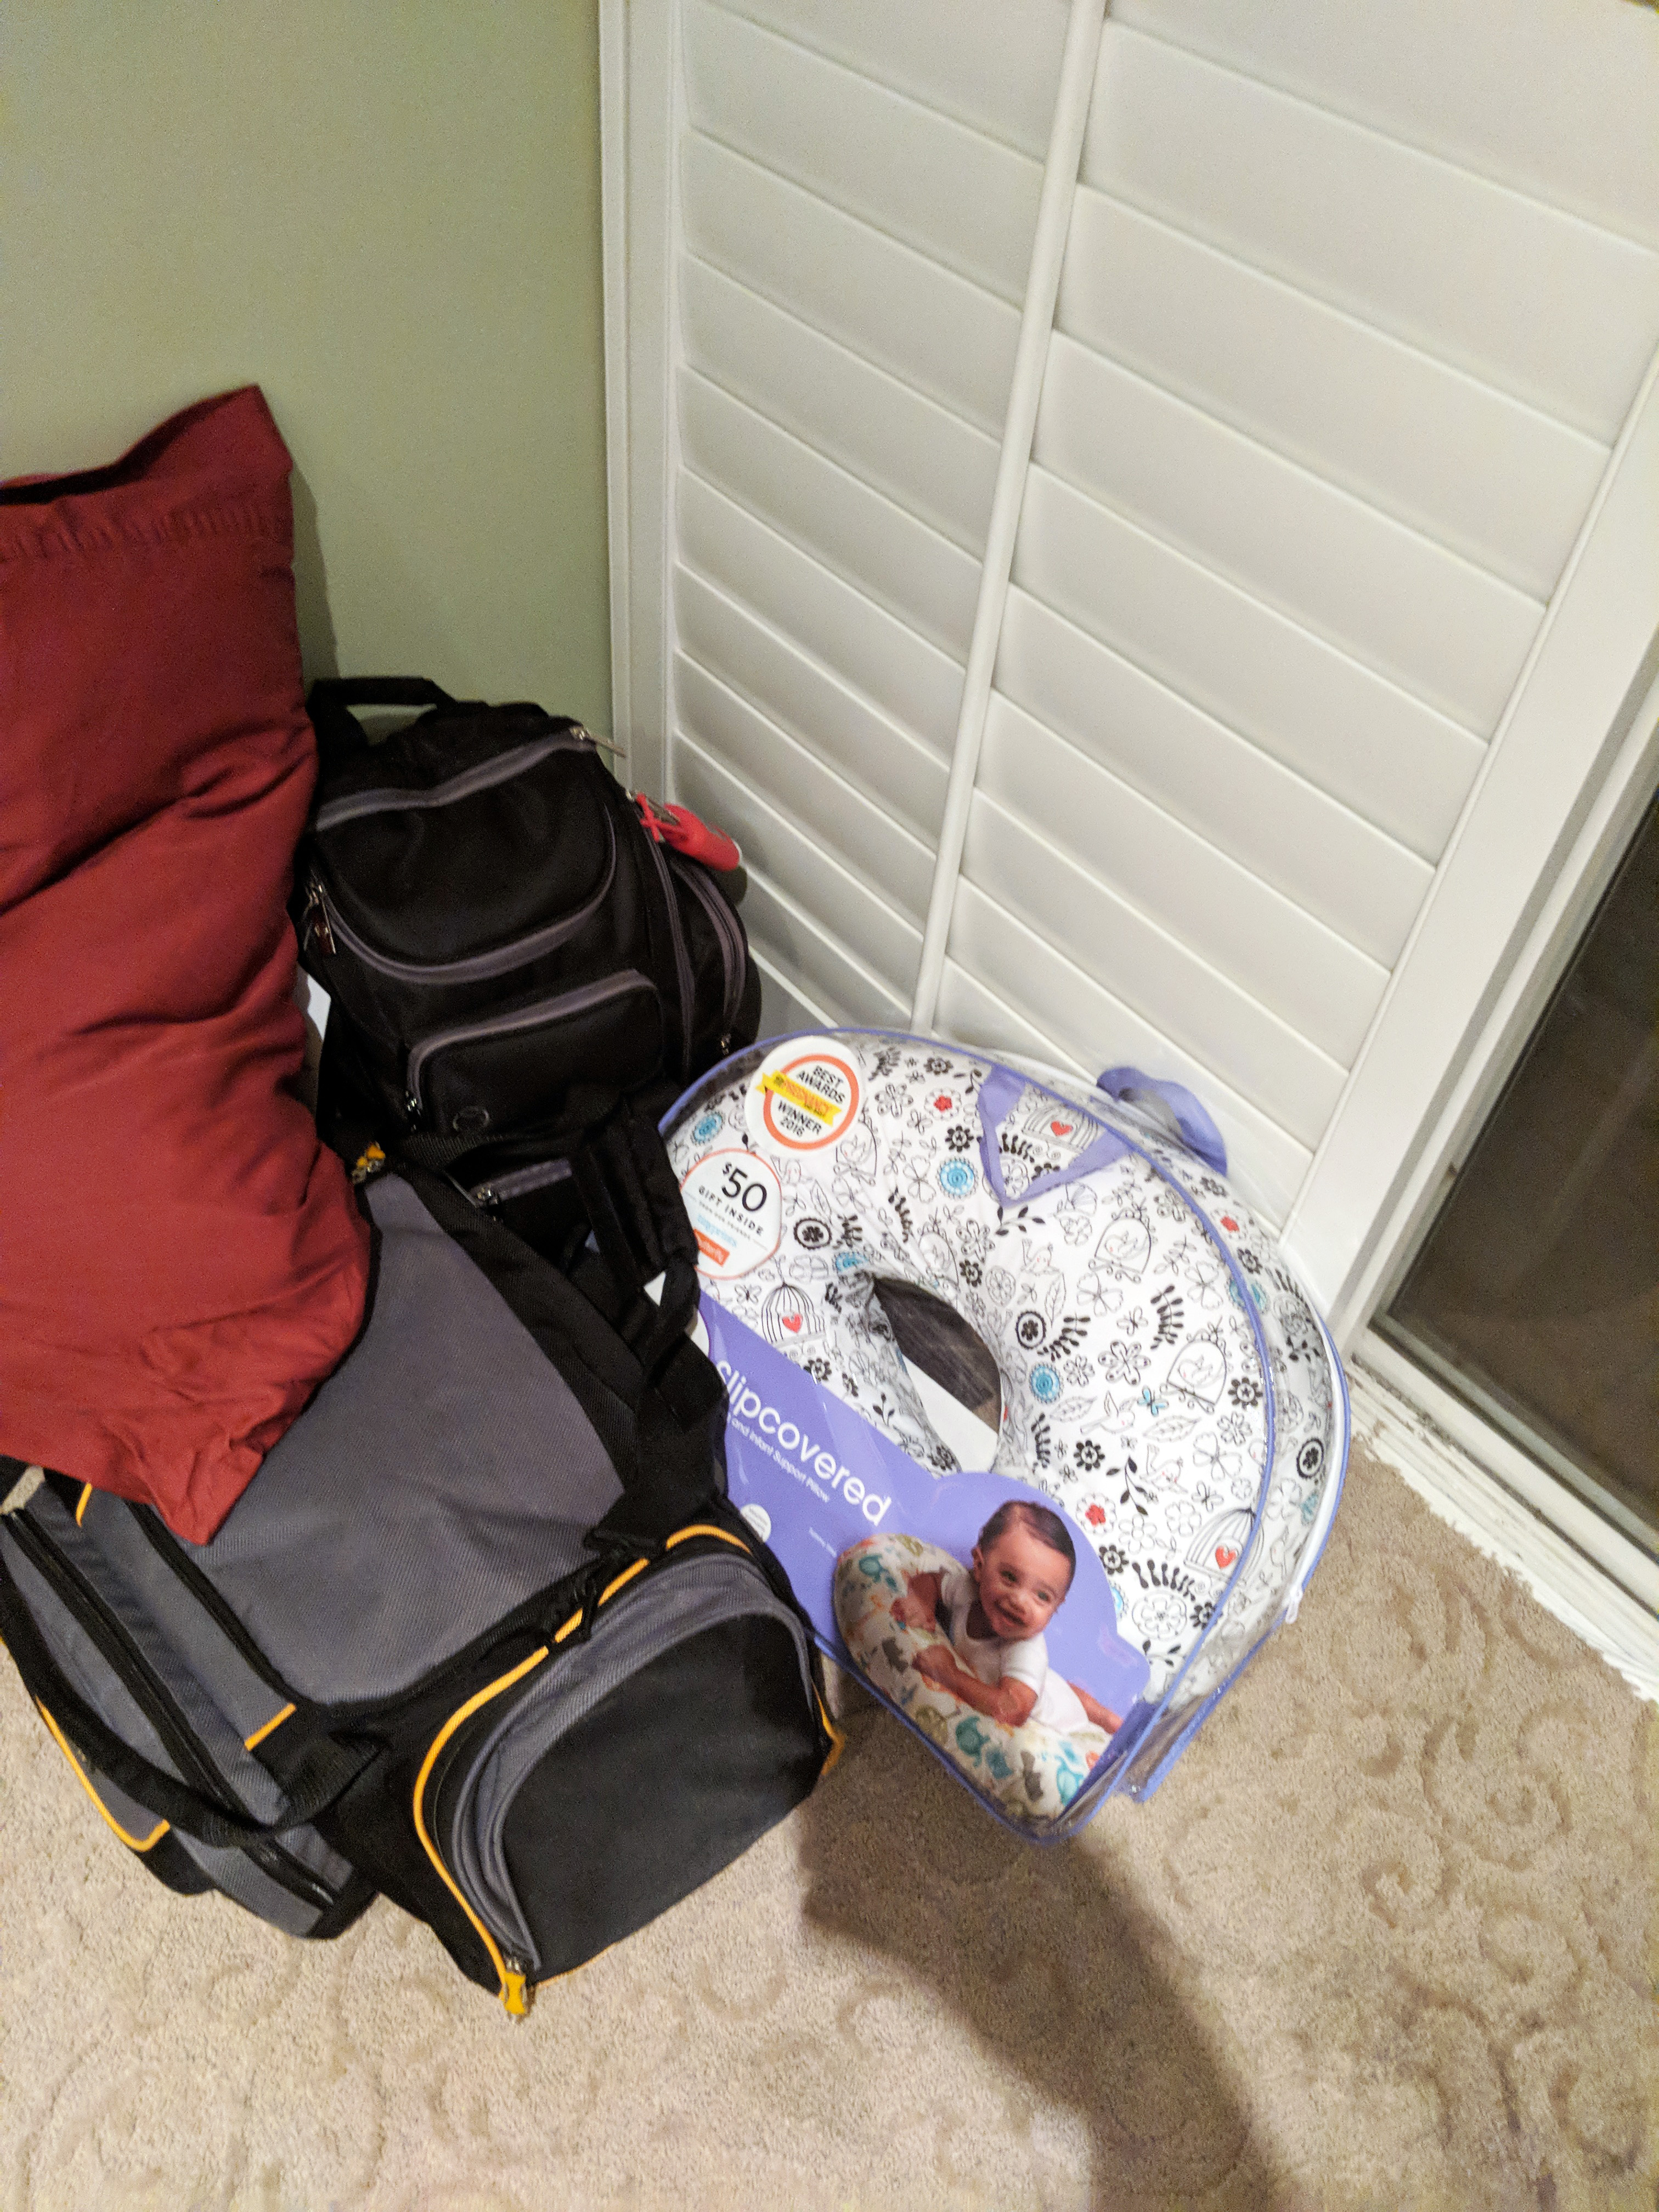
Since I last wrote we packed a diaper bag for the hospital plus duffel, I purchased a new nursing pillow after discovering that our old one had several hard-to-remove drool stains embedded into the design, I re-cleaned our child’s nursery probably a few times (deep vacuuming and dusting, yes!!!) and reorganized our master bedroom closet for my own sanity, and put together a haul video of everything we had purchased or been gifted thus far for the baby.
Duffel bag, diaper bag, personal pillow and breastfeeding pillow – all ready to go to the hospital!
So as I plan to go to the hospital for the delivery of my second (literally leaving in a matter of hours as I have been experiencing contractions all day and my doctor insisted we check in tonight), I wanted to share some of the video posts I have recently recorded for my sister YouTube channel for Play Dates & Travels. As a reminder, the YouTube portion of this site serves mainly to cover my obsession with all things Disney so will focus on that type of content even more than this blog such as Disney mystery box unboxings and items purchased from the Disney Parks, but I also occasionally post items related to being a new mom/pregnant over there as well such as the various registry bags and gift boxes like the Noobie box I received (I promise to post my Amazon box soon!!!!) as well as my newborn baby items haul. Note: that haul features all the essentials we gathered for our second child up until 38 weeks pregnant (with our first child, we had already purchased some of the larger ticket items such as a single travel system stroller, changing table and crib; so this is mostly supplemental items to provide some new items for our baby boy).
Here are the most recent video uploads to my YouTube channel and next time I check in, I will hopefully have a beautiful little boy to brag about!!! Please wish me luck 🙂
EVERYTHING WE BOUGHT SO FAR FOR BABY #2!!
ITEMS I RECENTLY PURCHASED FROM DISNEY WORLD, MY TOKYO DISNEYLAND TRIP, SHOP DISNEY AND SHOP DISNEY PARKS
MY FAVORITE DISNEY MYSTERY BOX I RECEIVED SO FAR — A REVIEW OF GIFTS FROM MICKEY AND ALL THE FUN, HARD-TO-GET DISNEY WORLD ITEMS THEY SENT ME
What I loved about this subscription box company is that the curator actually goes into Walt Disney World for you and picks out items according to your preferences. So beyond the usual customization that other companies claim to do, such as personalizing your box based on gender (do you want items geared toward a female or male) and age (are you an adult or child or want items for both?), they go the extra mile and send you souvenirs and snacks that actually remind you of the parks and are tailored to your personal tastes. So if you send in notes with actual items you want to see in your box (let’s say you are into home decor items or Jim Shore collectibles or want a specific snack from a particular park), they will do all they can to make it happen. Despite being a first-time customer I requested a pair of Figment ears that I knew could only be purchased in person from Epcot during their annual Food & Wine Festival. It was the first time this item had ever been offered but it was not available to purchase through the Shop Disney Parks app nor the Disney Store or anywhere besides ebay for exorbitant markups (some were going for upwards of $40), and given I knew I wanted it, I specifically requested that she include it as one of the items in my box. The curator happily obliged, even alerting me to the fact that the Festival was closing that weekend so if I wanted her to pick me up the ears to get my order in that week. The level of communication was outstanding with prompt replies and feedback received back from her within minutes of my asking her questions on Facebook, almost like working with a personal shopper without the added fees, and the box I received was filled with items I might have purchased myself, had I had the chance. This month, she is even offering to buy special items from the gingerbread house that the Grand Floridian resort on Disney property does every Christmas season — another merchandise item you can normally only get if you are actually visiting the resort in person. Now that’s personal attention!
For more info on Gifts from Mickey and the various boxes they offer feel free to check out their website here!
MY LATEST DISNEY MYSTERY BOX – WATCH AS I TRY OUT THEMEPARK MONTHLY, A COMPANY I HAD BEEN EYEING FOR AWHILE (NEXT I’M THINKING OF TRYING OUT THEIR SNACKS BOX AS THEY WILL CUSTOMIZE THAT FOR YOU…VERY TEMPTING)
I was very impressed with the caliber of the items I received in my first box from Themepark Monthly. It had long been an item I was wishing to try and initially expected to wait until Christmas to try out my first box — but then couldn’t resist trying them out in the month of November as well. They are a company that specializes more in giving the type of quality items that I like from the Disney Parks including larger home items such as the cookie jar canisters that they were selling a few months back or the gourmet casserole dish in the shape of Mickey’s head which I had seen at Disneyland last year and wished I had purchased when I had the chance but never saw it again, or even pillows, towels and backpacks. So basically, fun larger items than you might find in some of the other Disney subscription boxes who simply send their recipients smaller items such as a notepad and one or two tsum tsum toys (a retail value of only $5.99 each versus upwards of $30 with the larger items). The boxes I noted from fellow bloggers or vloggers (in the case of video uploads) always seemed hefty and perfectly geared toward an adult vs. boxes that included mostly filler items or items that might be better suited for my three-year-old daughter, and this was the reason I tried them out…and was not disappointed. I even scored a fun holiday countdown calendar and Mickey trivet in the process! Watch the video link above to see what other fun goodies I received!!!
AN IN DEPTH LOOK AND COMPARISON VIDEO OF EVERY CURRENT DISNEY SUBSCRIPTION BOX OUT THERE – LATE 2017 EDITION
For an even more in depth look at all the various Disney subscription boxes out there, feel free to watch the video below which outlines the prices and worth of the boxes you would actually receive if you subscribed to any of these companies. Full disclosure: this is a lengthy review so feel free to open in YouTube and click directly on the actual start times for each company listed OR grab a drink and snack as you learn all about the Disney boxes – both officially from Disney and those unofficial boxes.
That’s it for recent posts. Hope you enjoyed this quick look at my latest video posts and if anyone has any comments on these videos in particular, feel free to leave a comment below! Until next time…talk soon after I become a second-time Mommy!!
In honor of today’s special holiday I wanted to share two fun family traveling experiences we took to commemorate this time of year. My daughter has proven to be a real fan of Halloween and as she is thoroughly thrilled by looking at pumpkins, witches, ghosts and skeletons and all the other crazy fun thrills of the season, we decided to take her to the local pumpkin patch as well as Mickey’s Halloween Party at Disneyland where she could experience trick or treating and pumpkin picking in style. We even threw a fun Halloween party that doubled as a baby sprinkle last weekend, but I will save those images for a future post. Without further ado, here are photos from these two special occasions!!
Pumpkin Patch Fun for Halloween
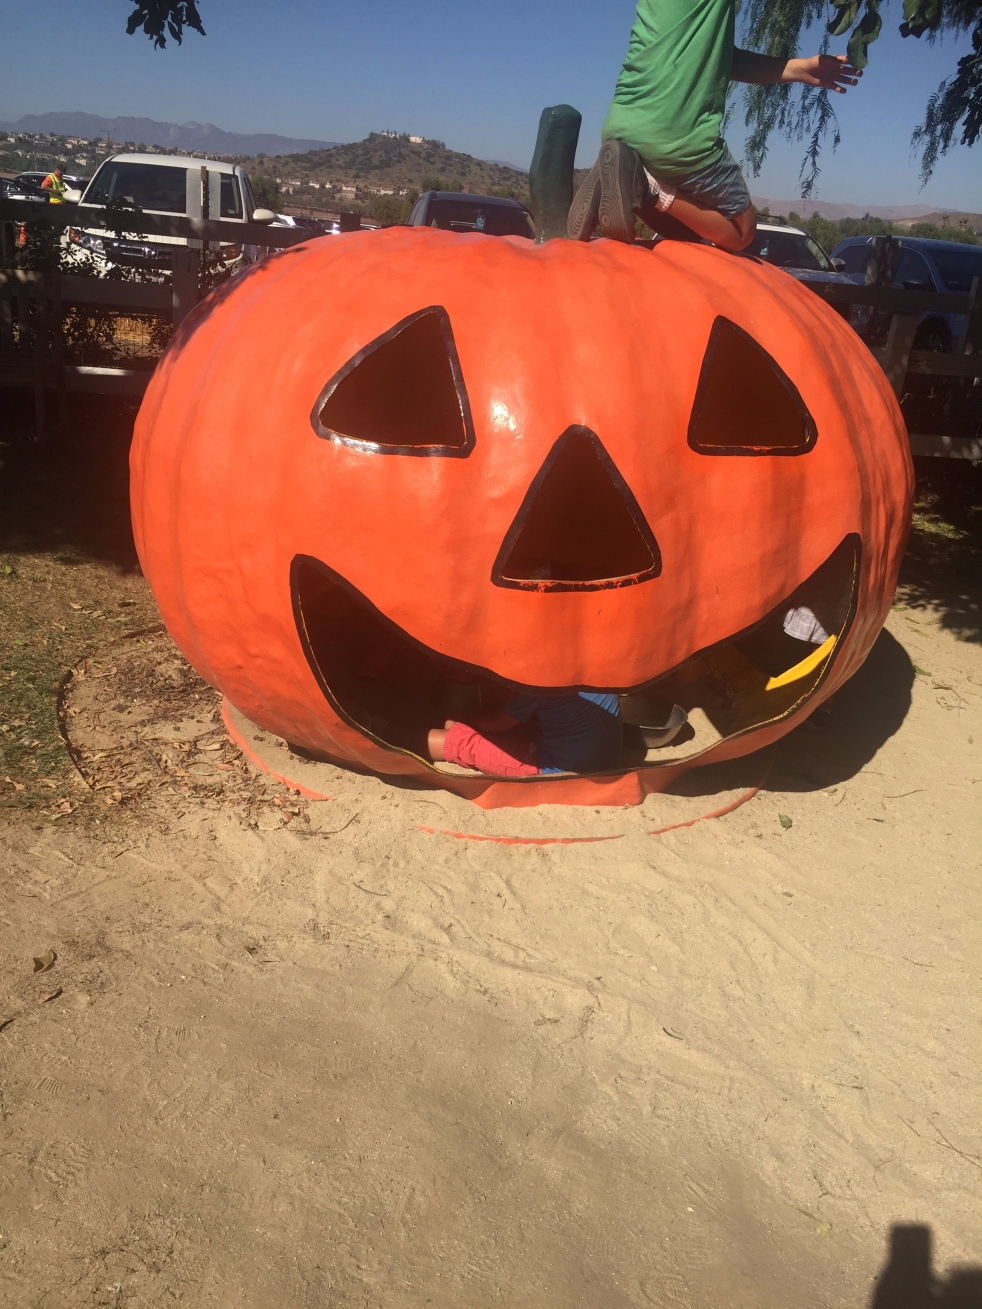
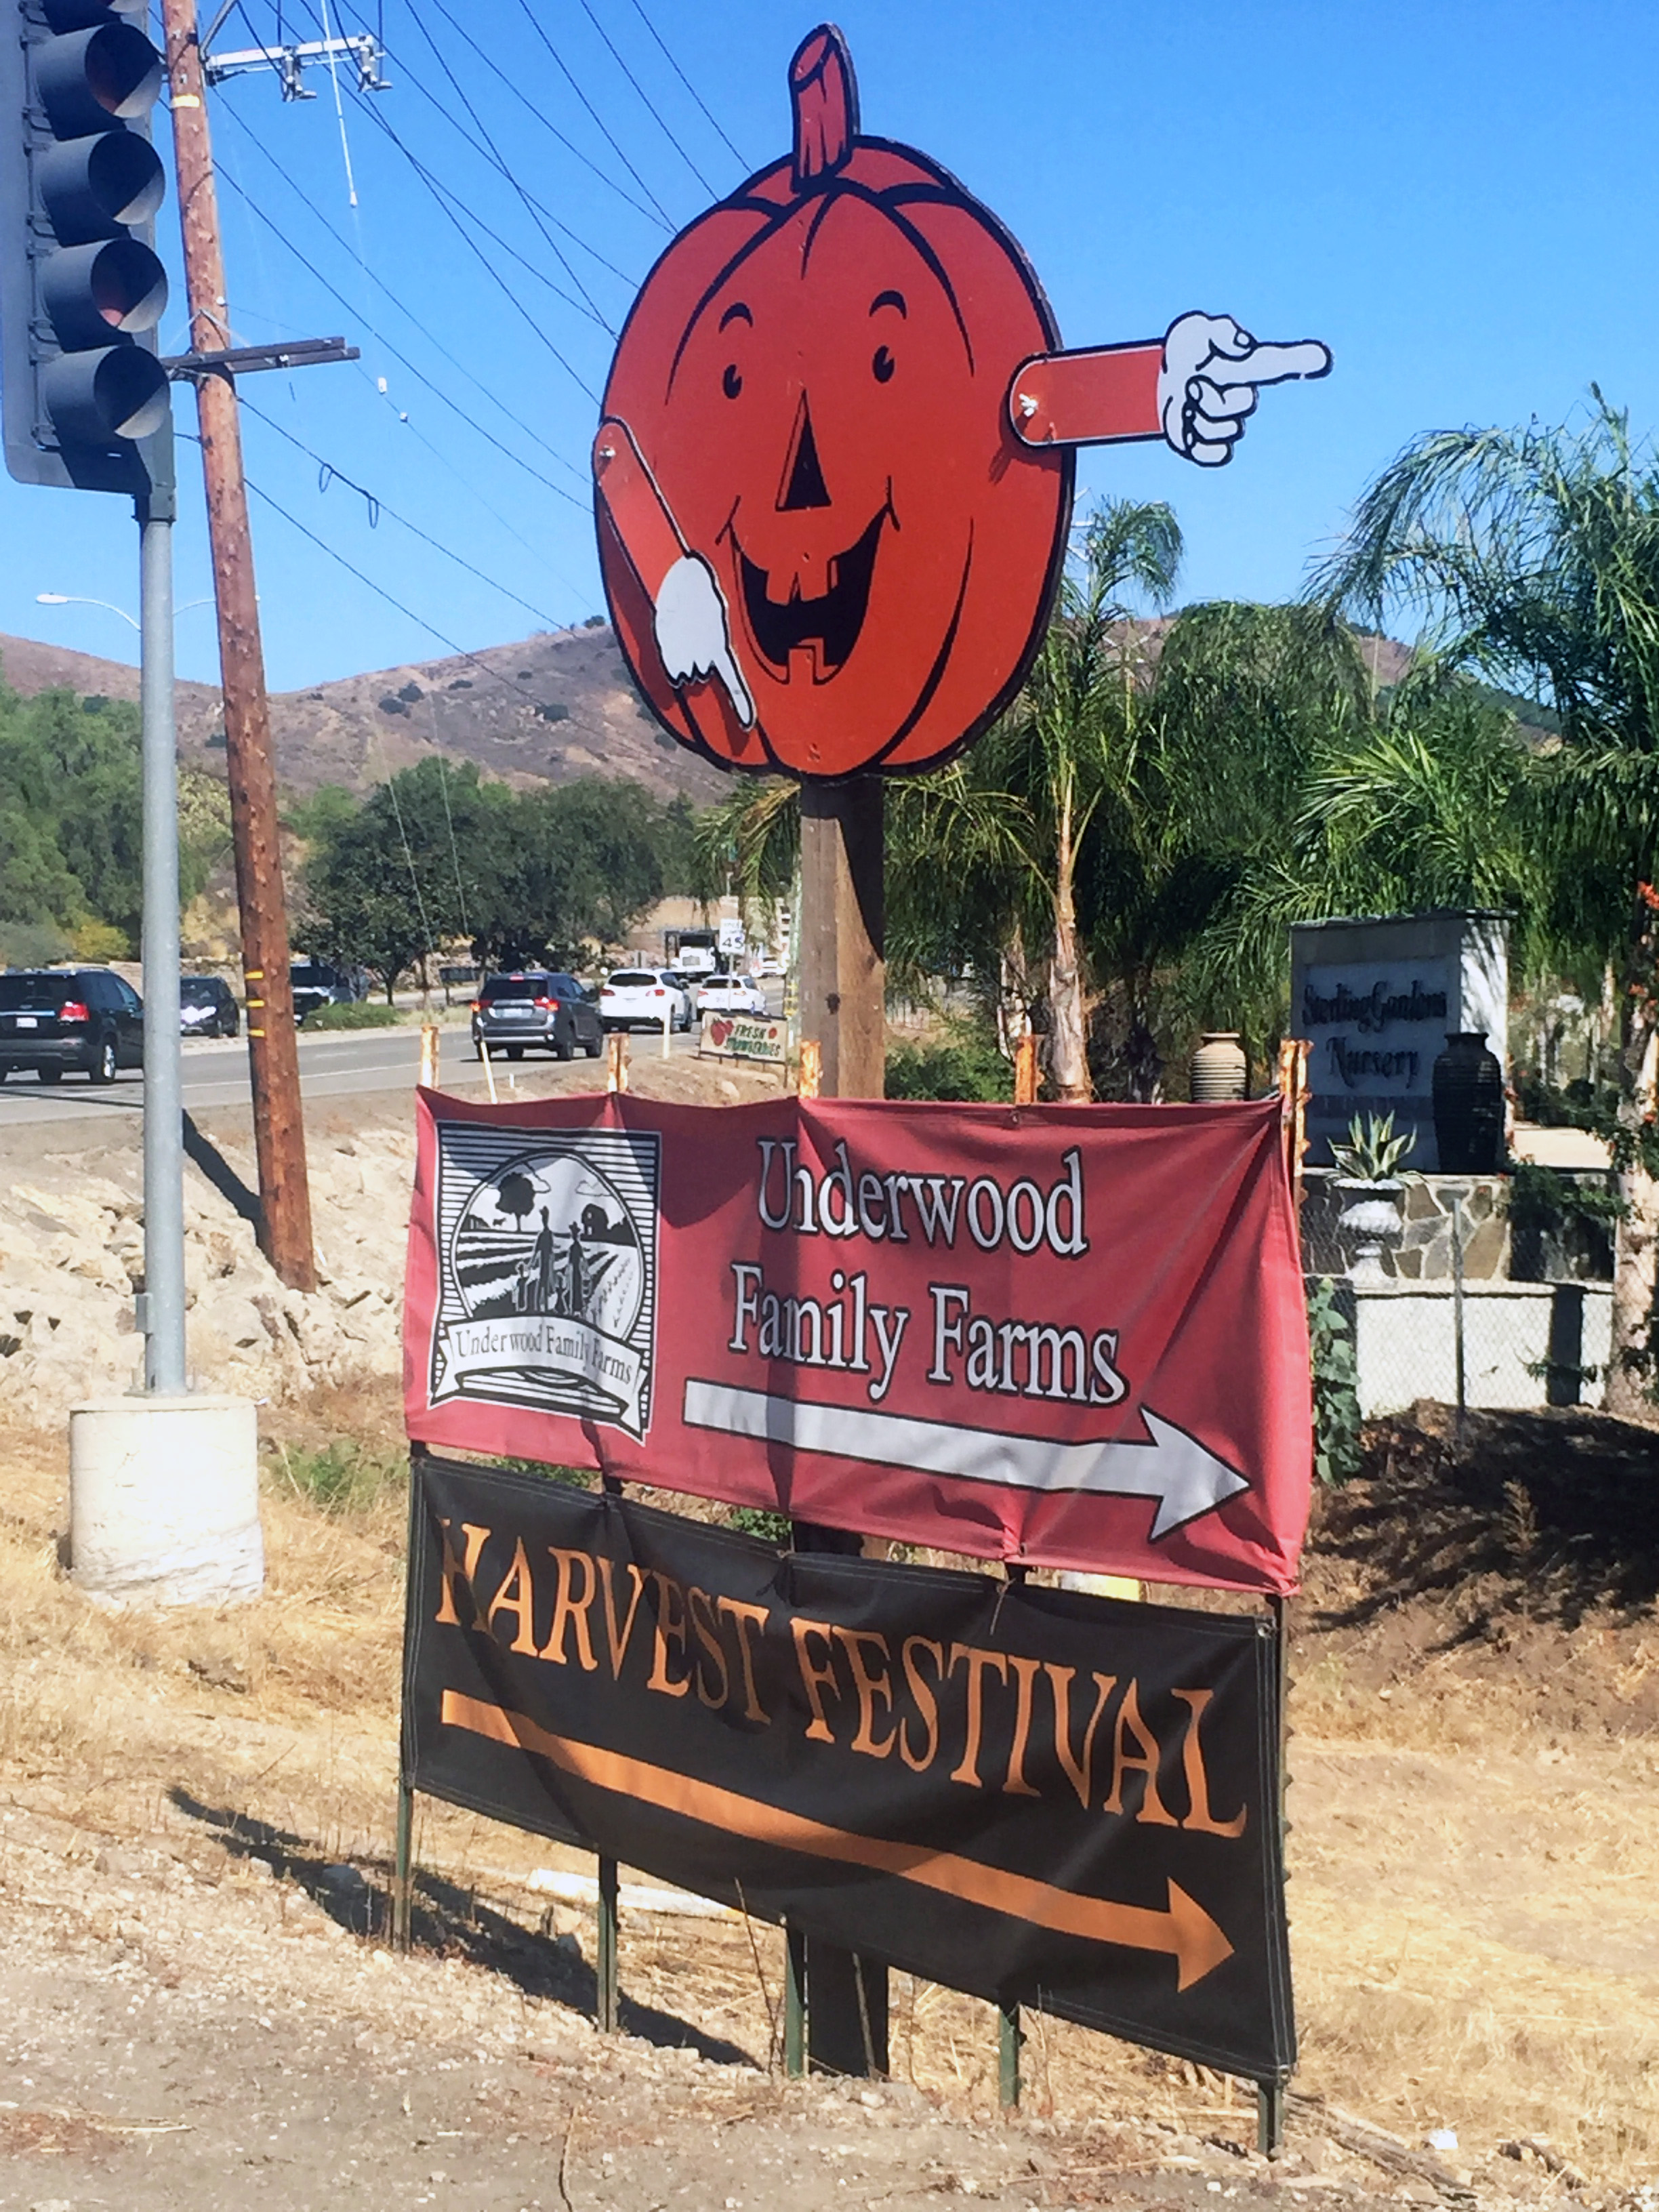
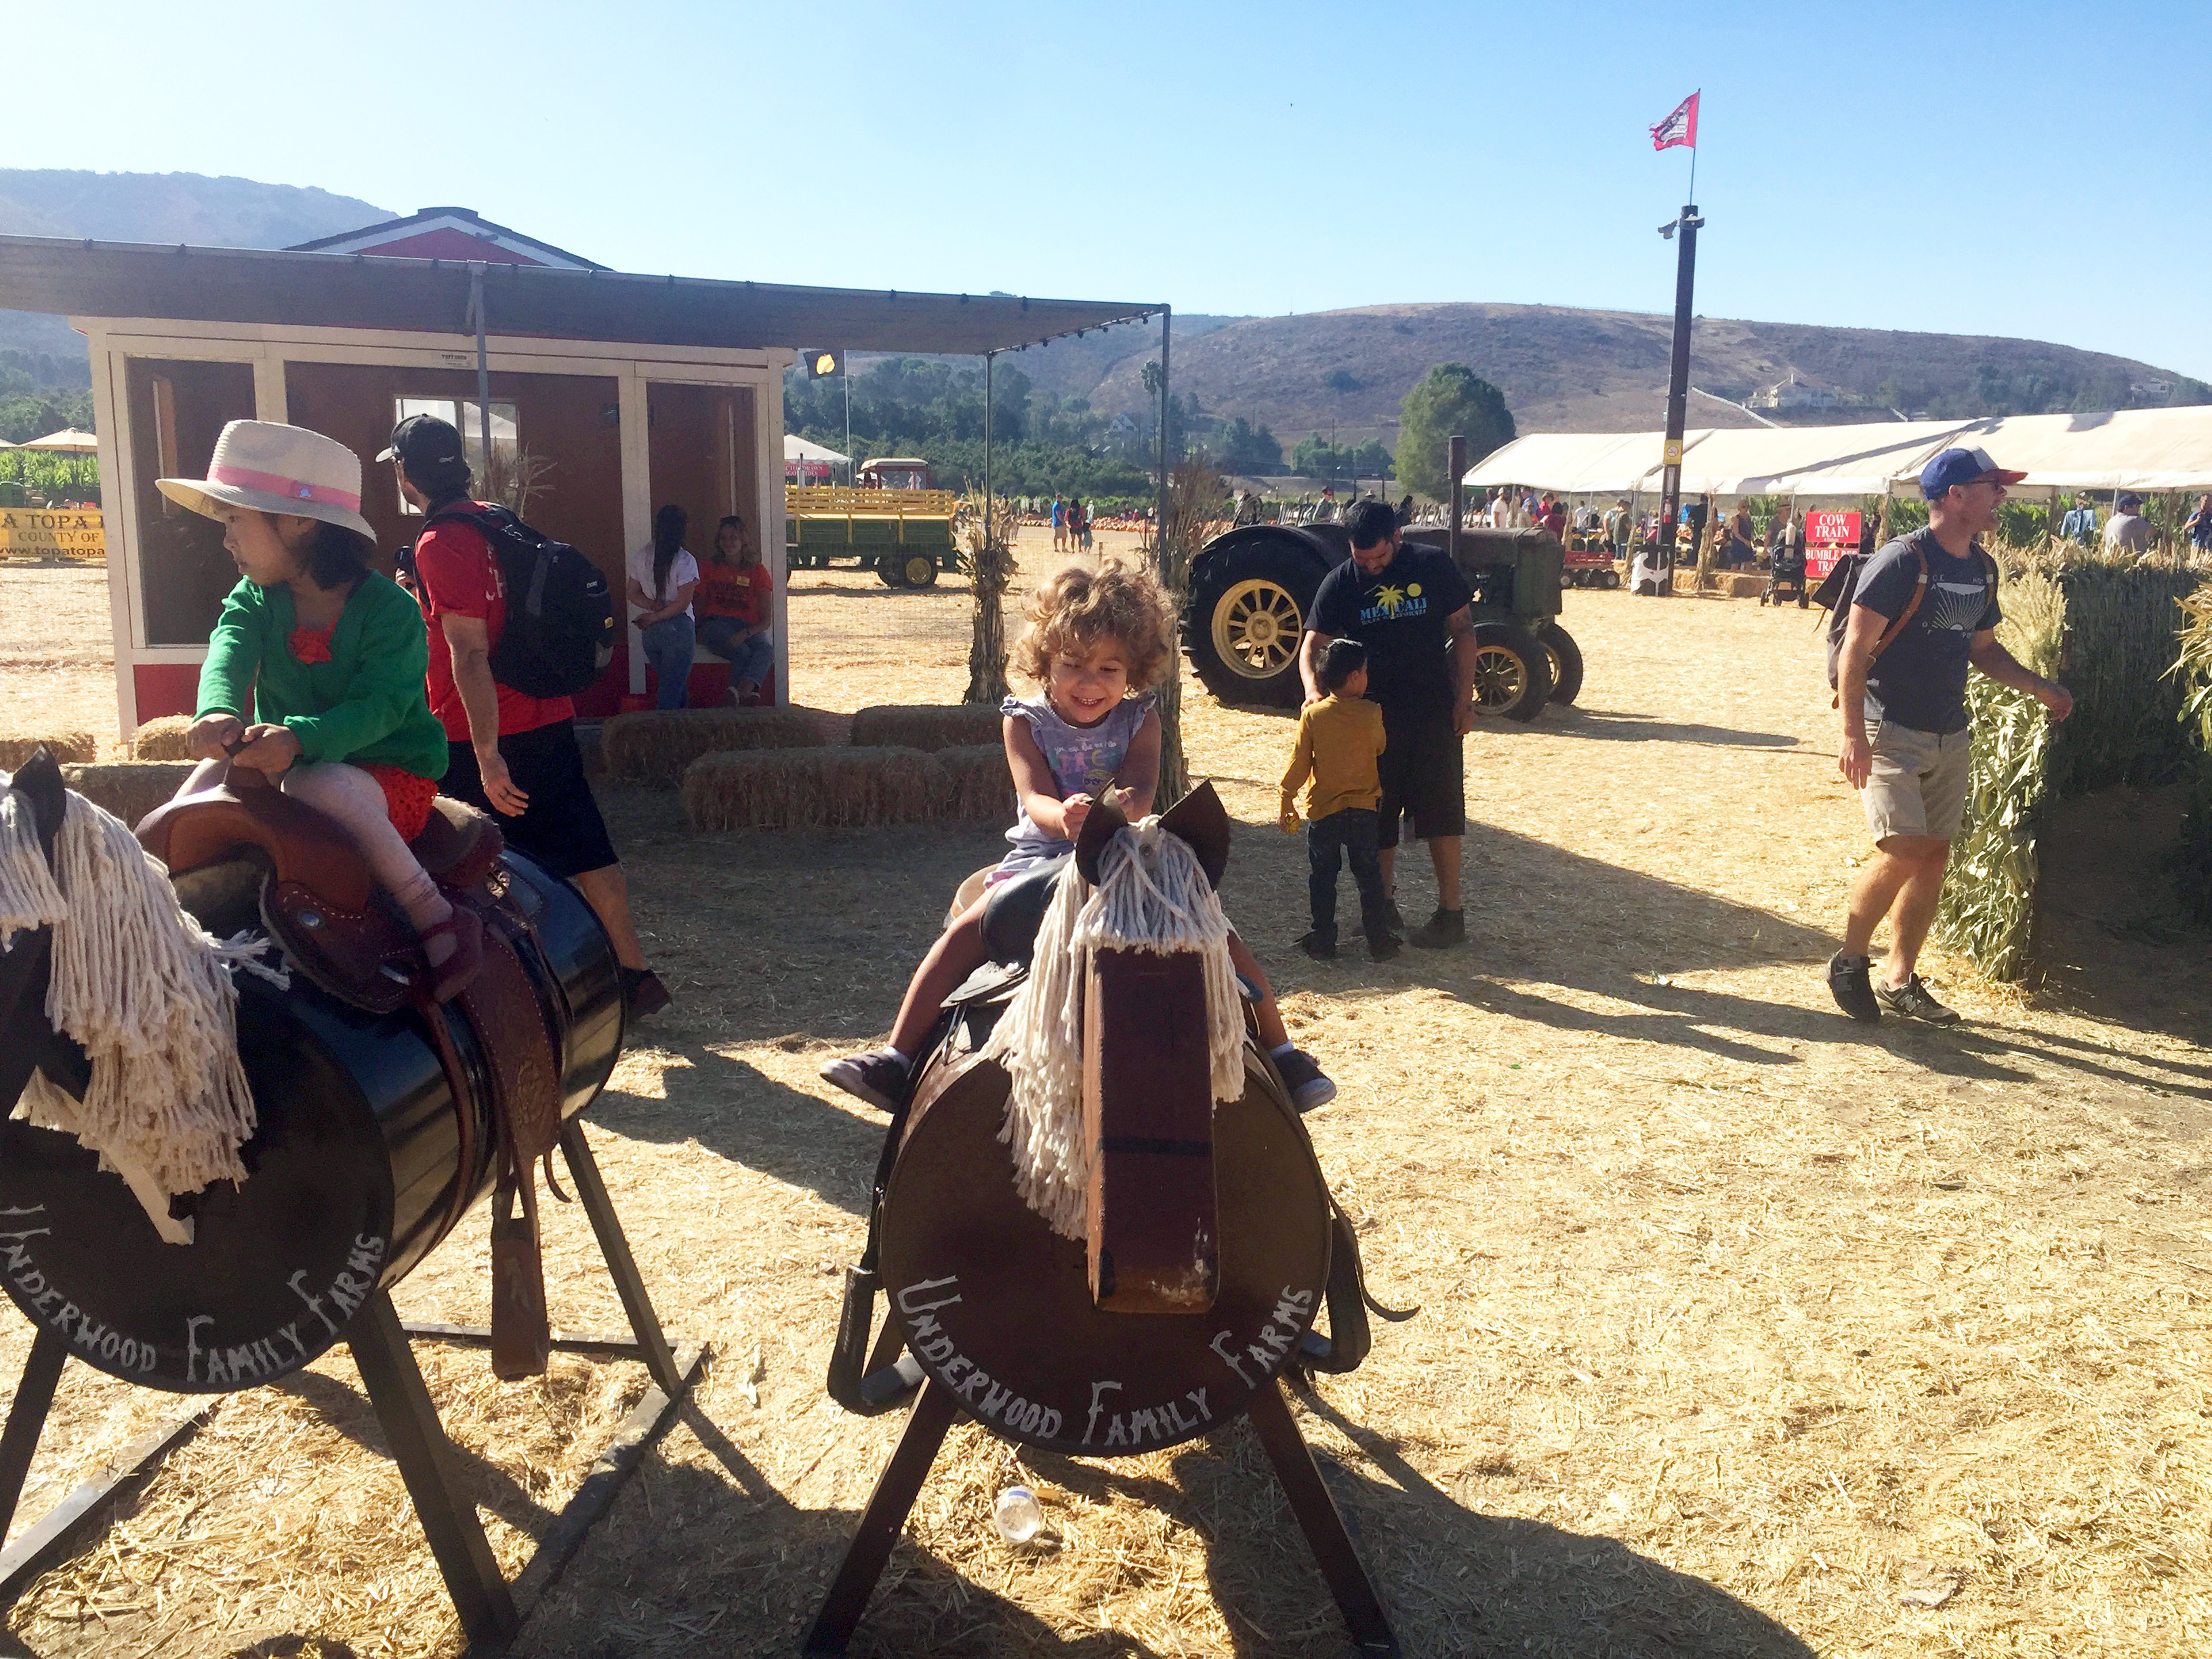
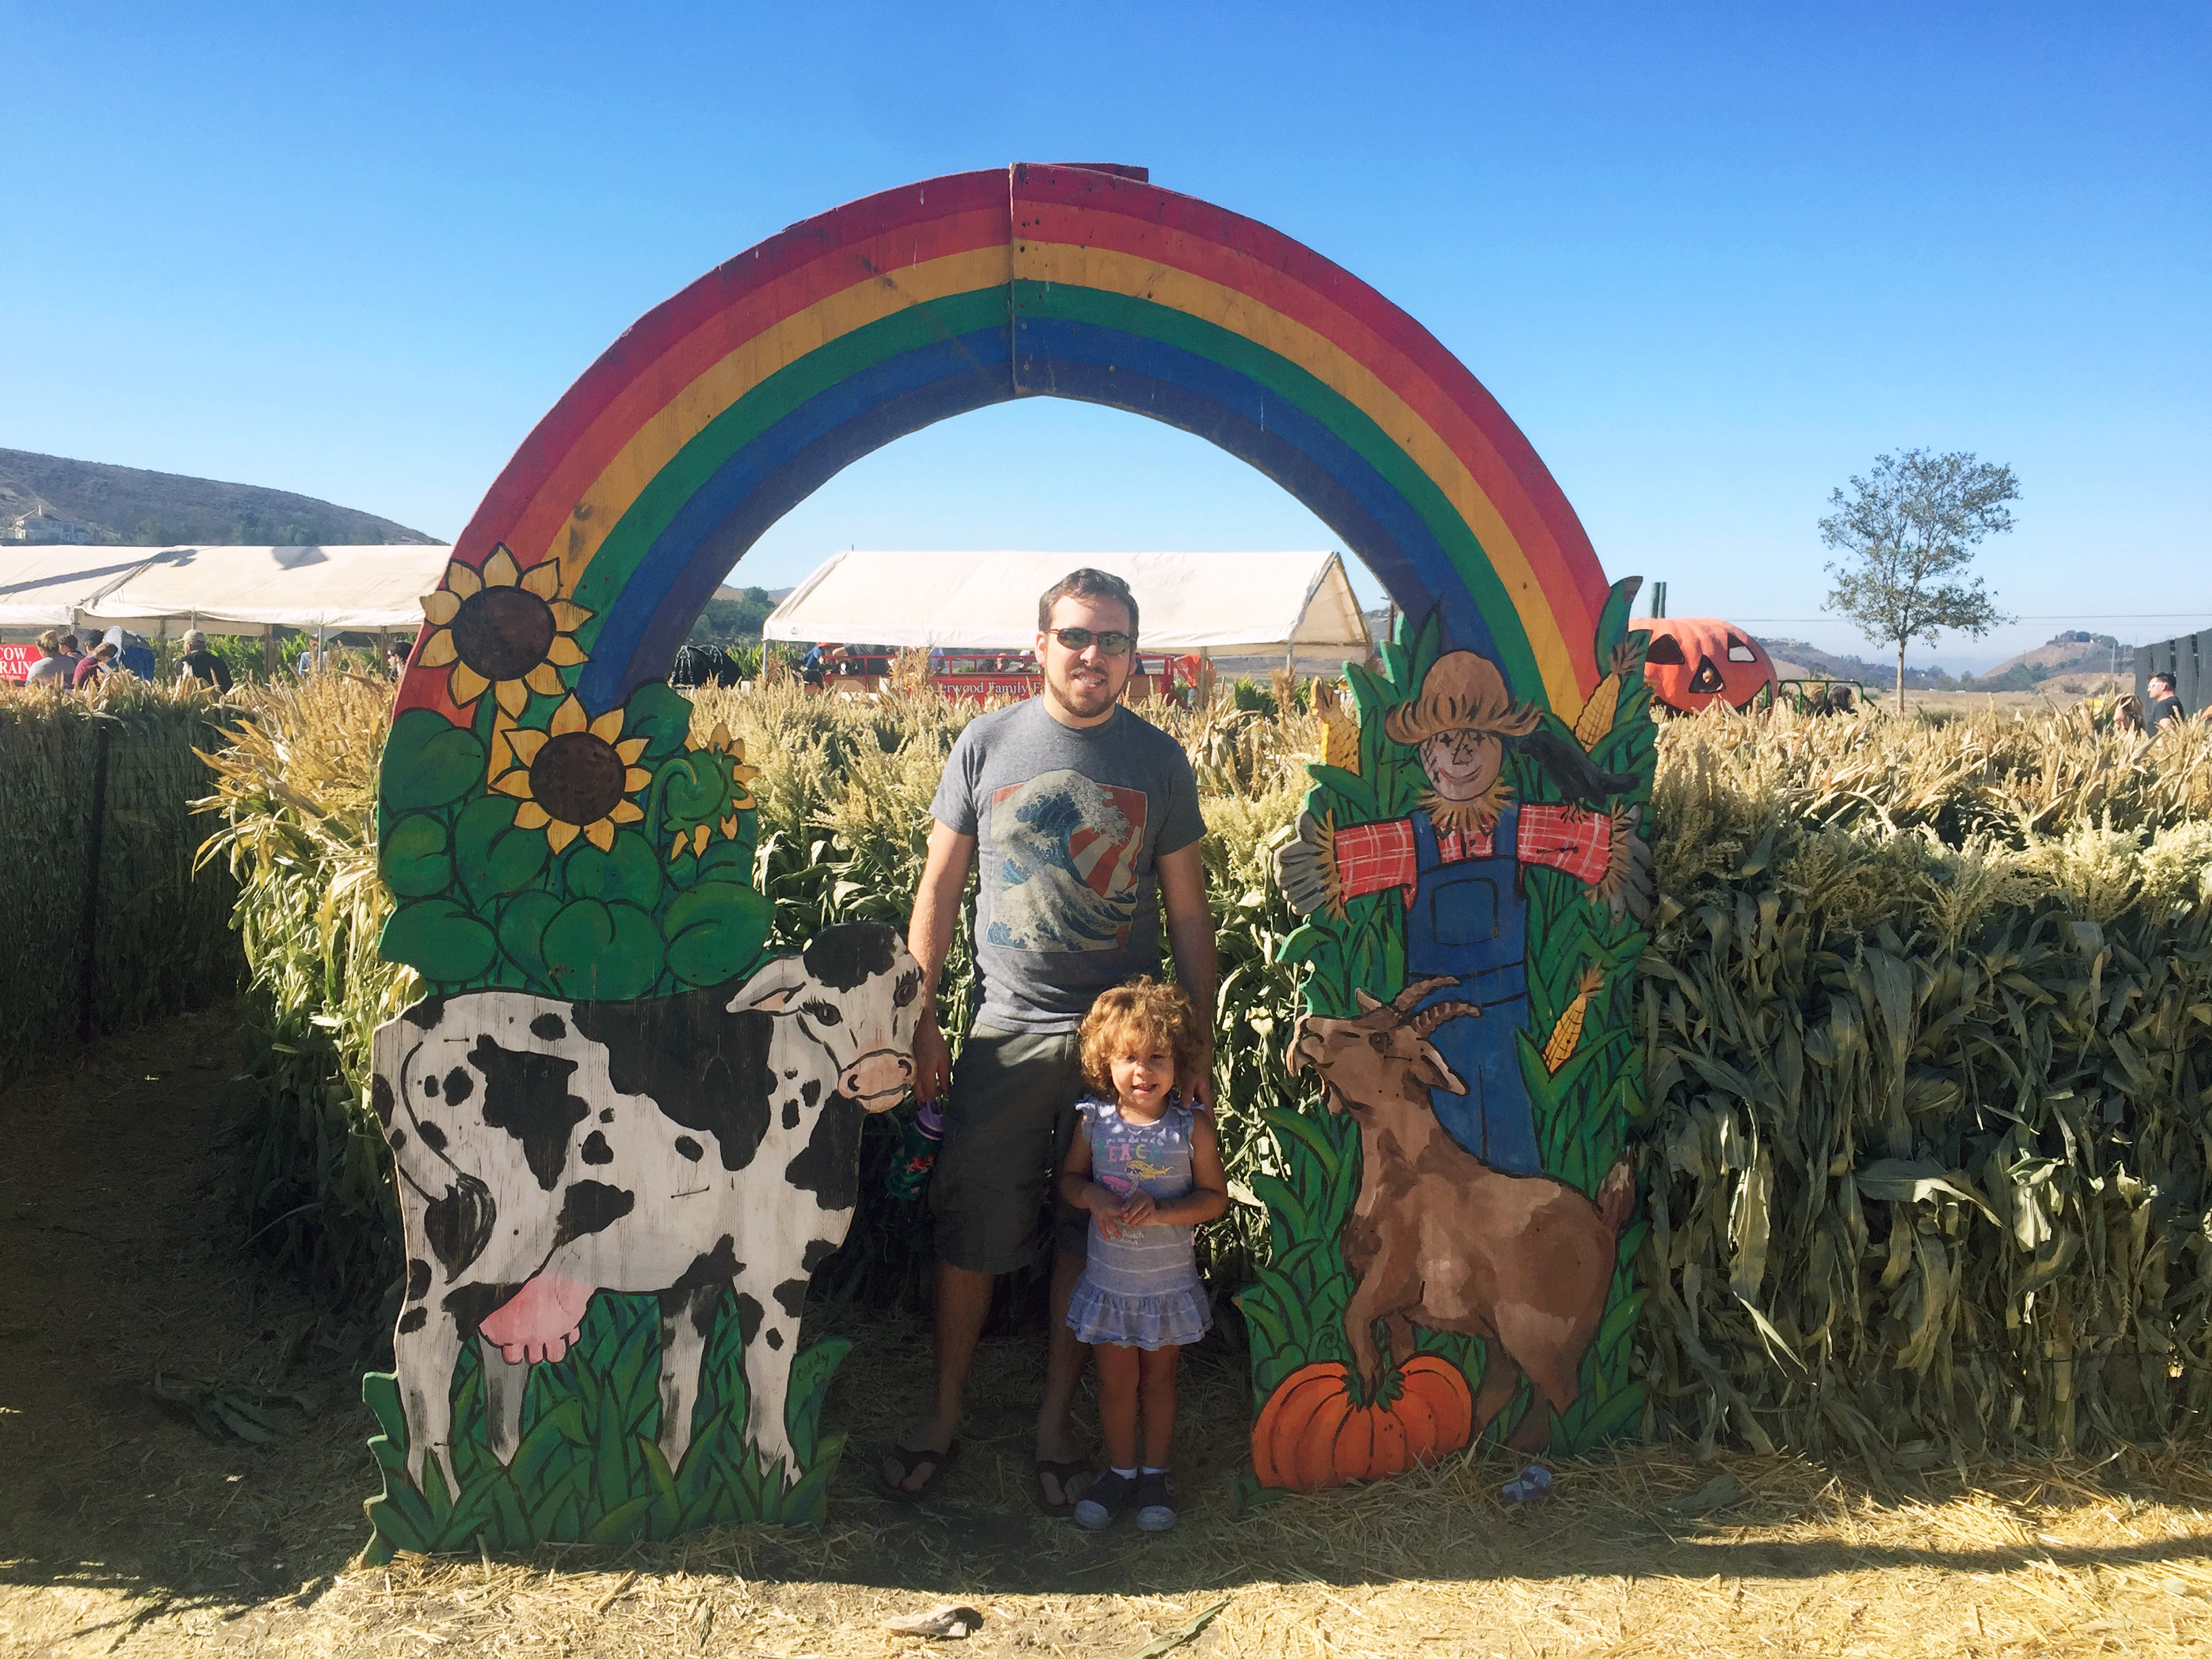
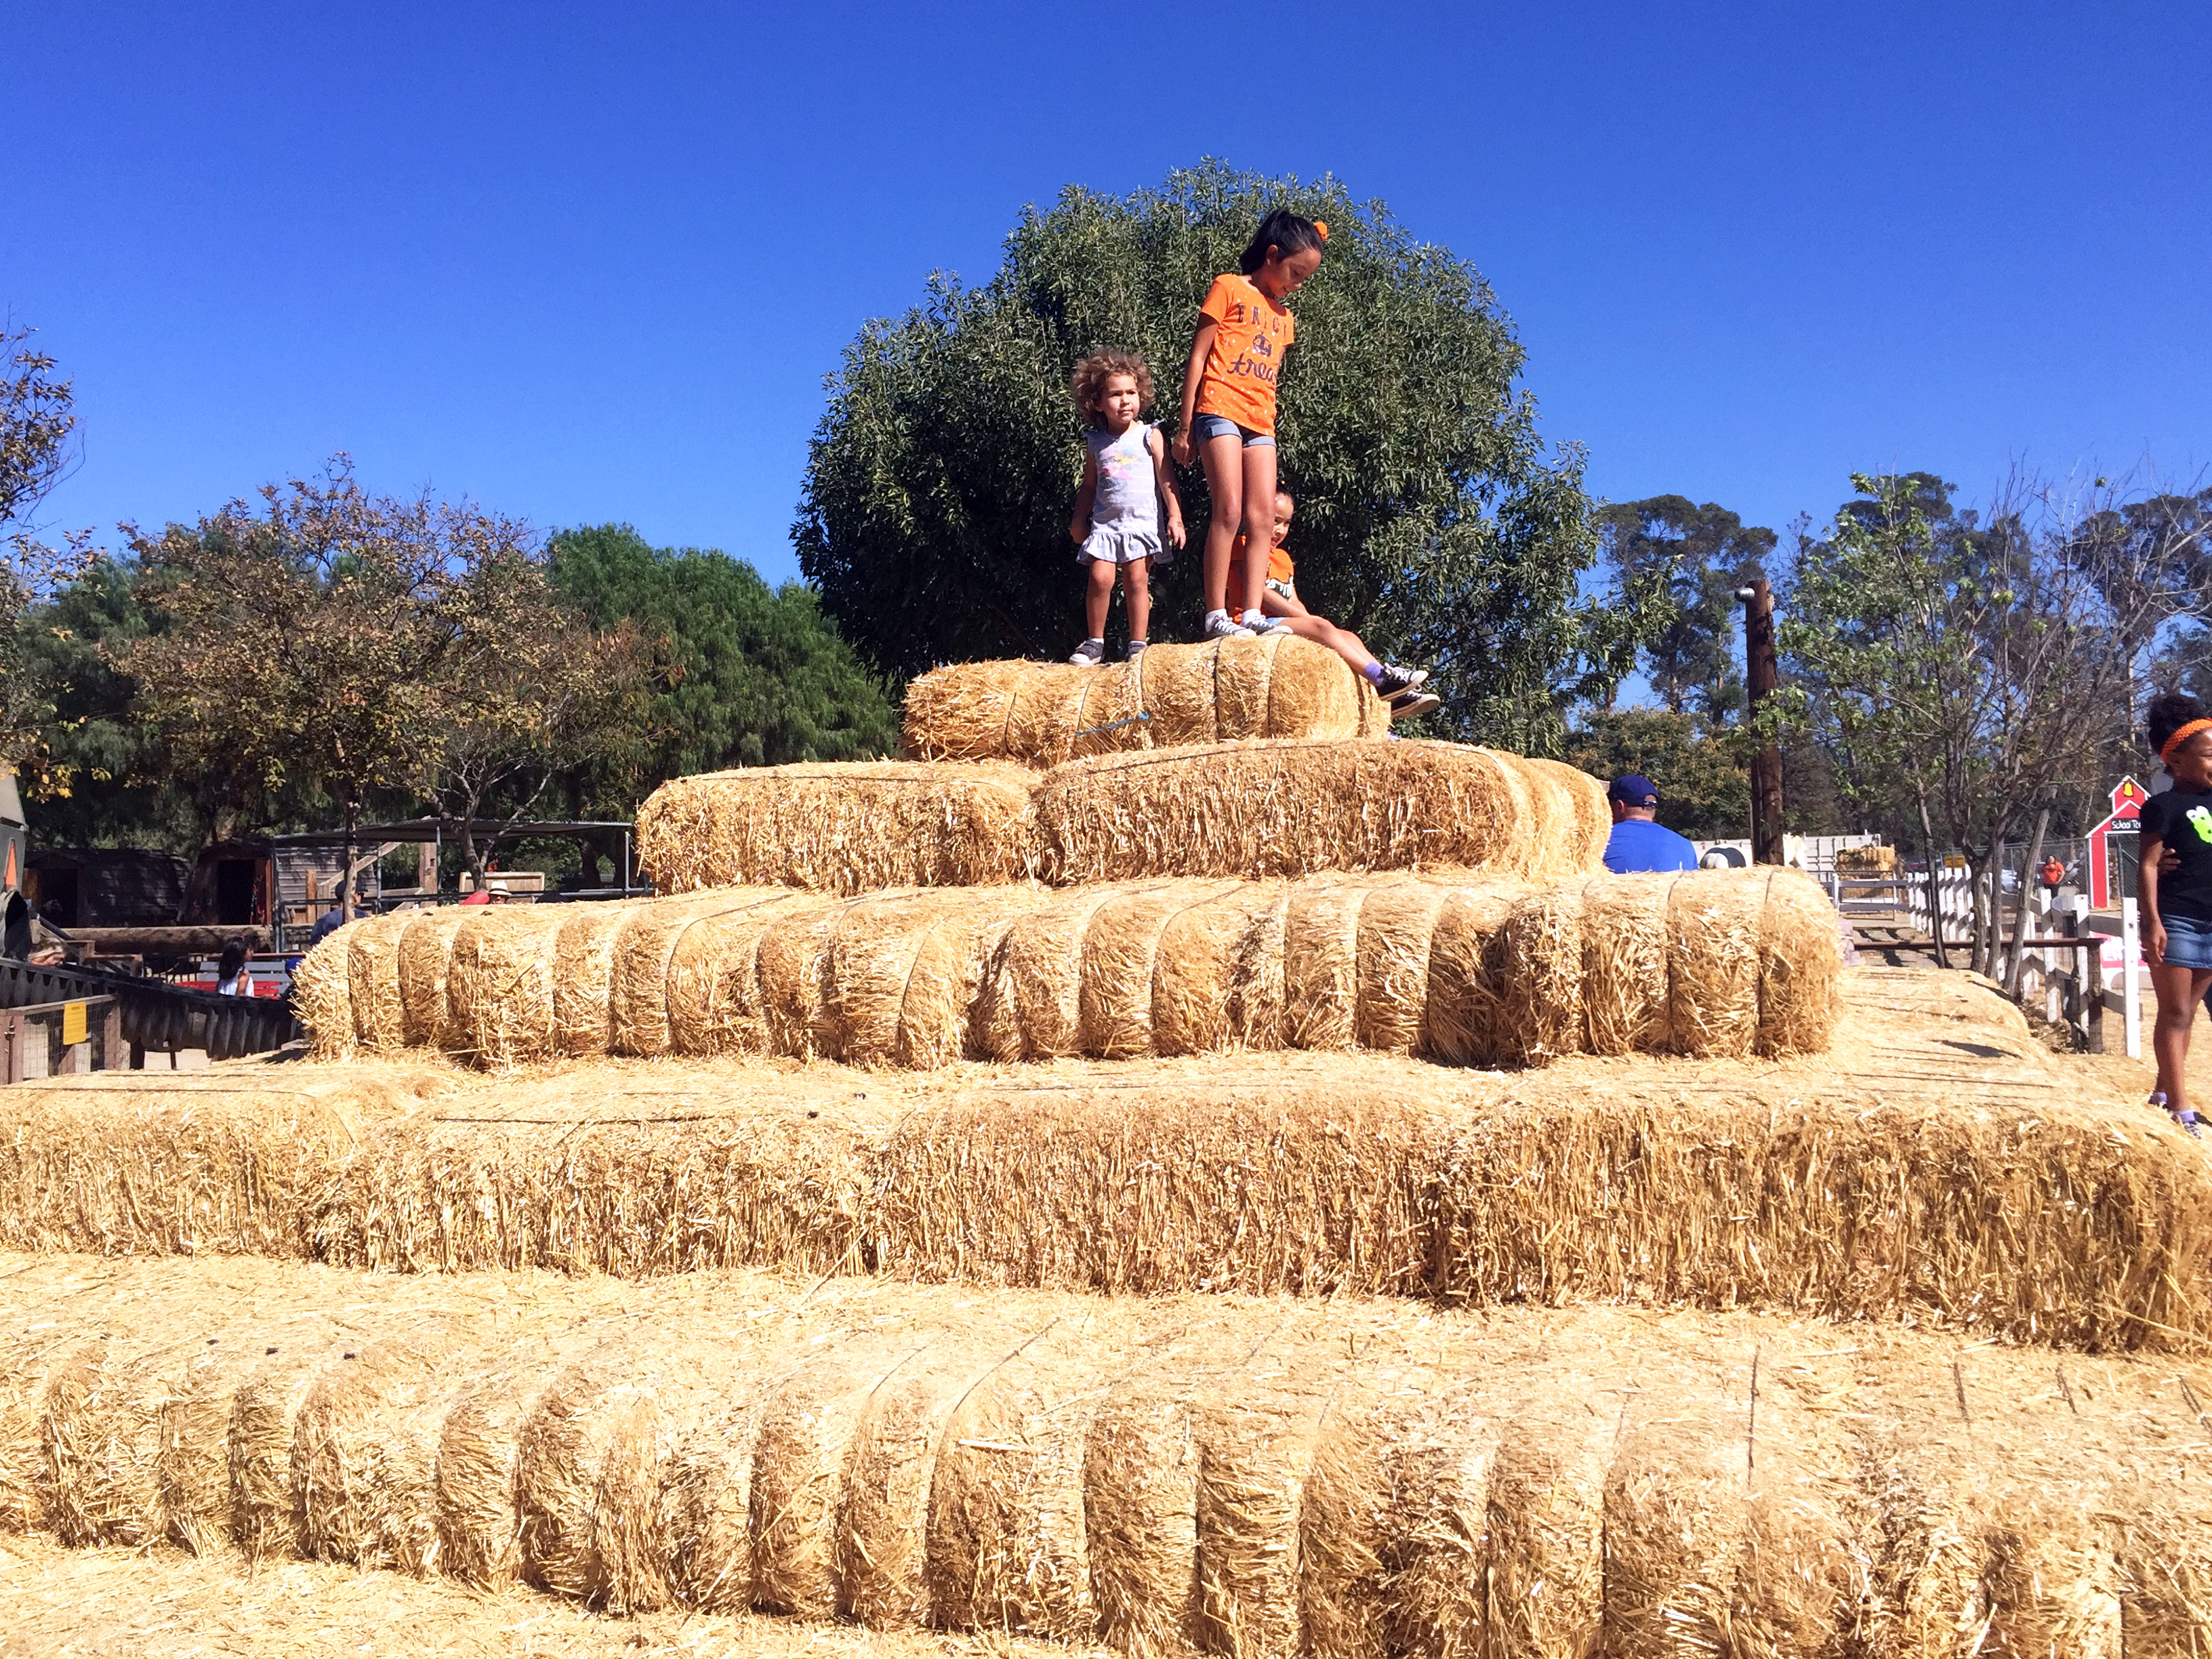
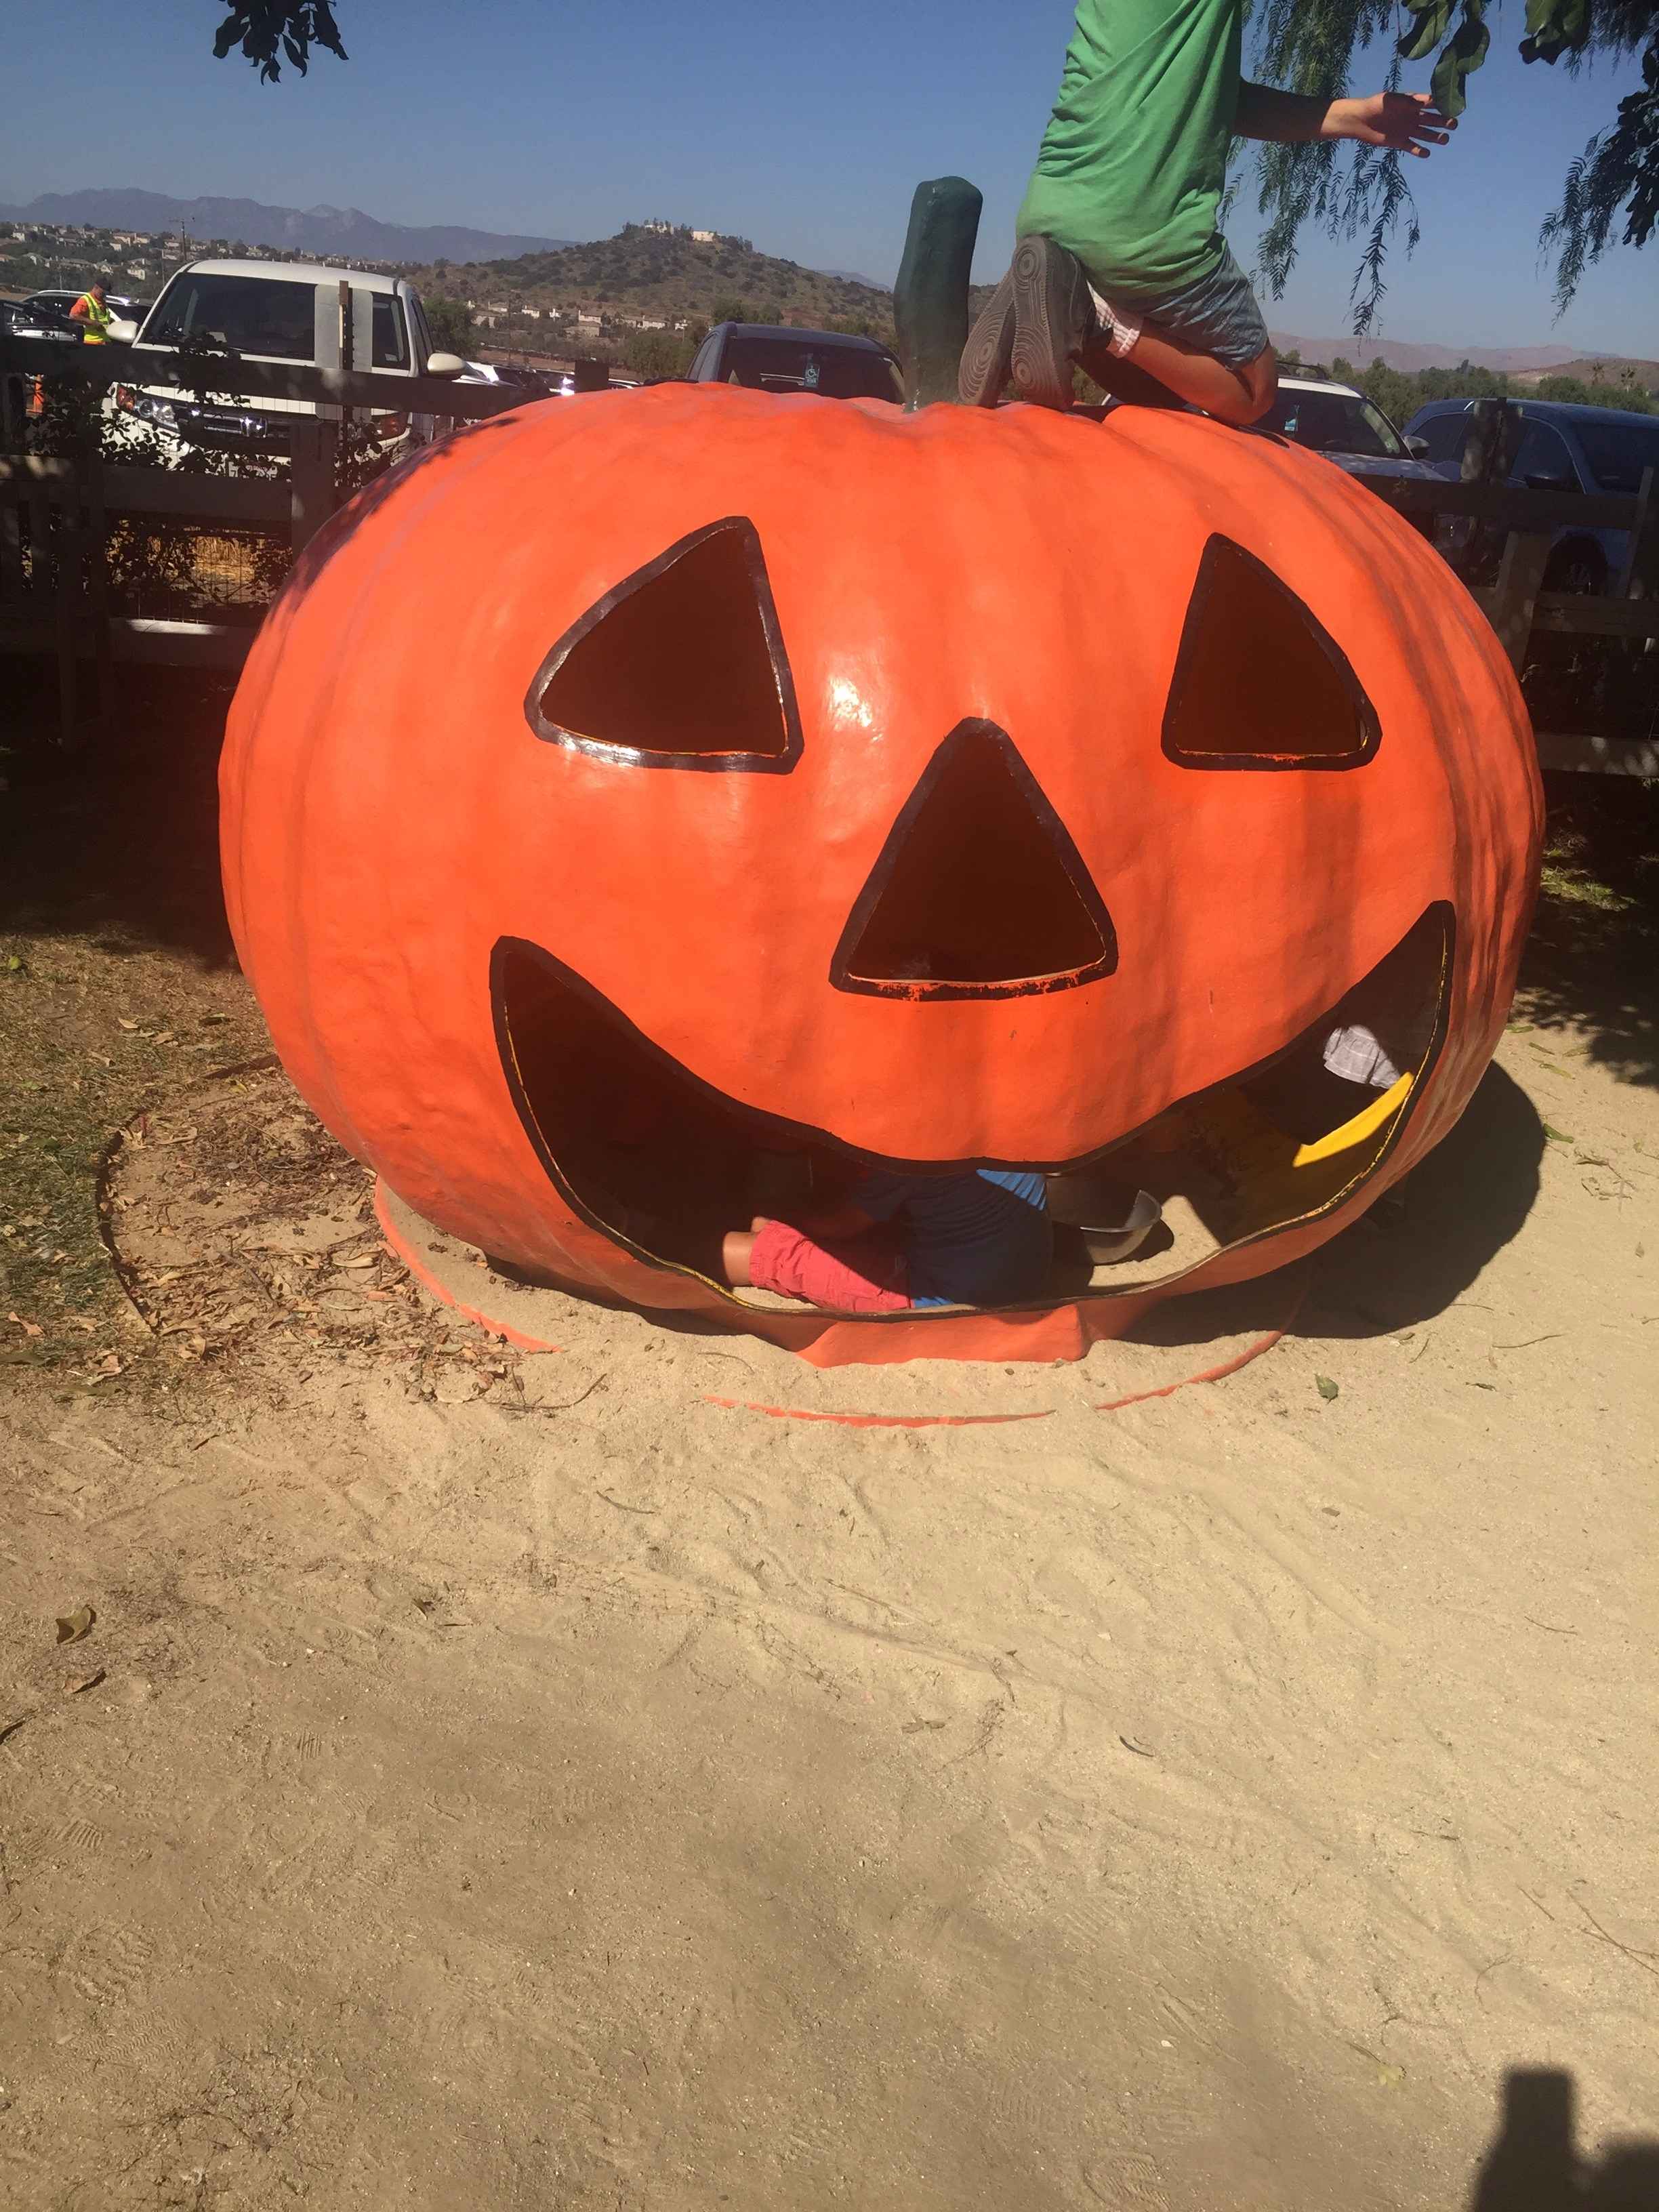
This past weekend, we took our daughter to a new pumpkin patch. They are in the middle of a Harvest Festival so there was plenty of Fall activities to do for the kids including live music, pig races, corn mazes, animal shows, tractor wagon rides for the whole family, tomato and live produce picking, pumpkin picking, food such as corn on the cob, tri-tip sandwiches and kettle corn (as well as shaved ice with two refills, burgers, hot dogs, chicken strips and the like) and a kids’ play area that included a slide, swings, pumpkin structures and more. There were even plenty of live animals including sheep, goats, cows, mini horses, pony rides etc. that you could feed if you wanted as well as mini tractors to ride or tip, depending on your preference. 🙂 Some special add-ons were ticketed such as the pony rides and mini tractor rides, while food was primarily cash only, but a majority of the attractions listed here were included with general admission.
This was our first-ever trip to this pumpkin patch as we had gone to a different one the past two years, and we all absolutely loved it! My daughter loved running through the corn maze, climbing atop the large stack of hay, entering and exiting the tall pumpkin houses and picking out her own pumpkin at the end of the long afternoon.
Riding like a cowgirl near the entranceAt the exit to the mini corn maze
Pumpkin house entrance
Enjoying the pumpkin house
Atop the haystackPumpkin play structure in kids’ area
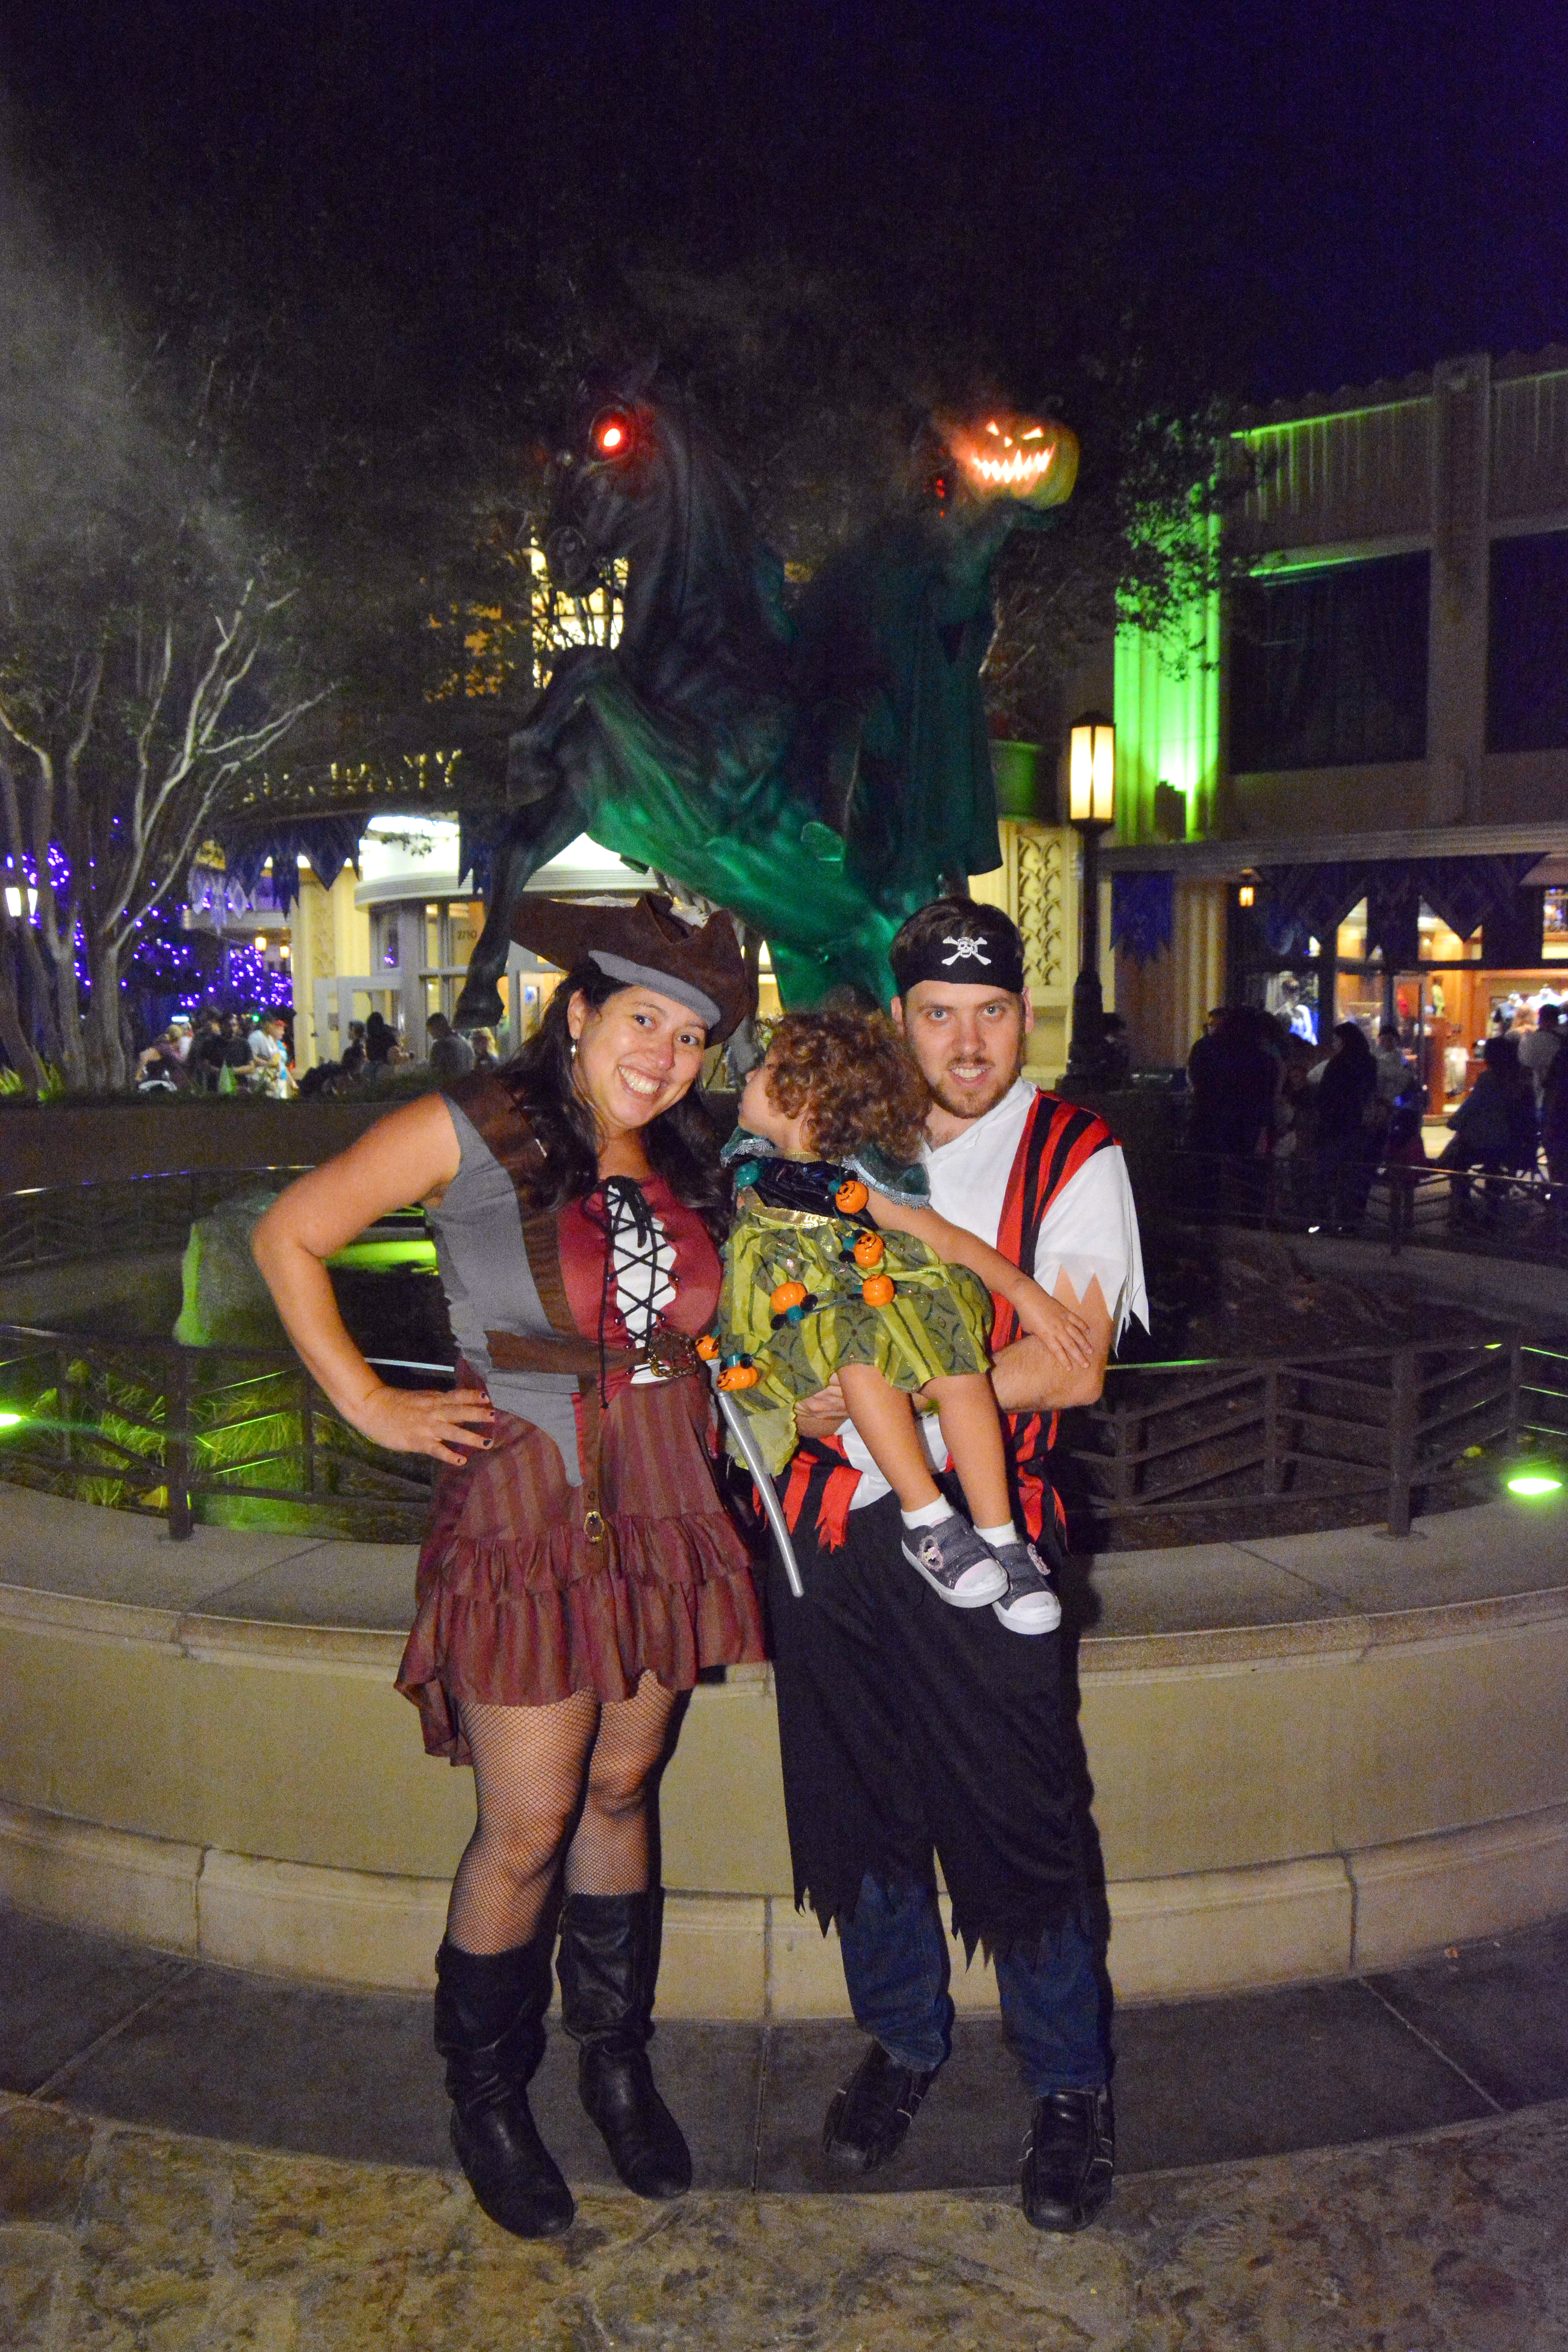
Halloween Time at Disneyland
Because our daughter is such a big fan of Disney and Halloween, and as she is at the age where trick or treating is starting to become relevant and fun to do with her friends, this year we decided to plan a family trip to Disneyland in California so she could experience the fun that is Mickey’s Halloween Party, a special ticketed event held at the park each year. Not only does the party allow all guests to come dressed in costume, something that Disney typically does not allow unless you are a child wearing one of their princess dresses, but it also gives each ticket holder admission for up to three hours in advance (giving you a full eight hours to enjoy the park at a lower price than what you would pay for a regular full day’s park admission).
Everyone must pay the extra ticketed price for this closed party event – including annual passholders – and this year was more expensive than previous years as it was the first-time ever Disneyland decided to expand the party to include admission into both California parks (including a huge Halloween overlay in California Adventure from the Oogie Boogie spookified entrance to bats circling overhead in the main street to a festive Halloween theme over Cars Land) as well as unlimited Photopass photos during the event, meaning if you took a ton of photos from Disneyland’s staffed photographers you would be able to download EVERY single one of those photos for free without paying extra.
This also meant that, in addition to the regular fun of Halloween Time you can generally experience at Disneyland which includes some Halloween-ified rides such as a Nightmare Before Christmas version of the classic Haunted Mansion ride or a Ghost Galaxy spin on the ever-popular Space Mountain, ticketed guests for Mickey’s Halloween Party could also experience special features ONLY available during the party such as unlimited trick or treating at designated stations throughout the park, photos with Disney villains that are typically only seen year-round at this special event (think Cruella de Vil, the Evil Queen etc.), spooky barber shop-style singing from the grim Cadaver Dans, a ghoulish fireworks show and Frightfully Fun Parade led by Jack Skellington of Nightmare Before Christmas fame and now also featuring a ride by the Headless Horseman of the legendary Sleepy Hollow tale who jaunts along on a black stallion to sinister music just before the start of the parade. This year’s festivities also included a spooky Headless Horseman statue in the center of California Adventure as well as a Halloween ride overlay on two Cars Land rides plus their new Guardians of the Galaxy – Mission: BREAKOUT ride and plenty of spookily fun food from mummified Mickey rice krispie treats to bat wing cookies and sundaes, mummy macarons, poison skull cake pops and candy apples and even pumpkin spice churros.
I recently uploaded a video to my accompanying YouTube channel showing all the Halloween merchandise I picked up during Mickey’s Halloween Party at Disneyland as well as some video footage of the beginning of the parade. Check that out below if you want to watch:
In addition to the fun merchandise we took home, including cute Mickey pumpkin lights (which we doubled as a festive light-up stroller finding tool at nighttime) and some appropriate Disney Halloween-themed mugs that I ordered online (including a poison apple mug and Haunted Mansion mug, both featured in the above video), here are a few snaps we took during the event itself.
Halloween Decor at Disneyland
Outside Disneyland Park just before the party
Outside California Adventure just before the party
Sleeping Beauty Castle between two Mickey pumpkin stanchions
Sleeping Beauty Castle with Halloween decor at night
Halloween Treats at California Adventure
Special treats offered during Halloween Time only at California Adventure’s Clarabelle’s
The Spider Silk ice cream sundae (we thought the ice cream was kinda bitter) – cherry spun ice cream, popping candies and raspberry sauce within the charcoal tart macaron sandwich
Our bat wing raspberry sundae with chocolate bat wing cookie – much more to our liking
Poison apple cake pops
Mummy and Mickey pumpkin rice krispie treats
Candy apples with Halloween decor
Halloween Dinner at Cafe Orleans in Disneyland
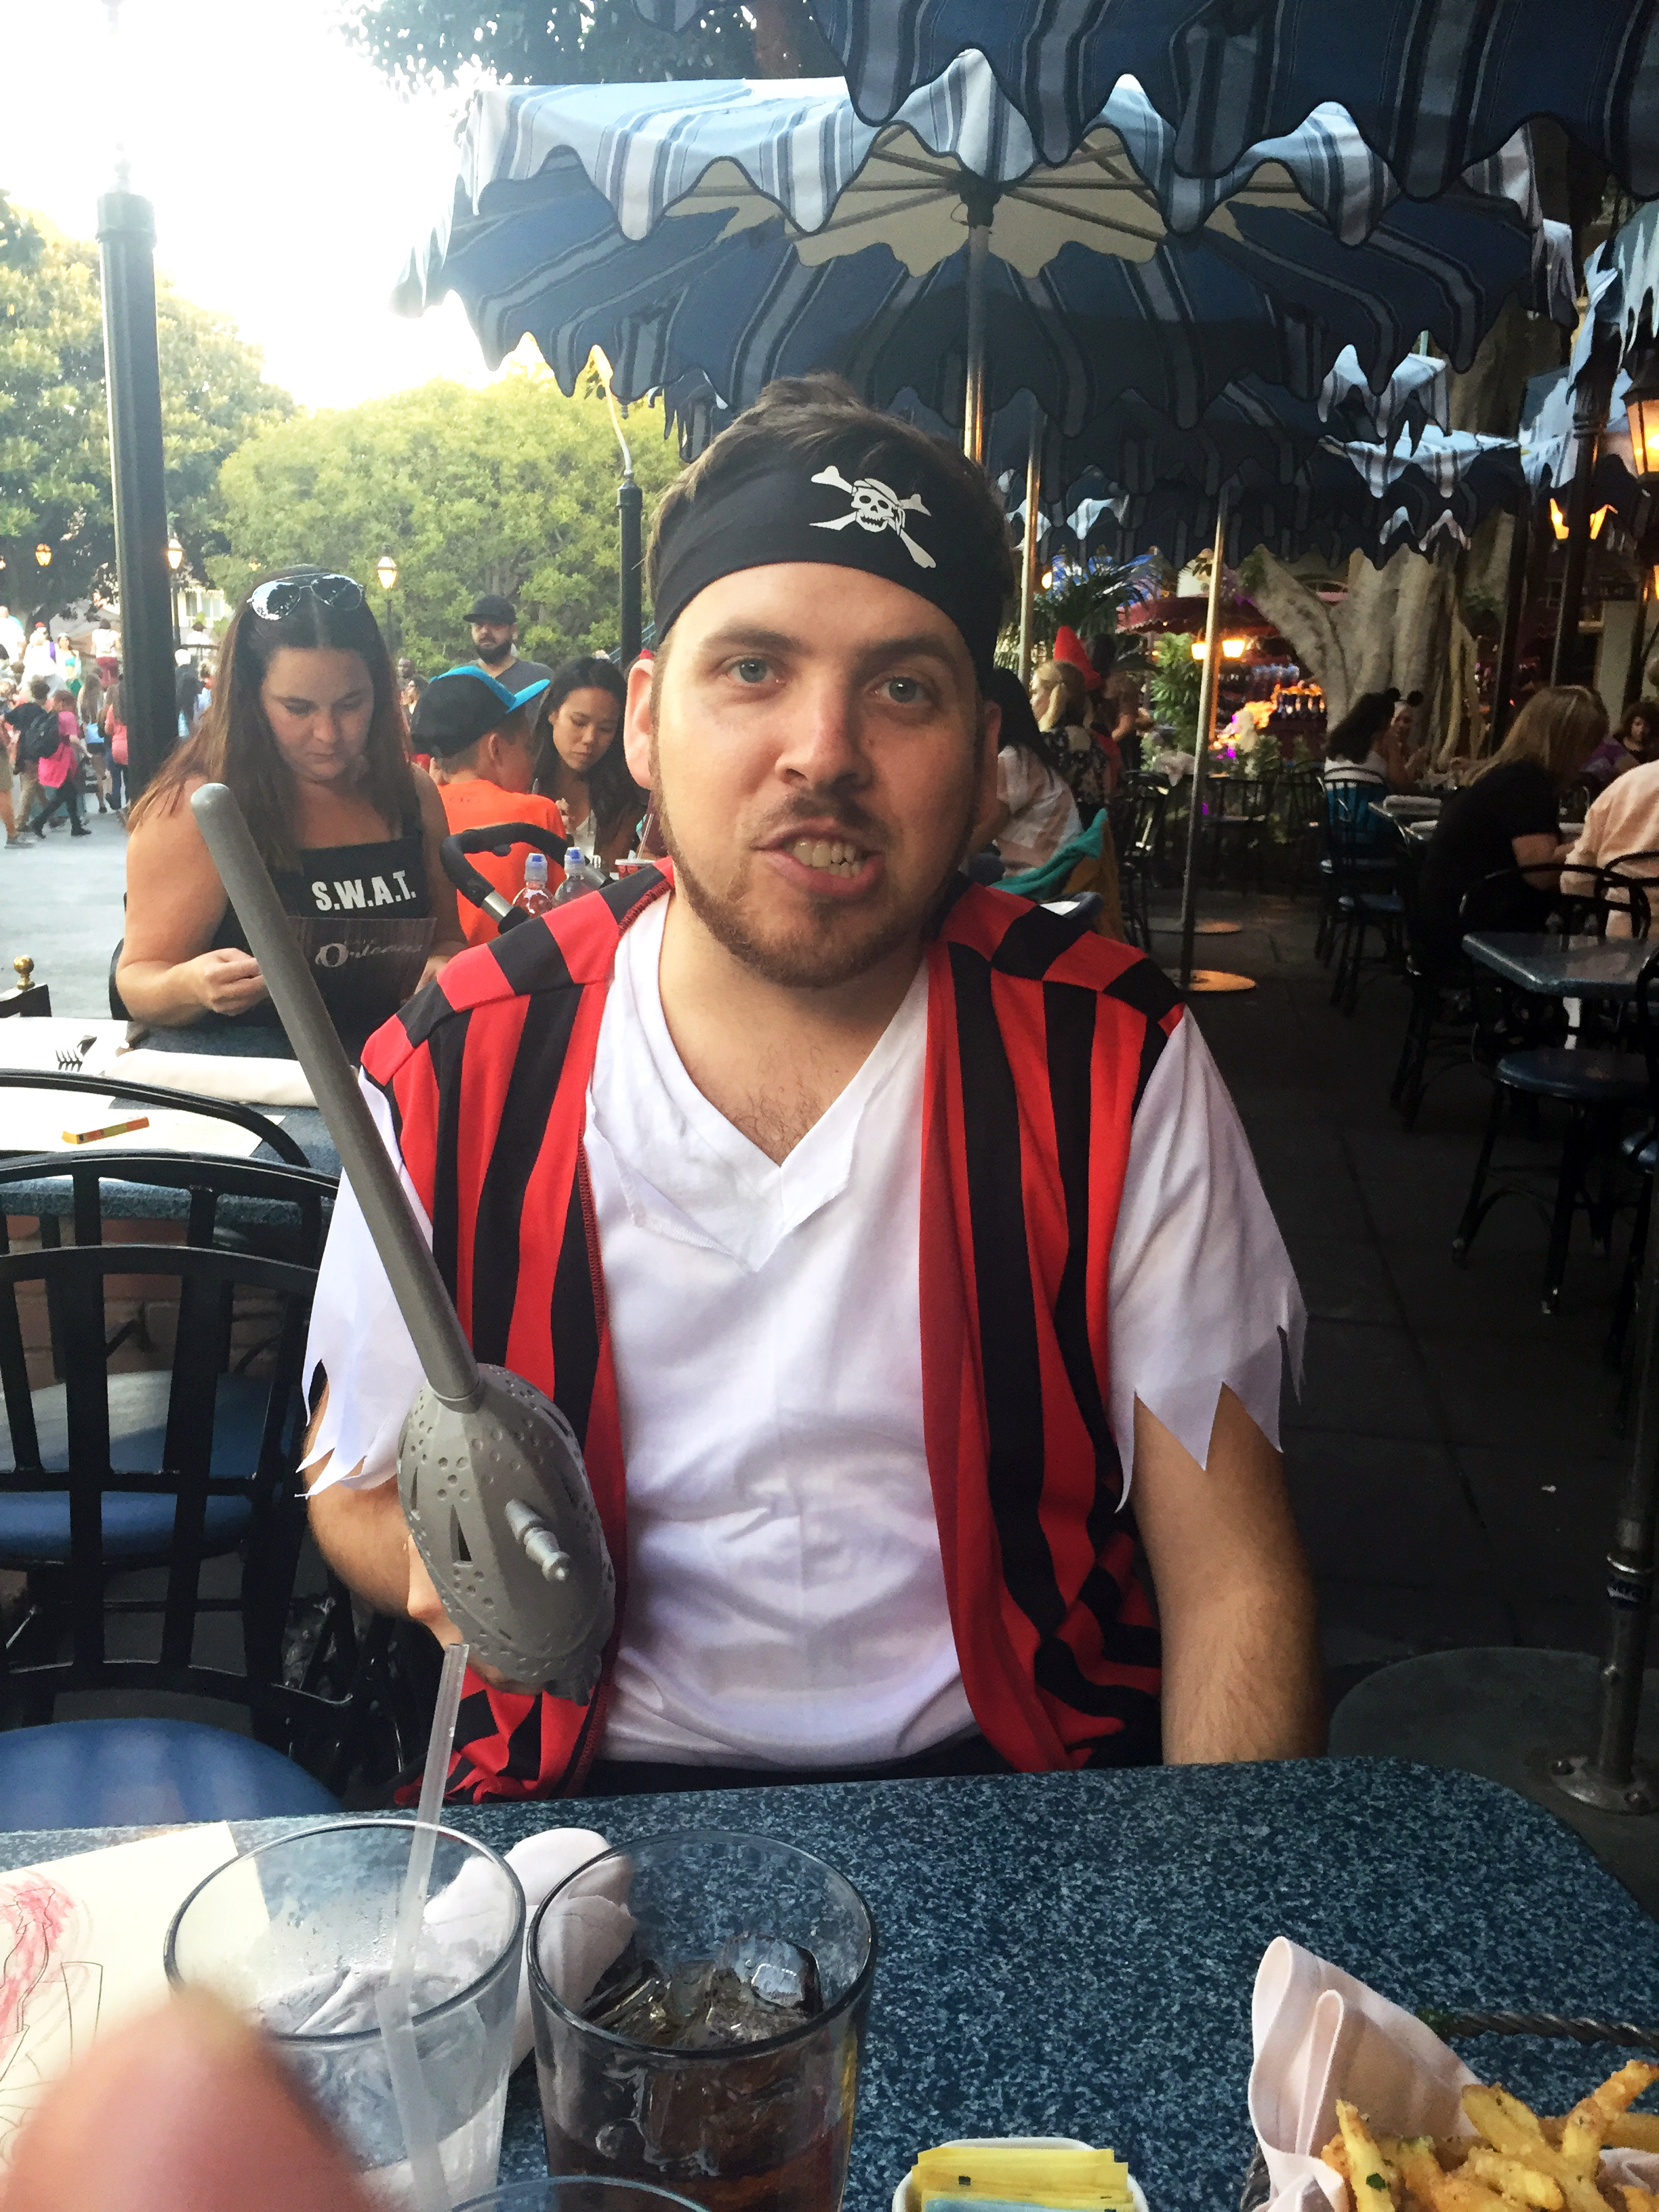
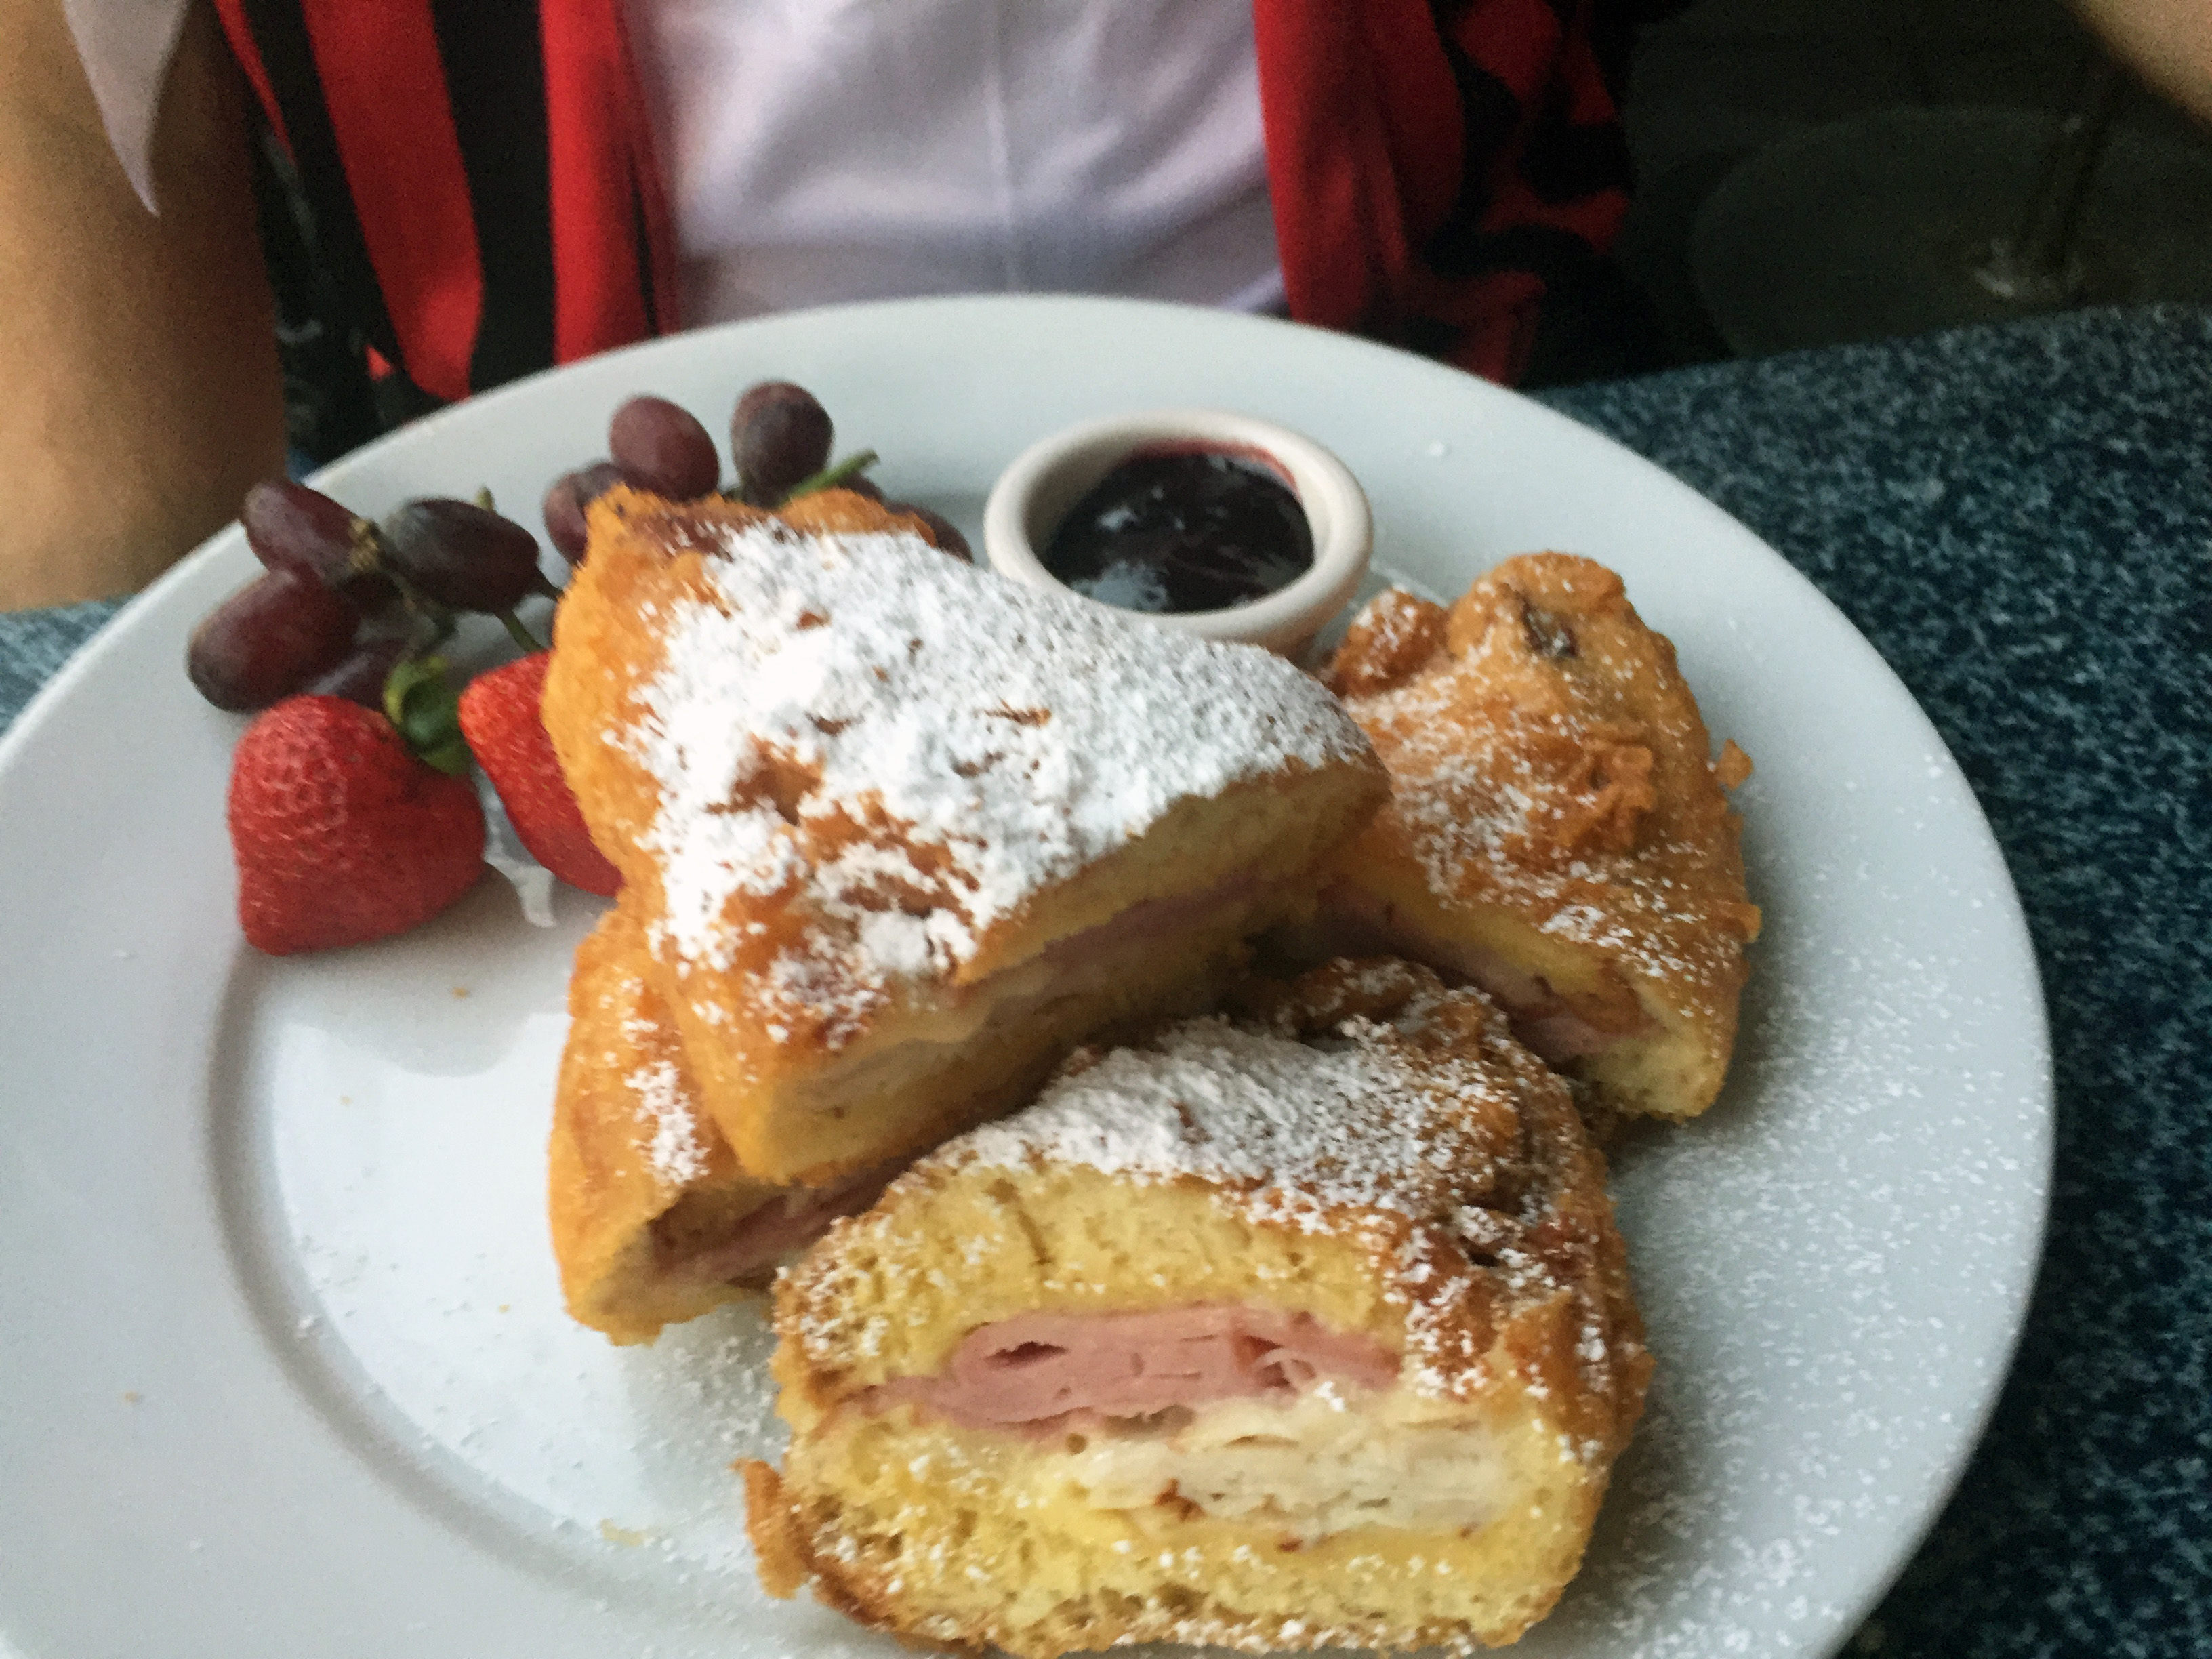
For our dinner in the park, we chose to eat for the first time at Cafe Orleans, a New Orleans-inspired eatery, and were so excited to have snagged the last dinner reservation available for the evening! Pirate Dad was a good sport but HATED their signature dish, the Monte Cristo sandwich, as he felt after two bites he was simply just done. Topped with powdered sugar, this is a deep-fried Croque Monsieur sandwich with turkey, ham and swiss cheese all battered in the fried dough while served with a berry puree. I liked it (thought it was similar to a donut) but admittedly wasn’t prepared to eat a whole plate of it, and my husband found that once you got past the overly everything-is-super-fried aspect, his sandwich simply had too much ham in it for his liking.
Pirate Dad says “Arghhh….”The Monte Cristo at Cafe Orleans
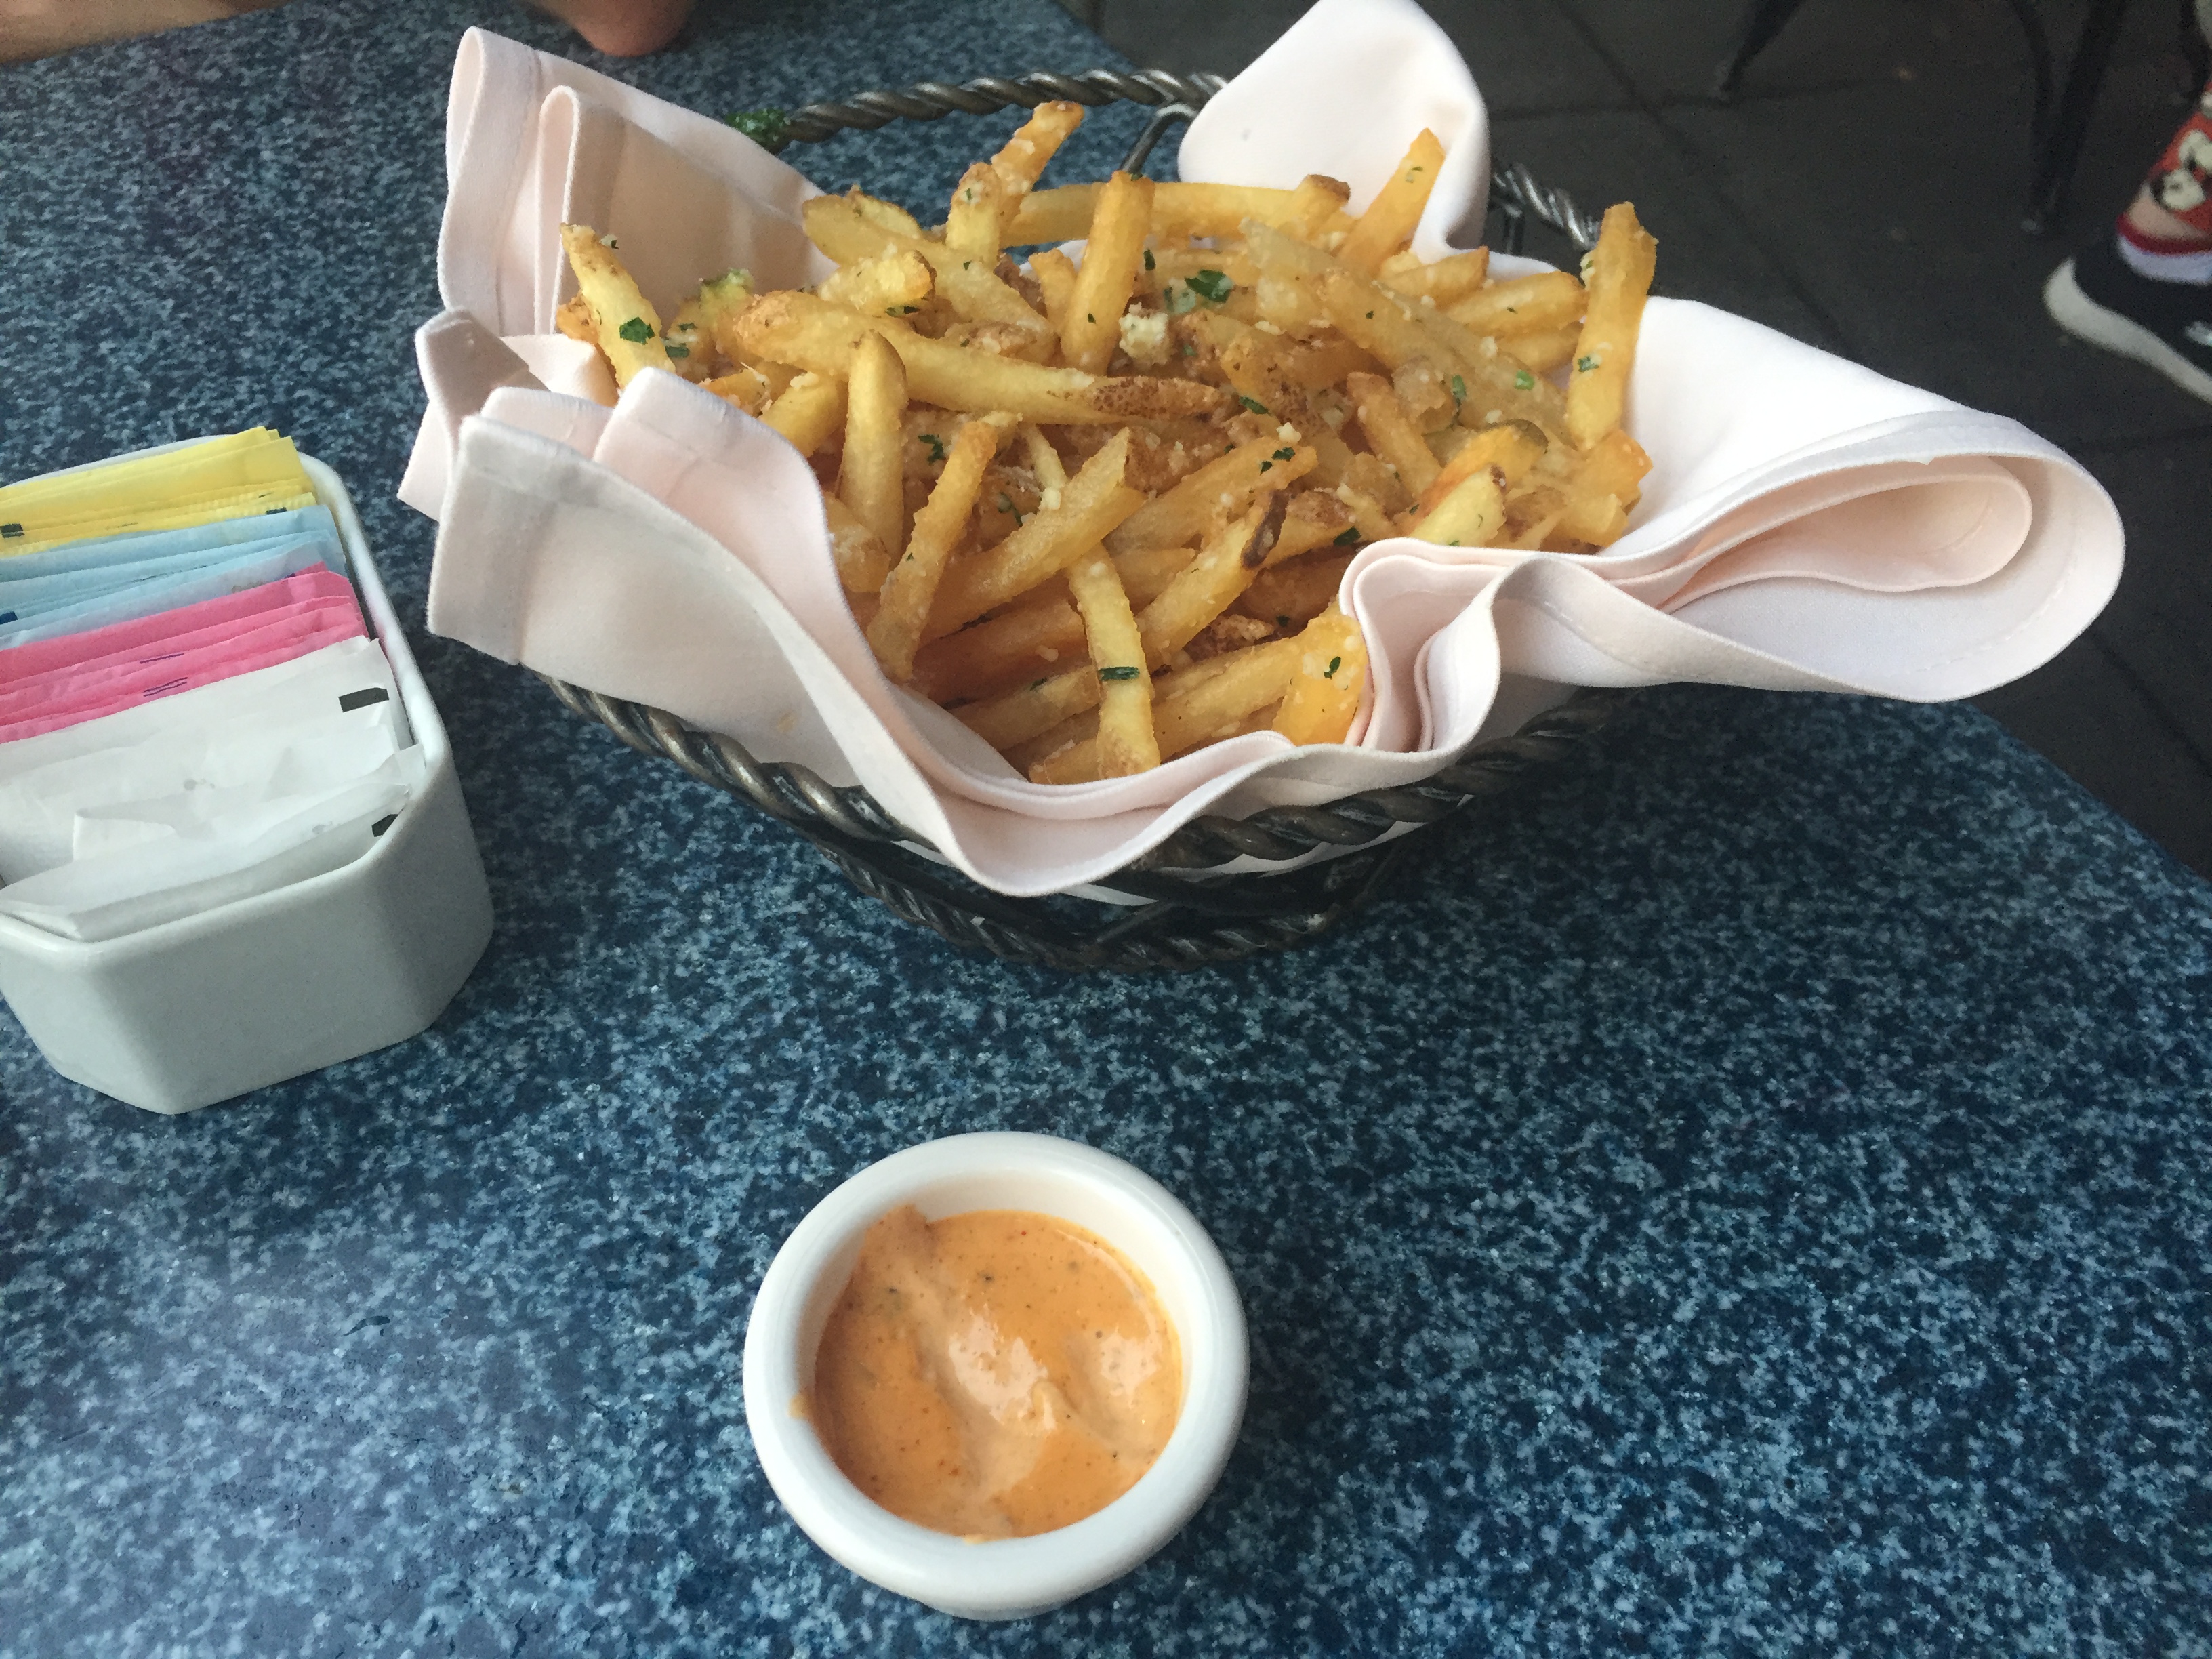
We were, however, crazy about the pommes frites (garlicky parmesan fries) served with their signature Cajun spice remoulade sauce — so finger-licking good! We did not leave a single fry in the basket. As part of the season, the menu also included shrimp and grits (which my daughter [ahem mom and dad] enjoyed as her meal) as well as their bourbon street chicken. Both my dishes were enjoyable and tasty. I later had one more evening snack in the form of tacos – see photos below.
The delicious pommes frites at Cafe Orleans in Disneyland with spicy remoulade
Shrimp and grits kid’s menu portion
Bourbon street chicken at Cafe Orleans
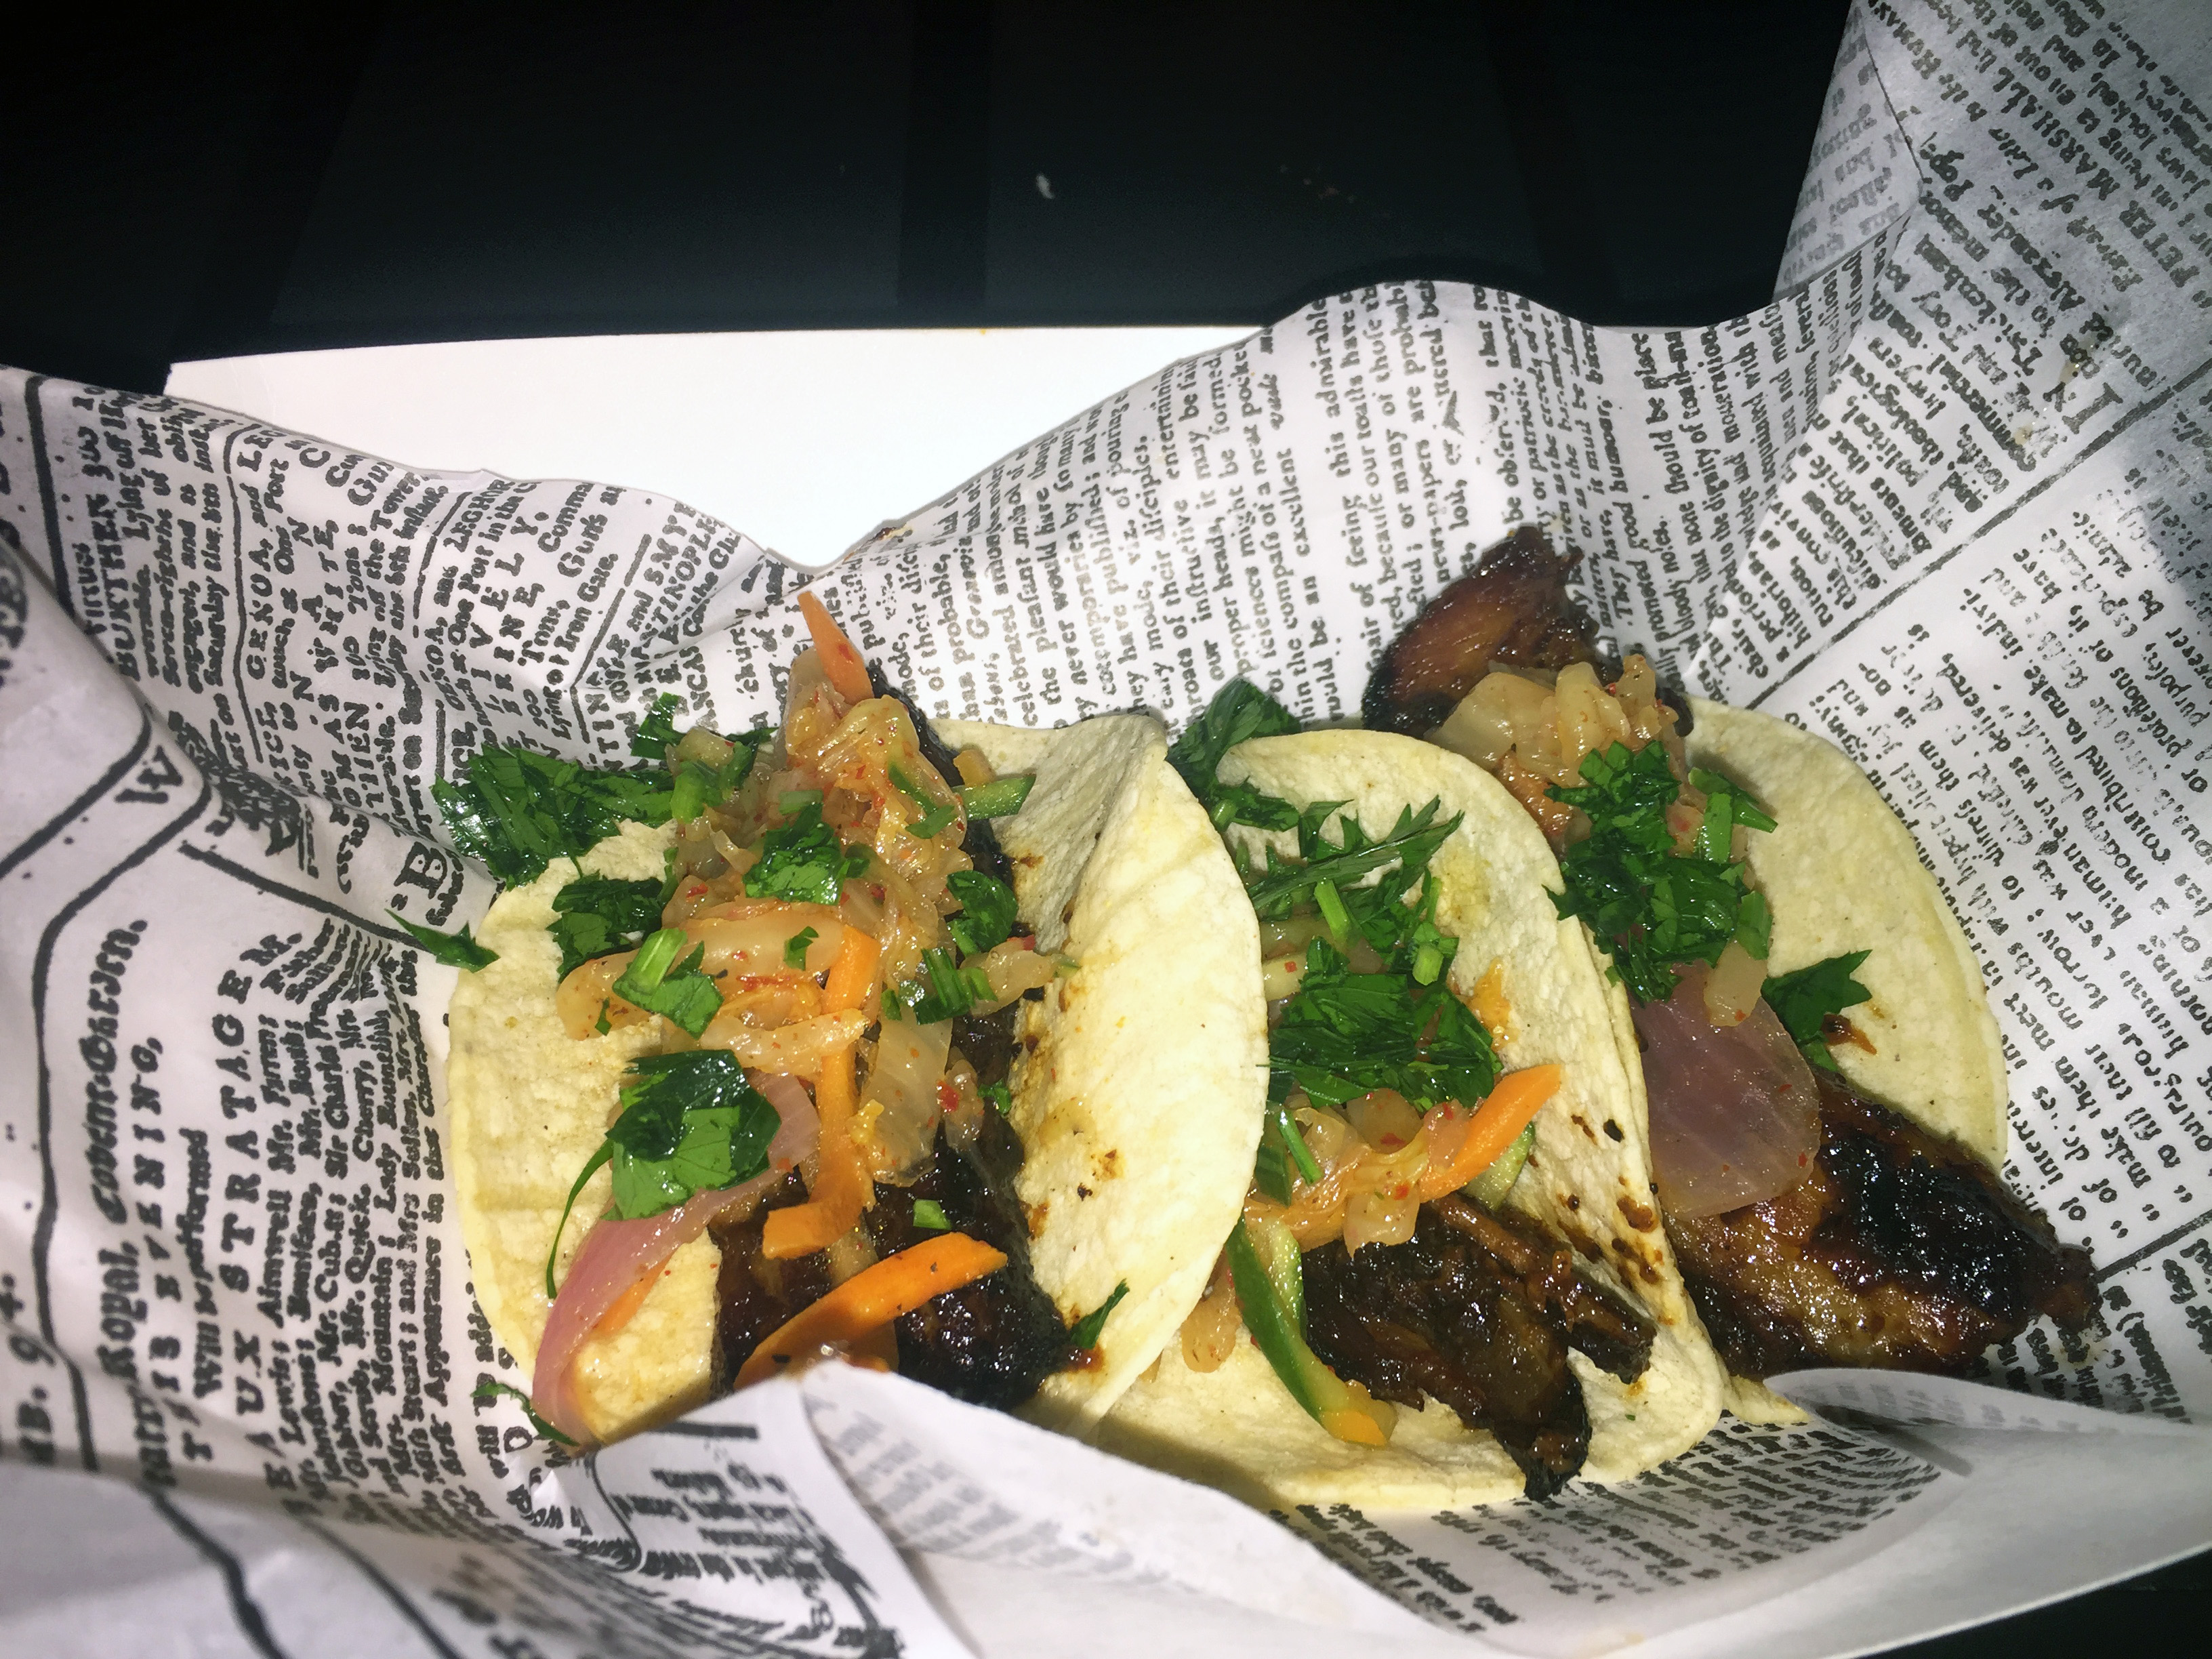
One more dish we tried – the Dragon Breath Tacos available at Studio Catering Co. in California Adventure as part of the Guardians of the Galaxy special menu introduced this past summer (the dish was a combination of pork belly tacos with Korean BBQ sauce, kimchi and a sriracha aioli)
More Halloween Fun at both Disneyland and California Adventure
Outside the Headless Horseman statueCute Mickey Mouse Halloween sign
We had such a blast taking our daughter around each park for Halloween Time, even if we did not focus much on the rides this time around. Have you ever been to the special Disney Halloween party held at either Disneyland or Disney World or had a chance to visit your local pumpkin patch this year? Let me know in the comments.
I am 35 weeks pregnant as of today which means I have about 5 weeks left until baby #2 arrives. That simple fact is a bit terrifying but exciting all at the same time. Since I am hitting the home stretch (even funnier to use this term right now since we’re in the middle of the World Series), I wanted to reflect on my pregnancy so far and how this pregnancy has differed from the first time around. This post will include my reflections on how my pregnancy has fared so far, how it compares to the first time and a full recap on what labor was really like (I jotted it all down in a baby journal three years ago so I wouldn’t ever forget). Full disclosure: if you’re squeamish about talking about that “time of the month” or just don’t want to hear about my past pregnancy compared to this one or would prefer to not think about labor, this post may not be for you. You have been warned as I know some of my readers are male and I wanted to give you a chance to bail. 🙂 Okay…deep breath…reflection time!
LEARNING WHEN TO GO TO THE HOSPITAL
With my first pregnancy I measured four days ahead the entire time so my doctor was convinced I might go into labor slightly early. This made planning a tad difficult since my parents live across the country and my mother and sister were both trying to schedule a trip to coincide with my daughter’s birth so they could be present in the delivery room. Things worked out as my doctor stripped my membranes on my due date in an effort to expedite the process. She told me doing so sometimes caused moms to go into labor as early as the same day if not sometime later that week, and she was right. My sister, mother and I all went to lunch at a restaurant close to my doctor’s office where I ran into a famous Hollywood director…I’ll never forget the day I saw Rob Reiner in person was the day I went into labor. The contractions began around an hour or so after leaving my doctor’s office – while I was sitting next to said director – so all my weeks prior of trying to force the event into action (i.e. sipping on raspberry leaf tea, extra exercise, etc.) didn’t matter – the stripping of the membranes did the trick!
I remember I was slightly nervous my doctor would even be in town as she told me she was going out of town the weekend prior to my due date so she told me to wait ad not go into labor early – eeek!!! At that point she also told me the rules of when to go to the hospital and to not even bother calling her office first – she said when the contractions began (and I’d know once they started) and they lasted only 45 to 60 seconds and came on every three to five minutes in a two hour period, to just check myself into the hospital. For my local hospital to admit you, the patient must already be between three to four centimeters dilated. Any less, and they would just send you home – the only exception being, if your water has already broken as it then becomes a slight health risk to not admit you. I learned this was true the hard way….
HOW LABOR BEGAN – MY FIRST PREGNANCY
My doctor’s appointment was scheduled for around 3pm on the day of my due date. I began tracking my contractions around 5:24pm that same day. I remember at first feeling what felt like a slight cramping that just wouldn’t go away. I laid curled up on my left side, attempting to watch TV to distract me. With Braxton Hicks contractions (the fake contractions that your body experiences in the weeks leading up to giving birth where your stomach momentarily squeezes and hardens and then goes back to normal), they tended to stop once I changed my position but these did not and only came on more frequently. As the time went on I began to feel a dull pain in my lower back and so I started to time the contractions with an app on my phone. I was averaging contractions about 6 minutes apart for between 35-60 seconds each and the pain was gradually increasing. With each build, I would feel a squeezing and a tightening that would come in waves and I recall having to take deep breaths to get me through. Having never been pregnant before, I recall still doubting whether I was in actual labor yet so I just sat still and continued to monitor this activity for about a half hour more before I even thought to call my husband who was still at work. I told him he should maybe leave work early and to start packing the last minute items we wanted to take with us to the hospital – our hospital bag had already been packed for many weeks at this point but we still had last minute items such as phone chargers, a camera, toothbrush, shower sandals, the baby’s new car seat and some essential paperwork like insurance info (to register the new baby) and a to call list of close family that we wanted to take with us.
THE CHECK-IN PROCESS
At exactly two hours from the moment I felt the first contraction, my family drove to the hospital and after filling out some paperwork (one form indemnifying the hospital in case I required emergency medical care and another form with basic info such as my name, number and address), the nurses admitted me. I remember doubling over in pain, leaning against the counter at the Labor & Delivery check-in while the nurses checked to see which room to admit me to as the hospital was a bit packed. While waiting, a girl arrived calm as a cucumber with only a towel held between her legs to indicate that her water had broken. Due to risk of infection, the nurses attended to her first and she calmly walked off with her partner to one of the rooms to await her fate. A few minutes later, my family was ushered into a corner room where I could faintly hear another mom in labor screaming in pain, and I was given a paper robe and told to undress completely. Once changed, I laid on their hospital bed while the nurse placed two belts across my abdomen to measure the contractions and also see the baby’s heartbeat and how she was reacting to the distress of labor. It was at this point that the midwife arrived and probed me to see how dilated I was — I was only 2 centimeters, ugh! So they told me to walk around the labor and delivery floor for a bit and come back after. When I returned about an hour later, I was still only slightly past 2 centimeters so the nurses told me to go home, relax with a bath and maybe drink a glass of wine. I couldn’t believe it – I had declined from alcohol this long and was determined to see it through!
At home I continued the contraction dance – the up and down movement of pain while the pain in my lower back steadily increased, and after about another hour and a half of this, I could take it no more. We returned to the hospital, checked in all over again (including having to sign the same papers once more – such a hassle) and waited for the nurses to find us a room. This room was bigger than our first time around. By the way, we later learned that you are charged an admittance fee for EVERY time you come to the hospital, so even though my previous visit had only been under two hours, it counted and I paid the hospital entrance fee twice. This is why with my second pregnancy I plan to wait out the contractions a little longer before coming into the hospital as I want to make sure to only have to go through this process once!
THE SECOND TIME AROUND – BACK TO THE HOSPITAL
When we checked in the second time at the hospital, it was just after midnight. We waited about 40 minutes for a midwife to arrive and when she did I was thankfully over 3 centimeters. Hallelujah! That meant I could stay this time. An IV was inserted into my right arm (after an unsuccessful attempt by the nurse to insert it into my left arm) and we then waited another 45 minutes for the anesthesiologist to arrive as I told them I wanted an epidural. I don’t do pain very well!
My labor went on for a total of 21 hours. In that time we had 3 nurse shift changes. Our second nurse had a very soft demeanor and was exactly what I needed at that point. While waiting for the epidural she had me lay on my side and gave me back massages to ease the pain in my lower back. (Prior to that my sister had attempted to ease my pain by rolling a tennis ball along my back but that wasn’t as effective as the nurse’s trained, steady hands.) I was allowed to take sips of apple juice along with ice chips. The anesthesiologist then arrived and had everyone leave the room except my husband while he administered both my miracle drug as well as Ptocin to help speed along the contractions. While he was administering the epidural, I felt only a prick and slight increased pressure but the drug began working several minutes later, allowing me to relax. Every 45 minutes after that, the nurses had me change body positions side to side to keep up the movement and encourage the baby to descend lower in my birth canal. It had been about 9 hours of labor – from the moment the contractions first began to the moment I finally received my first epidural – and afterwards I recall still feeling the pressure of the contractions so I could tell when they were occurring, but I no longer felt the associated pain. We watched the heart monitor which showed two lines – one for my own contractions and one line for that of the baby’s heartbeat – and both remained strong throughout.
THE SECRET TO PUSHING
My last nurse, Nurse Irina, had a real no-nonsense attitude about her and had been helping to deliver babies for 18 years. While her rough personality did make me feel incompetent a few times, she also walked me through the delivery process and told me how to push, telling me to be confident before we practiced a few times. When I reached 8 centimeters I was told my water sac was very tight but had still not burst. The midwife came in to burst it manually, making me feel a slight trickle as it ran down my legs. Then Nurse Irina told me how giving birth was like dealing with the worst poop of your life, and how when you have to go our instinct as humans is to grunt and hold your breath while trying to get it out. Here she wanted me to draw a deep breath and let it out while making the push as if I had to let out a very large one. (Sorry for the graphic image but this is how it was described to me and how I finally learned how to give birth) After maybe six or seven more practice pushes, the top of my baby’s head crowned and the nurse called for my doctor to arrive who had still been at her office, dealing with patients and was now caught in traffic. I could feel the pain of contractions starting to return along with the pressure which meant my epidural was wearing out, so the nurses called for the anesthesiologist to return (another 45 minute wait or so) and then I was administered my second dose. While we stalled another hour waiting for my doctor to arrive, the nurse had me continue to do practice pushes, coaching me through it the whole time. She told me, “They call it labor for a reason; this is hard work.” We did about 12 or so more practice pushes before my doctor scrubbed in. Watching my progress she told me the baby’s birth was imminent and after four more big pushes, with the baby’s head easing out further, I was told the next push would be my daughter’s birth. She was right – I felt a slight pulling as my daughter moved the rest of the way out and then there she was!
WHAT I LEARNED THE FIRST PREGNANCY
PUSHING – was probably the easiest part of my first labor! Yes, it was arduous and difficult as it required strength and breath support, but both baby and I worked together to make it happen and it felt good to finally be doing something. The end result was just amazing and so worth it – as I finally got to meet my daughter who I had bonded with for 10 long months.
BE PREPARED TO WEAR ADULT PADS – After delivery there is bleeding so anticipate that, especially with it being the heaviest in the first four days or so after labor. You will be given a peri bottle in the hospital to help spritz and keep down there clean as you’re not allowed to wipe with toilet paper right away while your body recovers. The nurses also gave me some Lanolin cream to help ease nipple soreness while both I and baby learned to get more comfortable with breastfeeding.
Hospital supplies provided post-birth: adult diapers, mesh liners and pads
Hospital supplies provided post-birth: adult diapers, mesh liners and pads in addition to a peri bottle and Dermoplast pain relief spray
Hand and body lotion and other toiletries provided by our hospital staff
YOUR PACKED HOSPITAL BAG MAY BE LIGHTLY USED – We barely used anything in our hospital bag simply because our hospital gave us practically everything we would need. I didn’t want to get blood on my clothes so I spent most of the time in the hospital-supplied robe and comfy socks, and used their toiletries and pads as well as plenty of ice packs to ease soreness. What we did use from our own hospital bag was our own soap/shampoo as the hospital simply gave us small bottles of Johnson’s body wash – I decided to save those bottles and use them on our baby later on – as well as our own toothbrushes and toothpaste. I ended up not needing my shower slippers but spent a ton of time in their provided comfy socks to prevent from walking around in my bare feet.
YOU WILL NEED MEDS – After I returned home I was given extra strength Motrin and Norco (sort of like Vicodin, which I really didn’t use) to help ease the subsequent pain. I was also instructed to walk around as much as possible and keep moving.
YOU MAY SHED THE BABY WEIGHT PRETTY FAST – Two weeks after delivering my baby, my body had already shed 19 of the 35 pounds I had gained during my first pregnancy. The first 9 pounds were gone within the first few days after giving birth, and I continued to shed about 1-2 pounds per day for the next week. By the third week the weight loss slowed as I was only down 21 pounds and that’s when you have to really start to work to shed those remaining extra pounds – or at least, that was the case for me.
MAJOR DIFFERENCES BETWEEN THE LAST PREGNANCY AND THIS ONE
THE EXTRA WEIGHT SHOWS EARLY – This time around, I feel like I began showing super early and have definitely gained more than I did the first time around. Everything feels like it comes on quicker and faster. I realized that every pregnancy is different and given this is my second, I have felt a little less anxious and “on top of things” than I did with my first. The first go, I took so many classes and read so many books and websites to really get ahead of my pregnancy – I even took a labor pain class to learn about the effects and advantages of different medications you can safely take while in labor as I wanted to know my options. I took copious notes on everything and still have them to browse should I choose – but honestly I have barely looked at them. I have yet to even pack my diaper bag! I felt like I was pregnant forever with the first but this time, it all sorta feels like a blur perhaps because I have had a young toddler to tend to and keep my mind distracted so I have not been as wholly fixated on this pregnancy as I was with my first.
BEEN THERE, DONE THAT – Even though it has been three years since baby #1 arrived, my body feels like it has maintained most of the most important memories and so you kinda enter a flow where you feel more at peace with your pregnancy. I have several mom friends who are all pregnant right now (we’re all just several weeks ahead or behind one another which I find so interesting) and they have echoed these same sentiments. It’s a bit of a been there, done that mentality.
FIRST TRIMESTER
In my first trimester of pregnancy #1, I woke up with splotches on my skin, I felt the need to burp a lot and experienced a gagging sensation primarily vs. full on nausea. My breasts became sore and I frequently felt tired, waking up at night with the need to pee. Sometimes when I sneezed that first trimester I even felt a slight dull pain on my left side as my muscles and ligaments began to stretch. This time around, I did not experience the joy of skin blotches until my second trimester, and while I only became nauseous at nighttime around 3am the first pregnancy, I felt nauseous pretty much from week 8 all the way through to my fourth month of pregnancy this time. It was brutal but also my first indication that maybe this time I was having a boy as the first trimester was so drastically different! I was tired a lot, but I didn’t really feel a need to go to the bathroom until my third trimester. Go figure!
SECOND TRIMESTER
In the second trimester of my first pregnancy, I experienced my first of many leg cramps at 6:30 in the morning and it was painful! After that I did stretching exercises every night before I went to bed and put my feet up while sitting down to allow the blood to circulate. This time around, I did not get my first leg cramp (only 2 so far this time, knock on wood) until my third trimester around my 32nd week maybe? I drank a lot of milk to build on the extra calcium and hopefully stave off future episodes which has seemed to help.
Also with the first baby I used to get kicked in the spleen – a lot – starting just after my 24th week of pregnancy. My daughter would sometimes sit on my liver it felt like and make me feel like I had to pee when I didn’t and gave me a few swift kicks to the ribs which were achingly painful. This pregnancy, I don’t know if it is the different temperament of my new baby or simply if he has more room to grow as the first baby already stretched me out, but I have barely felt any pain from kicks or movement. As I get closer to my due date my stomach sometimes performs gymnastics with him bobbing around but the jabs to my ribs are more tame and not as painful. I’ve only jumped in surprise maybe once or twice by the sheer force of movement, though at this point my stomach and extra weight do make me feel very heavy and I am clearly waddling when I walk – something I did NOT do with my first. It’s the heavy feeling that makes these final weeks of pregnancy kinda tough on the body – at least mentally.
THIRD TRIMESTER
Regarding the third trimester, by week 32 of my first pregnancy I started having difficulty sleeping through the night and I would say that feeling has been consistent this time too. The closer I get to my end date the more uncomfortable sleep becomes, despite wrapping my body around a sleep pillow every night. Sleeping on my left side is just not my preferred position and my baby wakes me up many times in the night with major heartburn or I end up feeling hot and uncomfortable or just have the need to kick off the heavy sheets. I also can’t stand for anything to touch my belly button which is once again protruding from my belly and has a darker tint to it than it normally does when I am not pregnant. I’m an innie but with each pregnancy I have seemingly developed an outie.
Week 35 was when I started to feel Braxton Hicks contractions the first go around, and I would say that has held true for both pregnancies (though mine started week 34 this time). While sightly uncomfortable they feel nothing like the real contractions so I know I have more pain to come! In my first pregnancy I didn’t begin to have my feet swell until about 38 weeks but I have already been swelling on and off since week 33 but perhaps that is due to the unusually hot heat wave we have been having these past few weeks (high temps in the 80’s to 100 degrees!).
So there you have it…a full recap of what it was like to be pregnant the first time versus what it is like with your second pregnancy (and I imagine this is the same for the third and so on). I’ll report back once I have my second child to account for any major changes between the hospital process and this time but the biggest takeaway is you never fully feel prepared for any pregnancy and labor but you learn to just go with your gut. That’s what I am following for the next several weeks until baby arrives so wish me luck! Hopefully by my sharing my experience this can help other expectant moms out there wanting to know what to expect. If anyone wants to report on their own pregnancies and how they compare/differ feel free to leave a comment below. Until next time!!!!
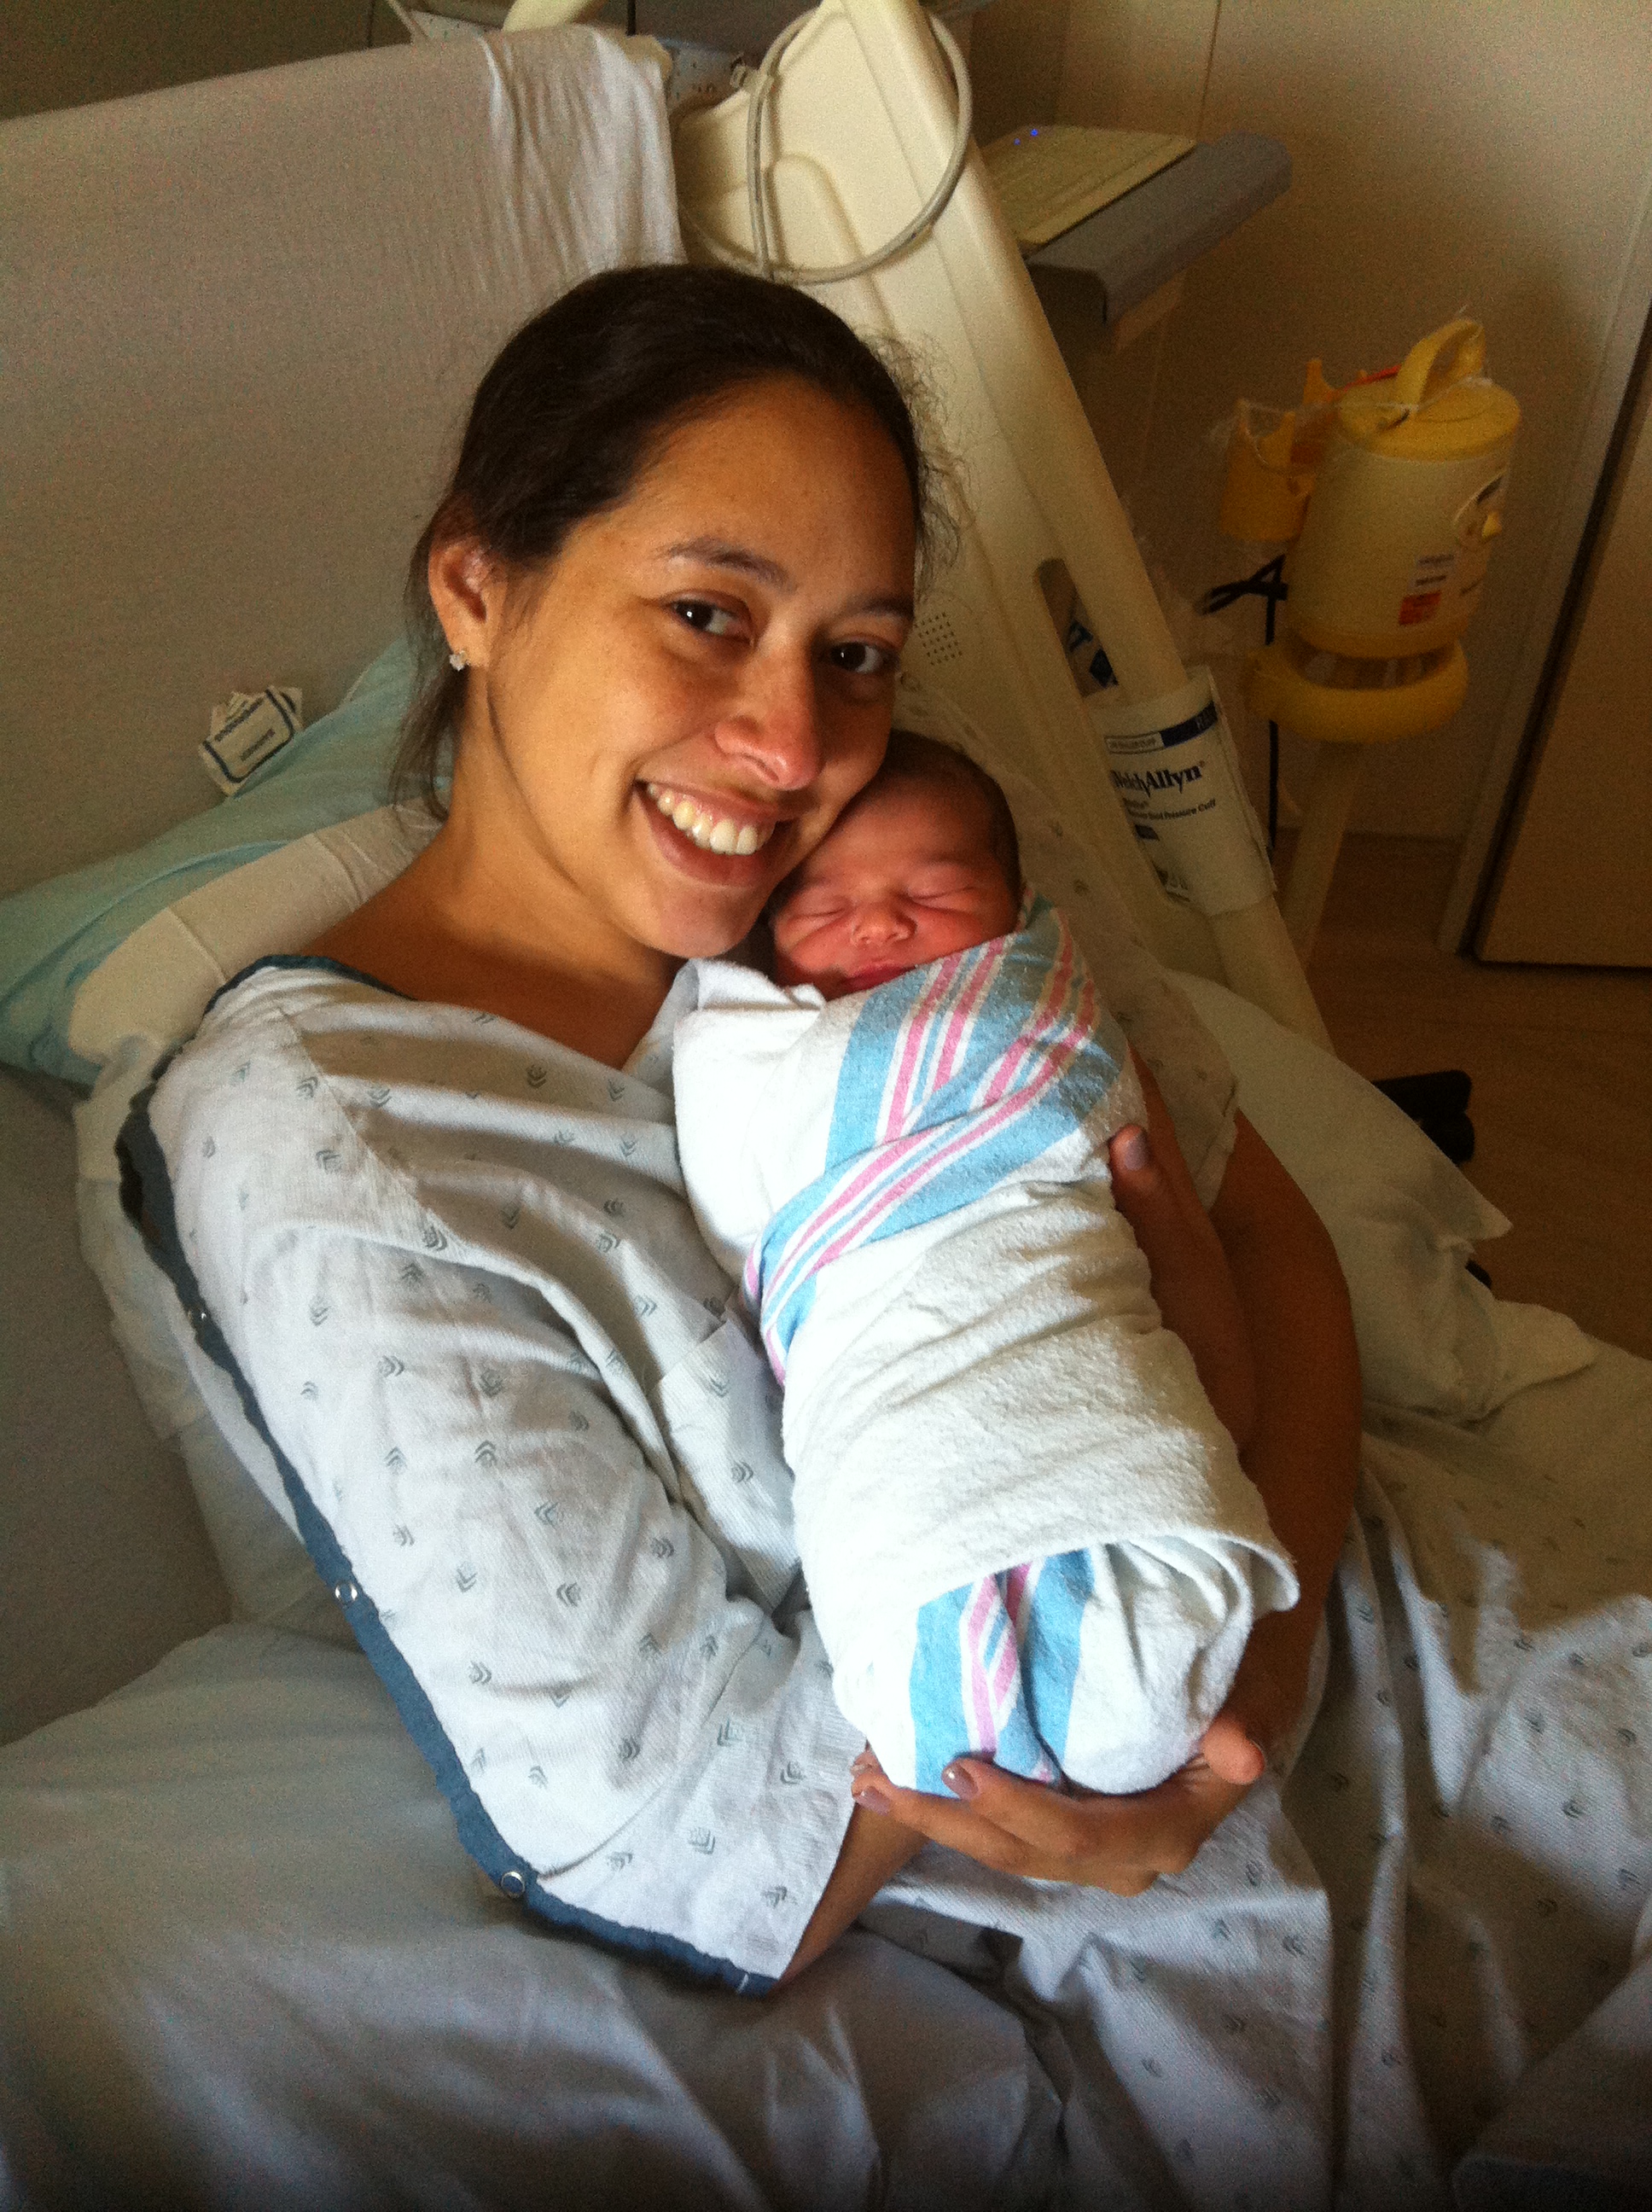
Me and my daughter after the birth process together
And now for Part 3 of 4 in my free registry bag series!!! I previously covered what came in my free registry bags that you pick up in-store after creating a baby registry at Target, Babies “R” Us and Buy Buy Baby so if you missed those two posts feel free to check them out here for Part One (all about the Target bag) and here for Part Two.
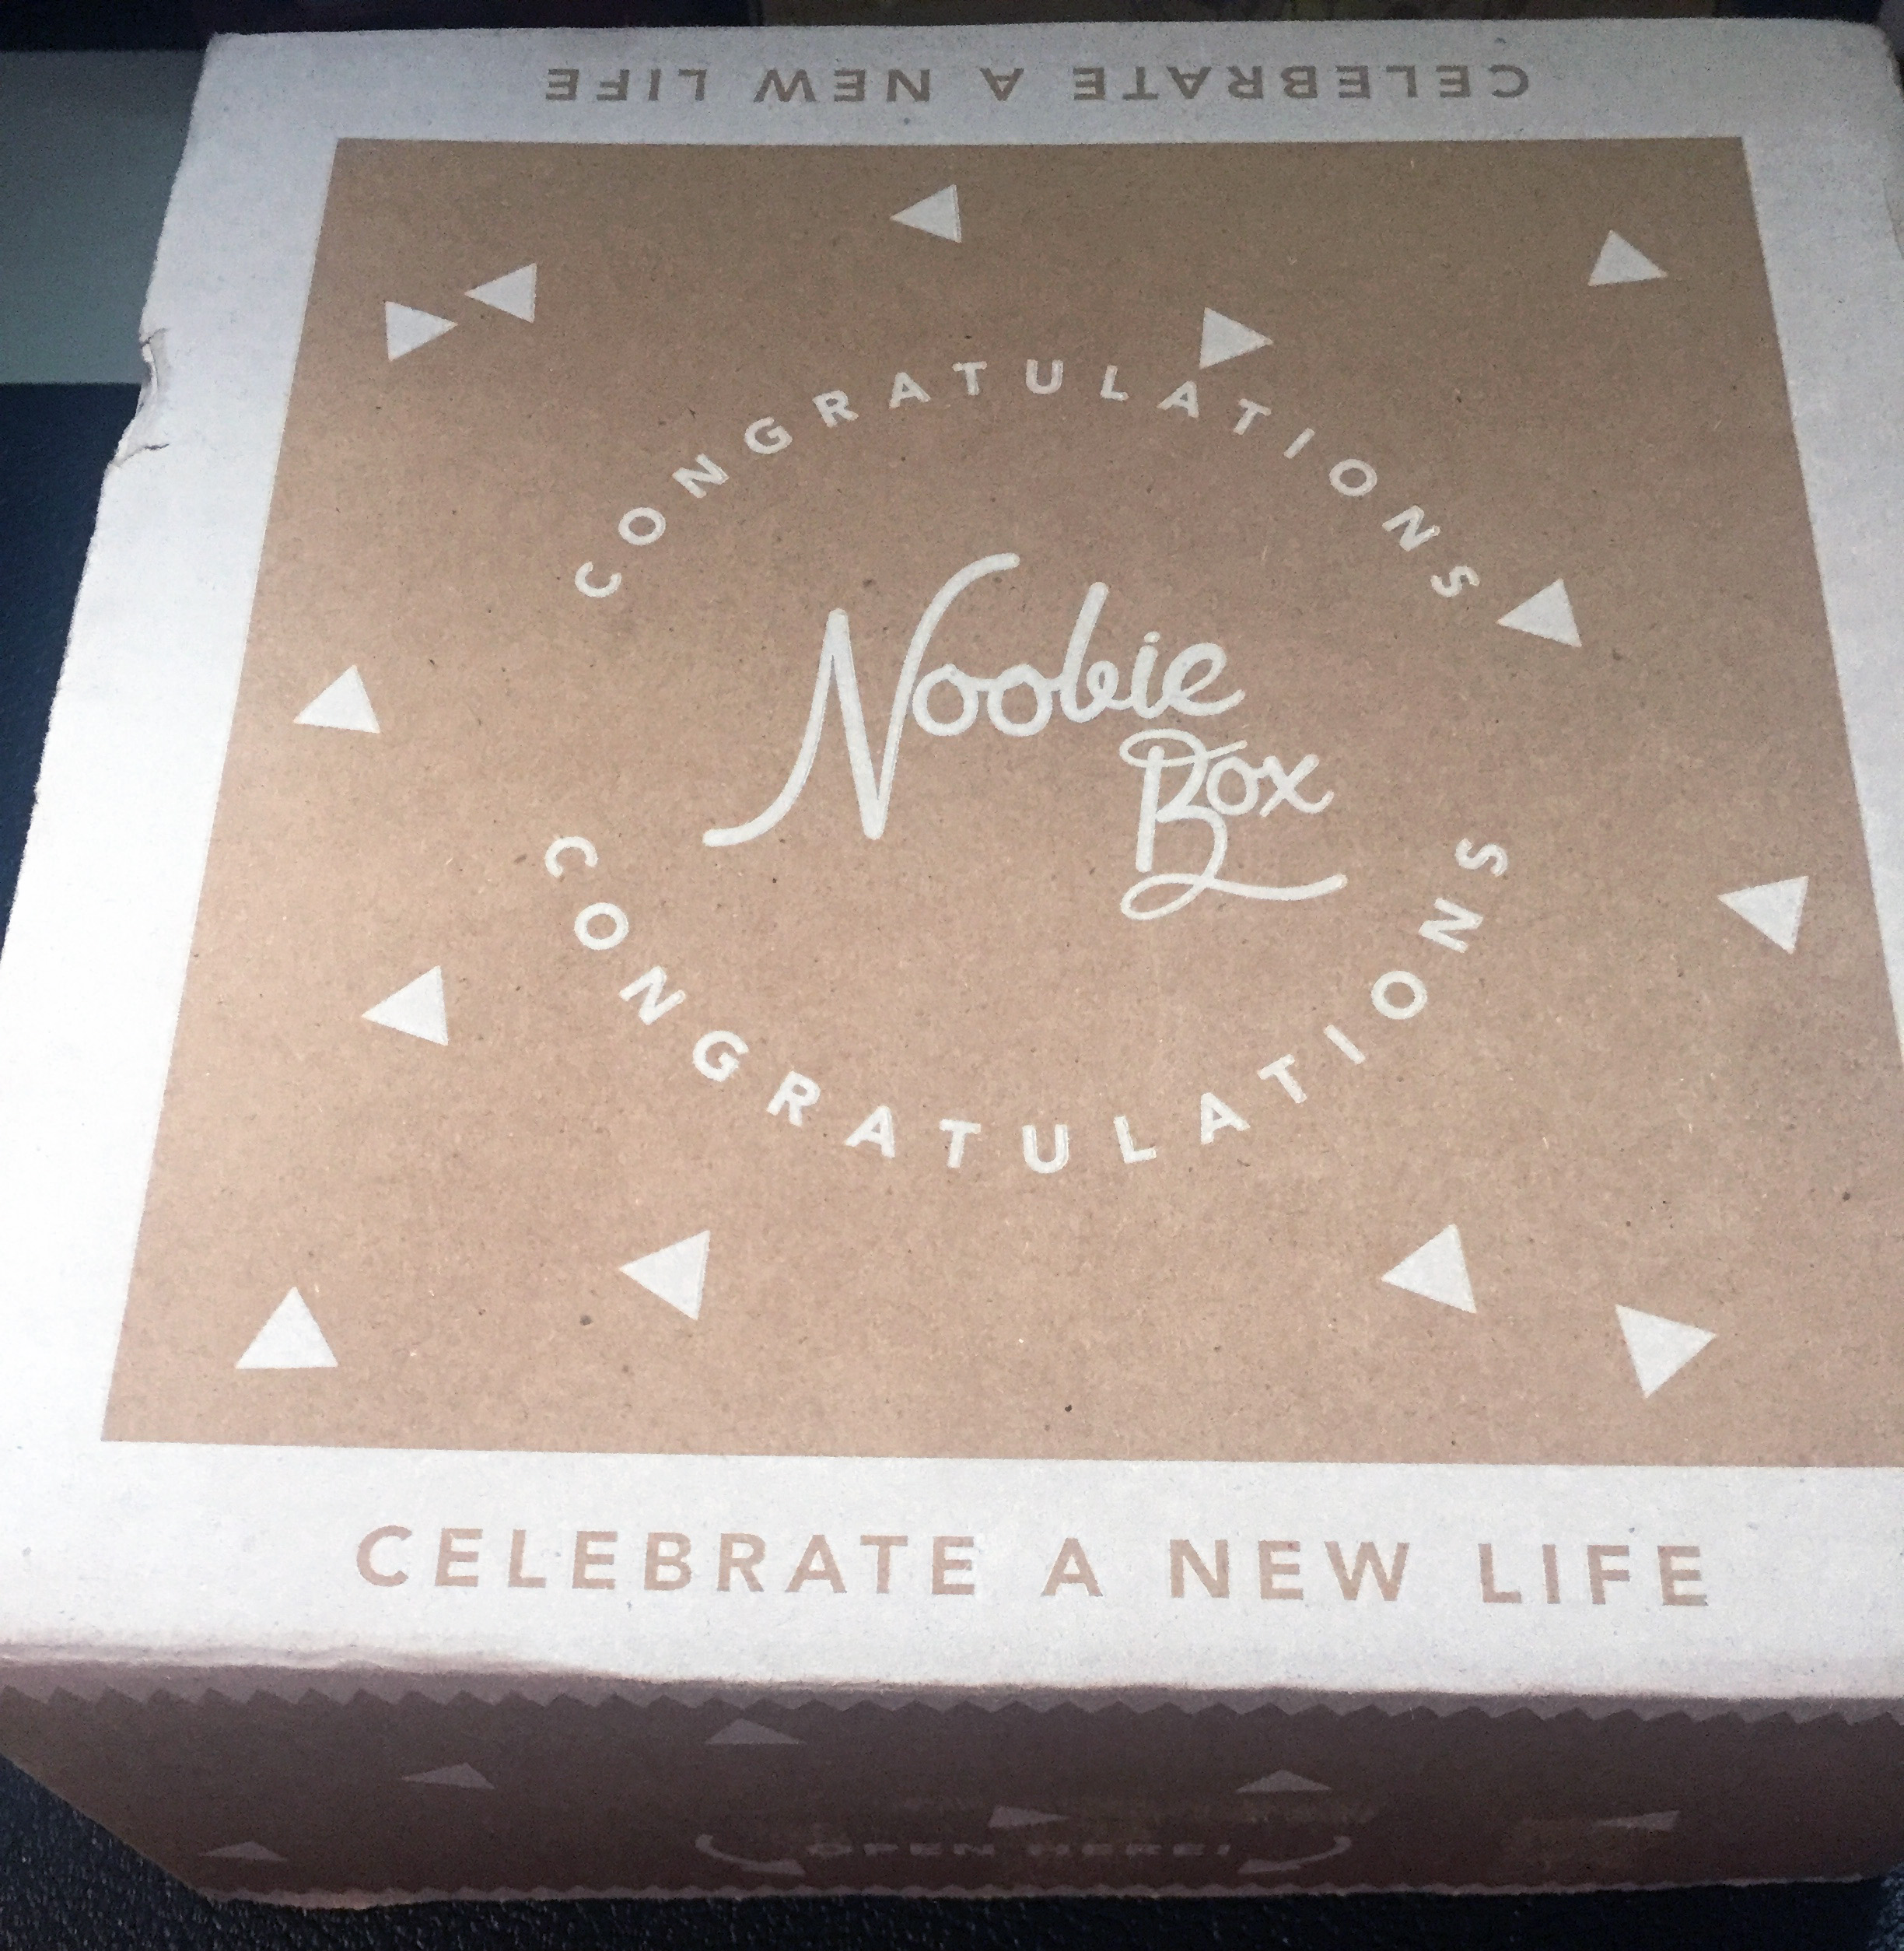
In this post I would like to cover what came in my free pregnancy gift box from a baby company called Noobie Box. This is actually a new(ish) company – formed around 2015 or so I believe – and was actually my FAVORITE box to receive of all the free baby items I have picked up so far this pregnancy, as it appears to be highly curated and came in probably the cutest packaging of all the boxes and/or bags I received (in my humble opinion). I received the free box back in September.
I first learned about the Noobie Box browsing through YouTube pregnancy videos and one mom had posted what contents came in her free pregnancy box. The video was posted probably six or seven months ago but the mom seemed thrilled with the items inside and I decided to look into it. Plus I saw the magic word – FREE!!!
Lo and behold, I visited their website and saw that their home page advertises their free pregnancy box upfront, suggesting that each box is filled with “high quality products, valuable coupons and important health information for both you and your baby.” The one-time box boasts a cute design and as the sample image on their website showed products I had yet to receive in any of my other registry bags, I wanted to give them a try. However, while their website suggests only one box will be sent per pregnancy, it also clearly states that this box can only be shipped to 12 states located in the Northeast. Oh no – I learned it’s a Northeast United States-only box!!!
I was bummed! I used to be a Northeast girl but have since moved out of their delivery area, and to receive this box in the mail, you have to live in either Connecticut, Washington DC, Delaware, Massachusetts, Maryland, Maine, New Hampshire, New Jersey, New York, Pennsylvania, Rhode Island or Vermont. My free box hopes definitely plummeted.
UPDATE AS OF JANUARY 2018: The company recently announced that they have gone national so now boxes are being shipped throughout the U.S. This is no longer a Northeast U.S. only-box. However at the time I wrote this post, it was still a Northeast only box so the following chronicles my experience and efforts in getting this free box shipped to me in a non-Northeast U.S. state.
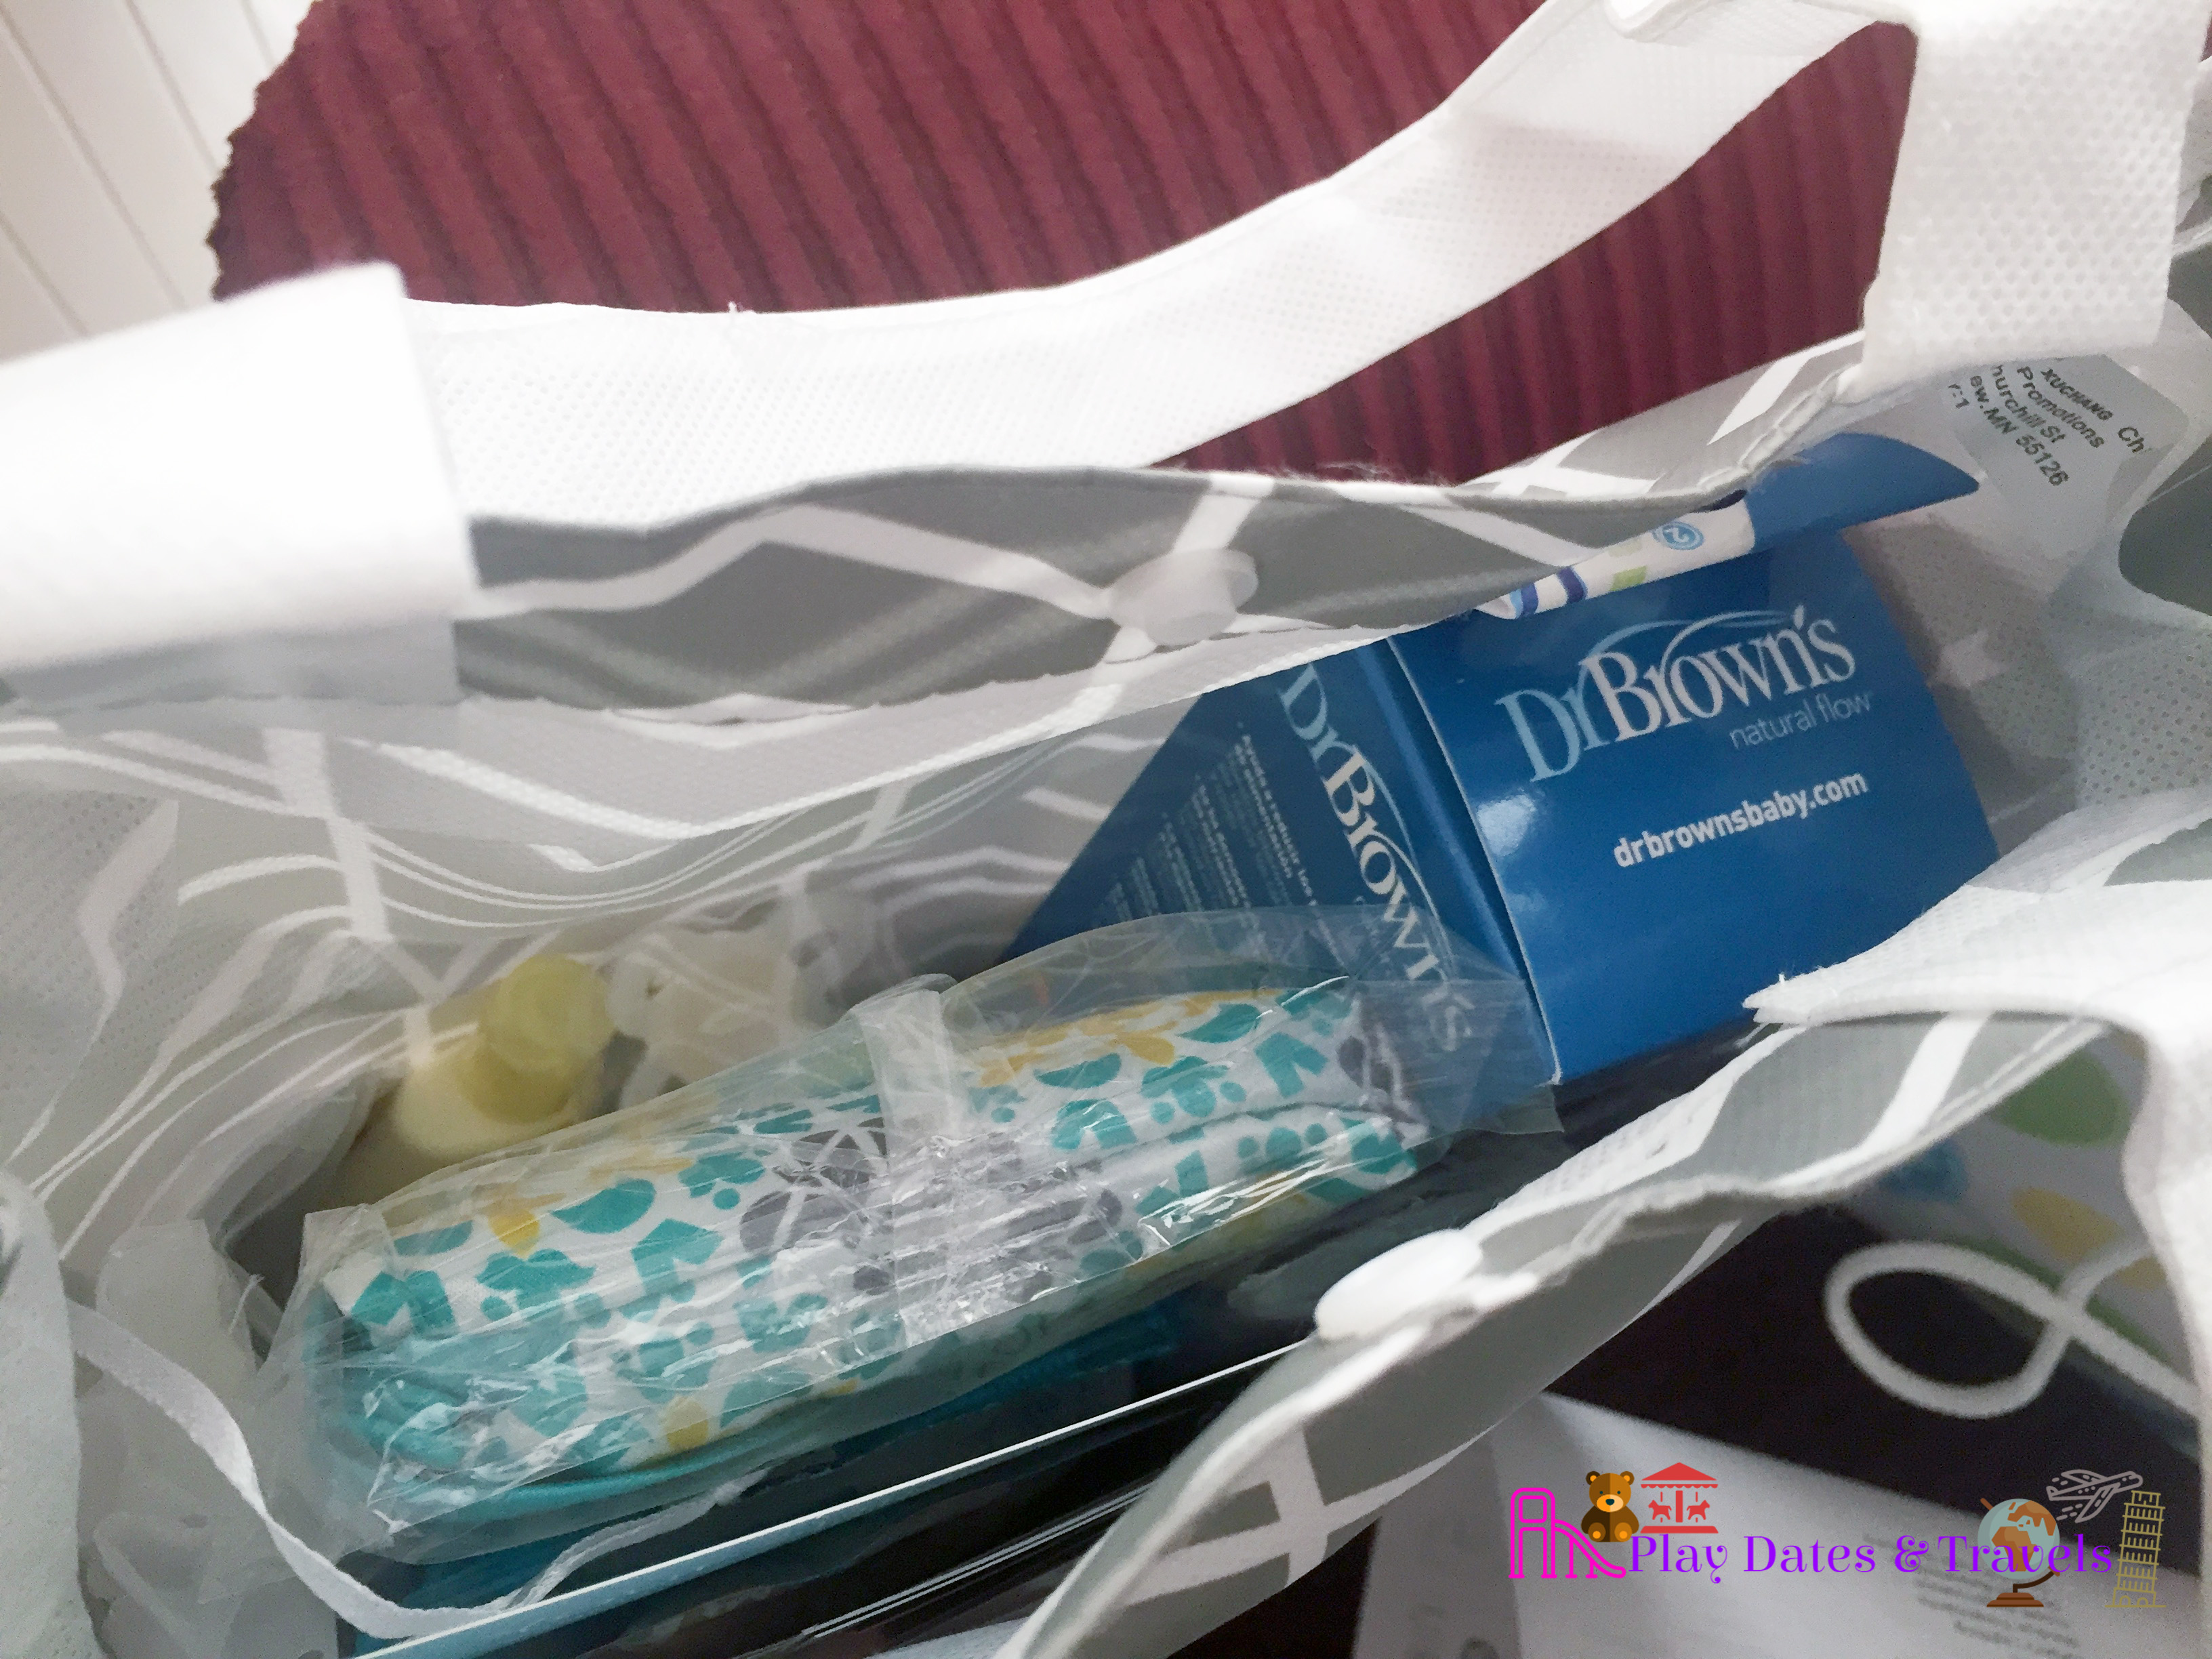
The free pregnancy box from Noobie Box
What attracted me to the box, besides its cute packaging and the seemingly custom curated items included in the sample photo on their website, was the offer of fast and efficient shipping. Their website states the item ships within two business days, which is even faster than my Amazon box arrived – more on that in a future post. So if you’re like me, and like to receive items quickly in the mail, this box definitely sounded promising. [Note: I also signed up to receive a free pregnancy welcome box from Walmart back in early September, which is advertised on their baby registry home page, but have still yet to receive it and when I reached out to their customer service I was told that the Walmart Box is only available while supplies last and they are currently “sold out of this free promotion” for the next few months…why they keep the free Welcome Box offer advertised on their website is another story but at any point, with less than six weeks remaining before baby arrives, I don’t think I will be receiving the free Walmart Welcome Box anytime soon).
If you don’t live in Noobie Box’s delivery area, they still encourage moms to sign up for their email list to receive their newsletter and offers from brand partners. That wasn’t going to cut it for me though so I thought about what friends and family I had who still lived in one of the eligible states and reached out to my sister who actually loves going to the post office and arranged for her to receive my free box and then ship it right back to me! She probably thought I was a little nuts but did oblige. So while the box did ship out in 2 days as promised I received it in about five, allotting for the extra transit time for my sister to take it to her local post office and ship the box across the country.
I actually uploaded a video of my unboxing of the Noobie Box on YouTube so if you’d like to check that out first view the link below.
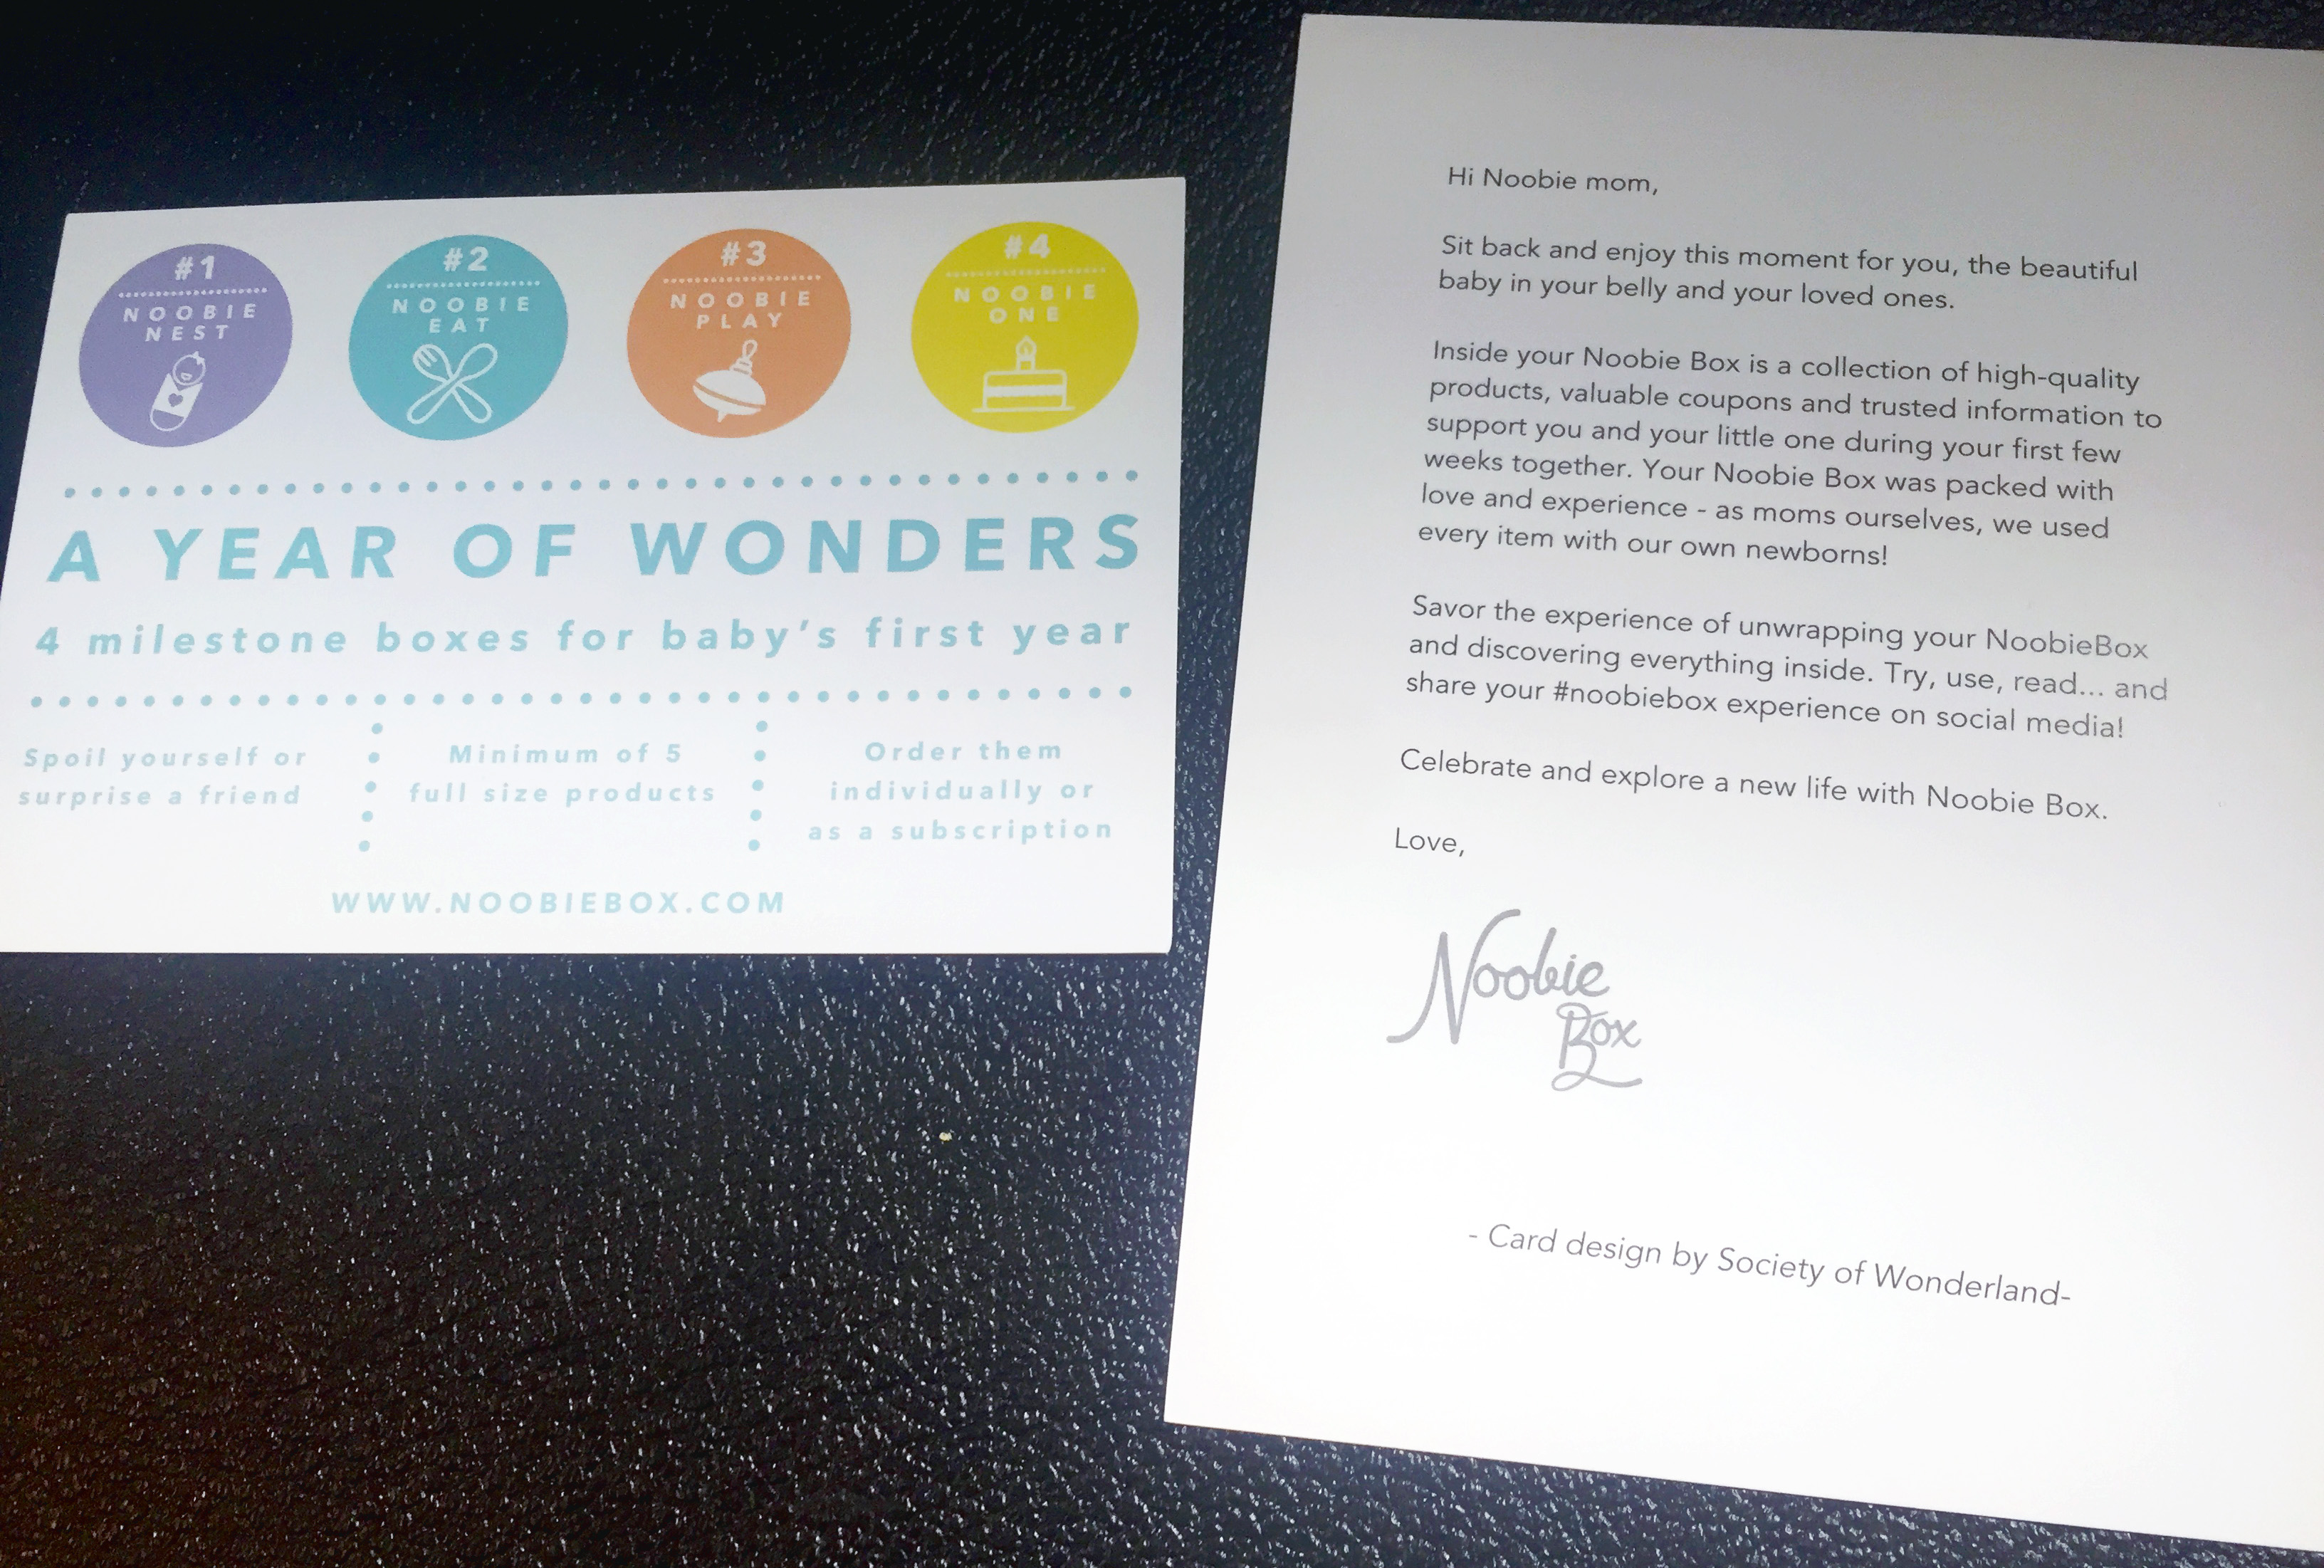
While the Noobie “Free Pregnancy Box” is free, you do still have to pay $6.95 for shipping. The company appears to have been founded by three European women who now live in New York City and wanted to create a mommy box in the style that is popular in Europe where new moms receive items in a specialized baby box to help transition them into motherhood. They also offer four other paid options, their “milestone boxes,” which come with five full-size products apiece that are targeted around a specific theme and stage of your newborn’s life including the Noobie Nest box for babies that are age 0 to 3 months and includes items designated to help you adjust to a sleepless schedule, the Noobie Eat box for babies 4 to 6 months with products included to help get your baby started on solid foods, the Noobie Play box for once your baby hits 7 months old and is most interested in engaging with his senses and finally the Noobie One box for ages 10 months and up, designed to help a baby prepare for important celebratory milestones such as first time rolling over, first steps, first tooth etc. as they approach the one year mark. Those boxes cost $24.95 each and ship within two weeks, though there is also an option to subscribe to a full year of boxes at once from Noobie Box for $99.75 and receive a free tote bag.
However, while they do offer these larger and more expensive boxes, the company allows you to make the decision whether to sign up for their other boxes or not so I simply stuck with their free pregnancy box. Since signing up and placing my order, I have only received one email offer to date so it is nice that they are considerate about spamming their customers (plus, the offer I received was actually useful with a 40% discount and additional 20% online discount toward clothing from Carter’s).
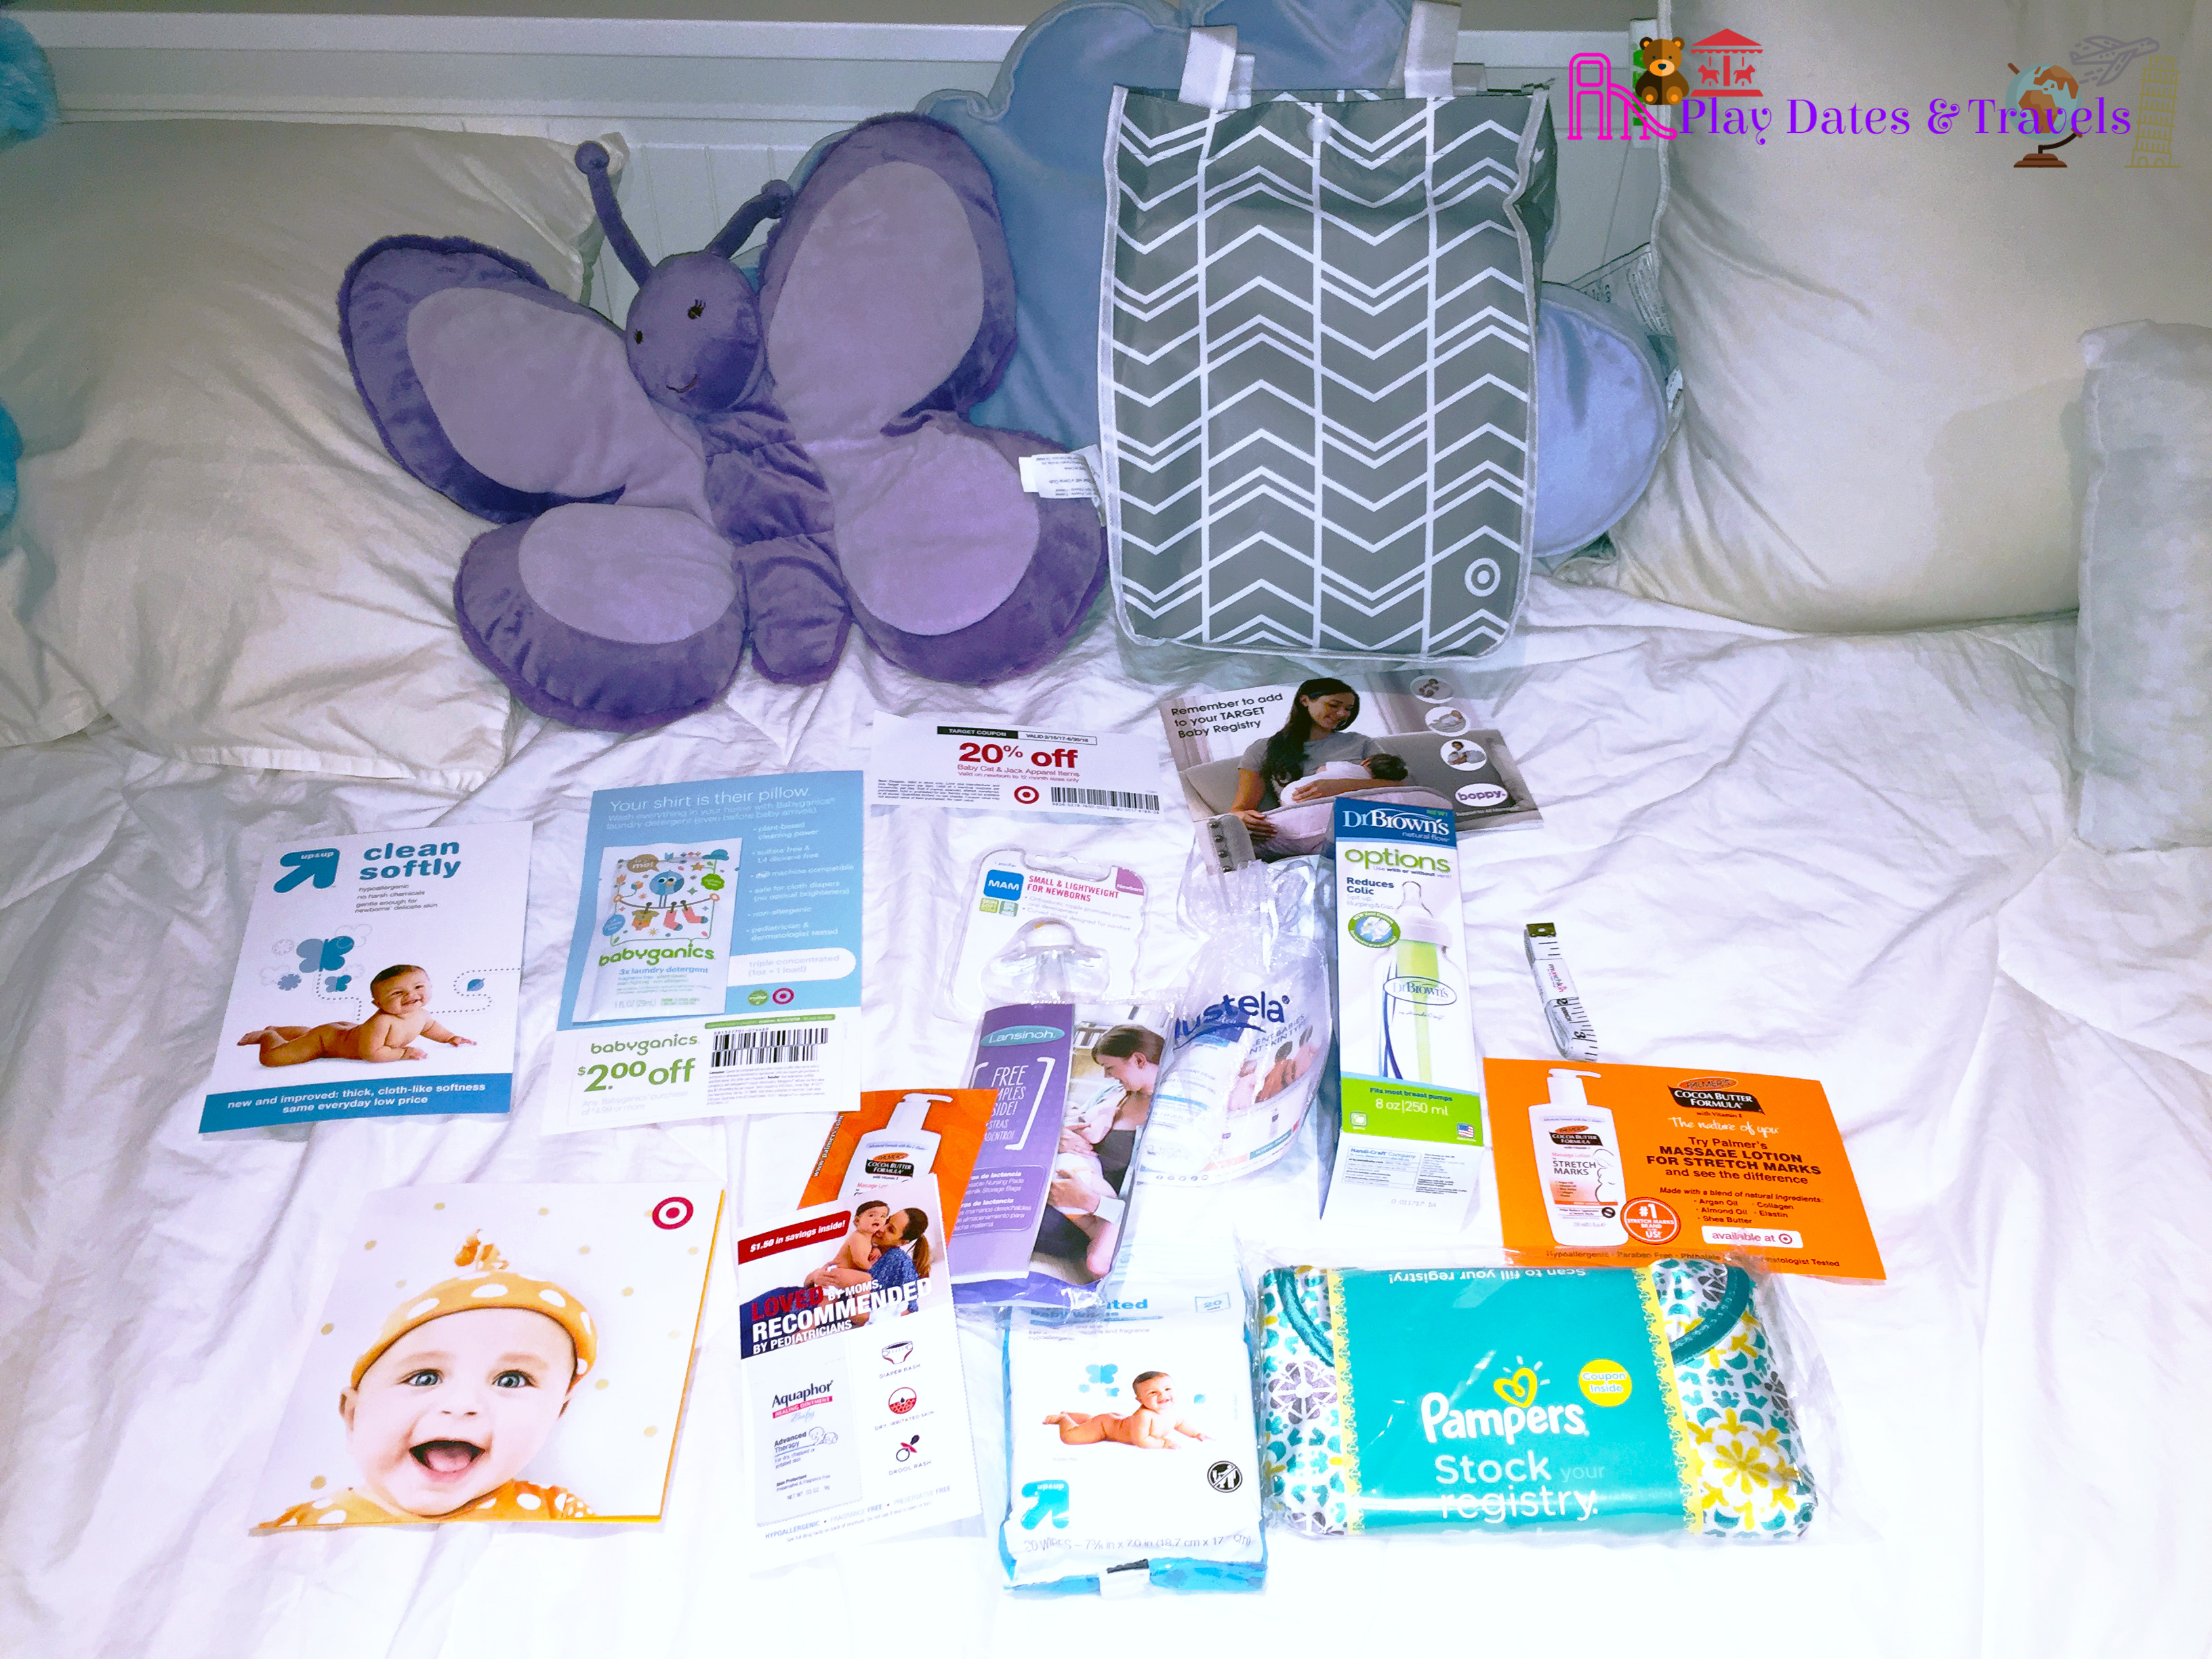
What Came in My Free Pregnancy Noobie Box:
Welcome card announcing Noobie’s other boxes as well as the welcome letter sent to moms-to-be
A welcome card describing the 4 other milestone boxes available from Noobie Box
A welcome letter that suggests the box’s contents were curated by the owners and each item was used with their own newborns (honestly I loved this personal touch as it showed a level of thought and consideration goes into each box)
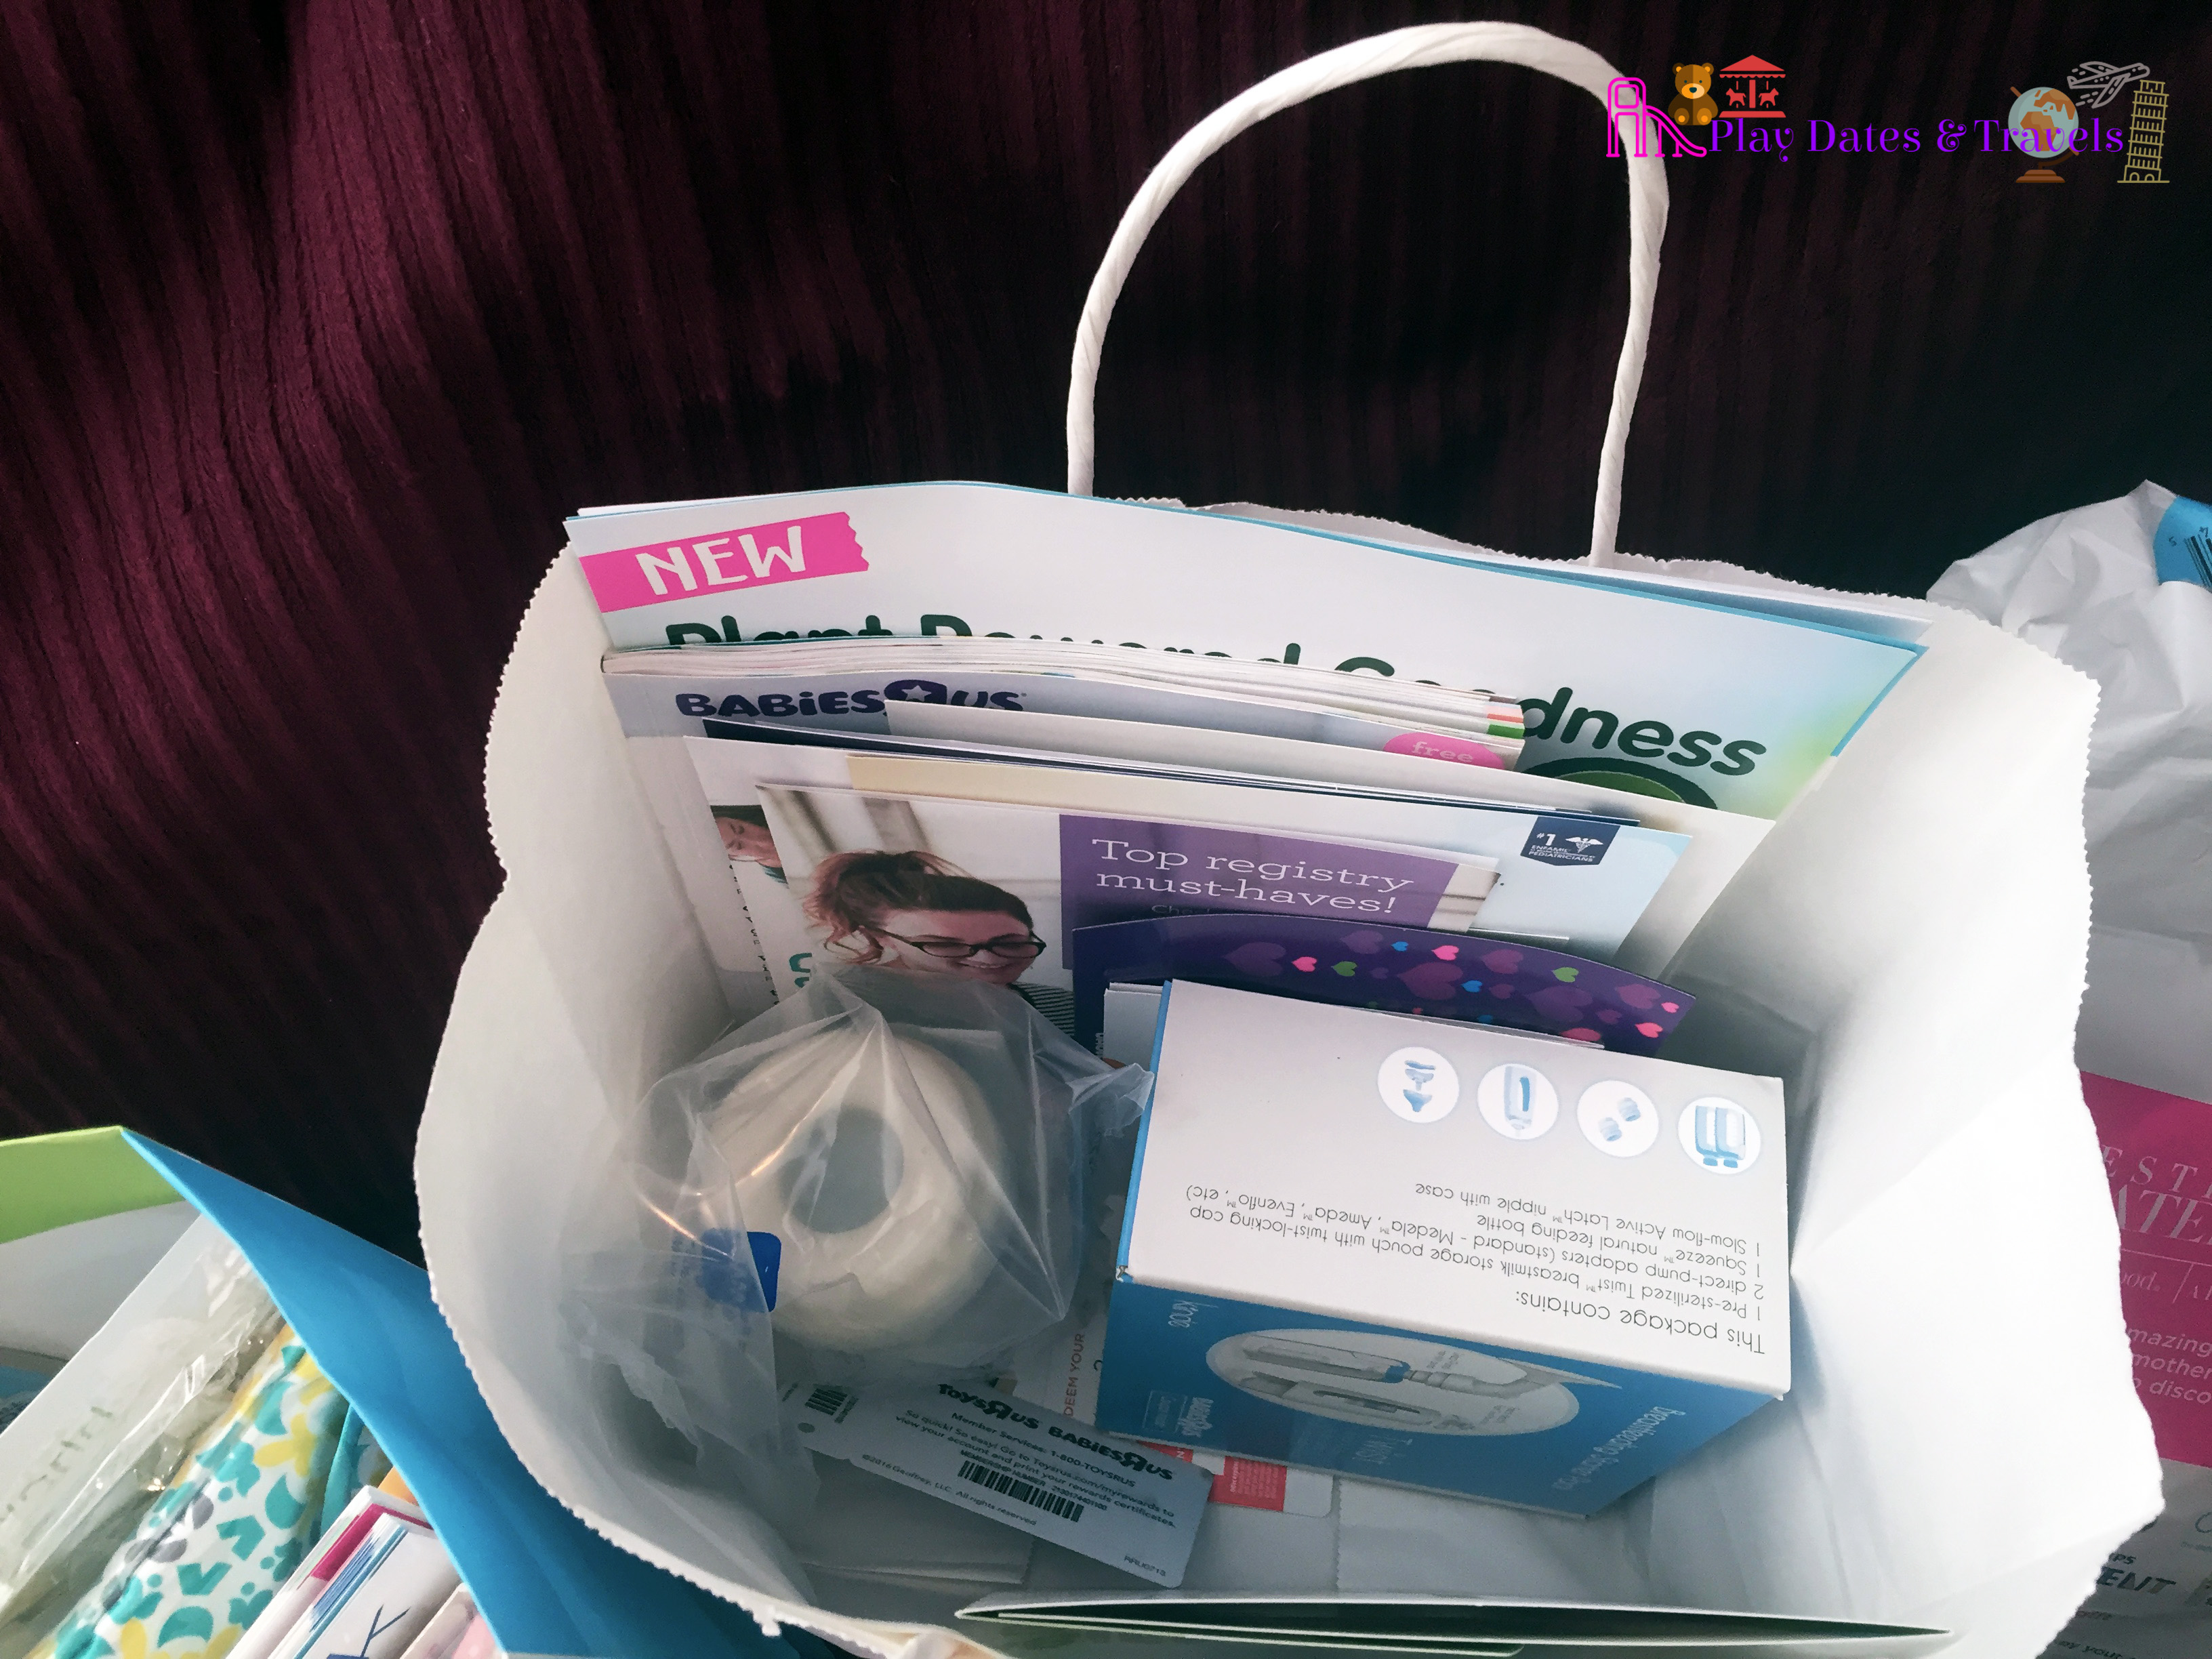
Personalized prenatal vitamins from a company called Care/of
a sample pack of 10 chemical-free wipes from WaterWipes, a brand I had never tried but had seen before
Month milestone cards from Chatbooks, a photo book company, to document each month of your newborn’s life for the first 12 months
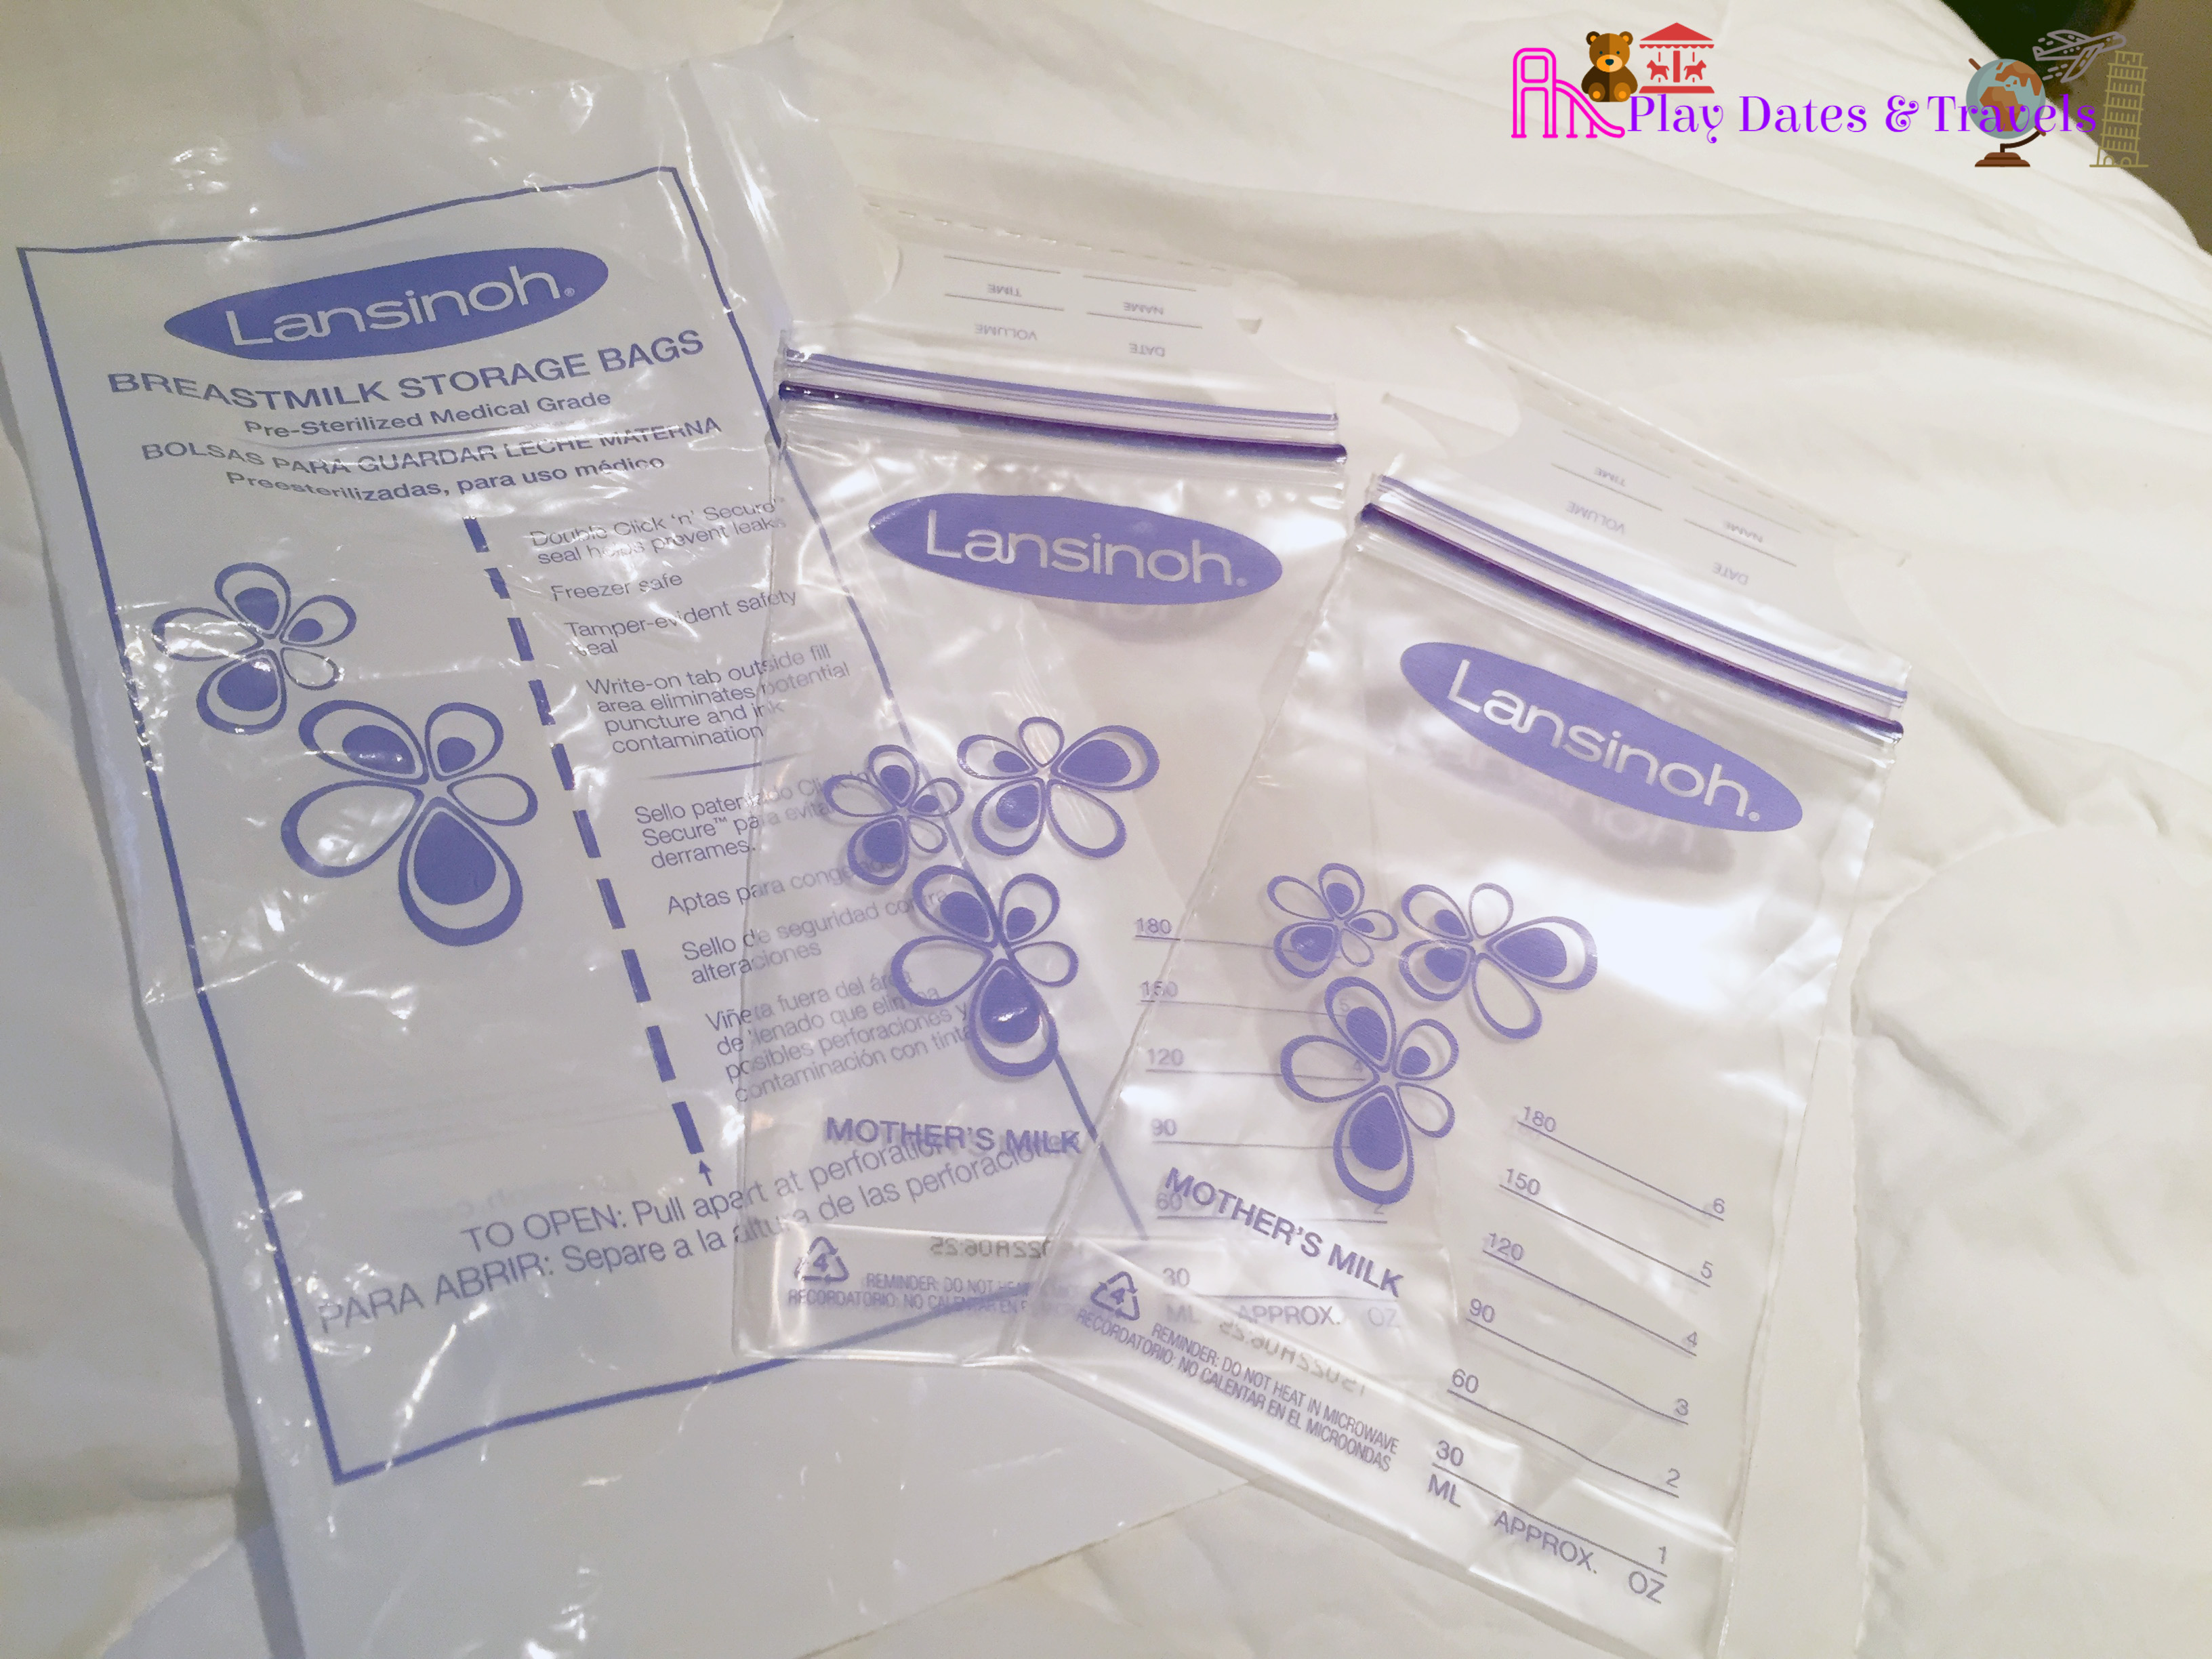
a sample pack from Lansinoh with 2 disposable nursing pads and 2 breast milk storage bags
one Mam anti-colic bottle
And a long-sleeve, warm and fuzzy footed onesie from Carter’s that included a cute gender neutral design with an owl, fox and elephant on the front with snaps along the baby’s legs and was good for 3 months and up — this was the reason I wanted this box so badly as I had seen another reviewer online specify that her box included a onesie (though her design was different for a warmer season) and I loved the idea of receiving a cute baby onesie in the mail as no other registry bag/free box does this!!! This was actually the first baby onesie I received or purchased for my newly anticipated baby so this was a real treat – who doesn’t like looking at small baby onesies?! They’re so cute.
Products received in my Noobie Box
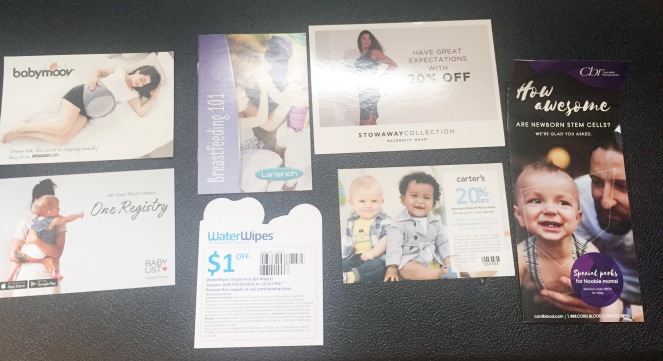
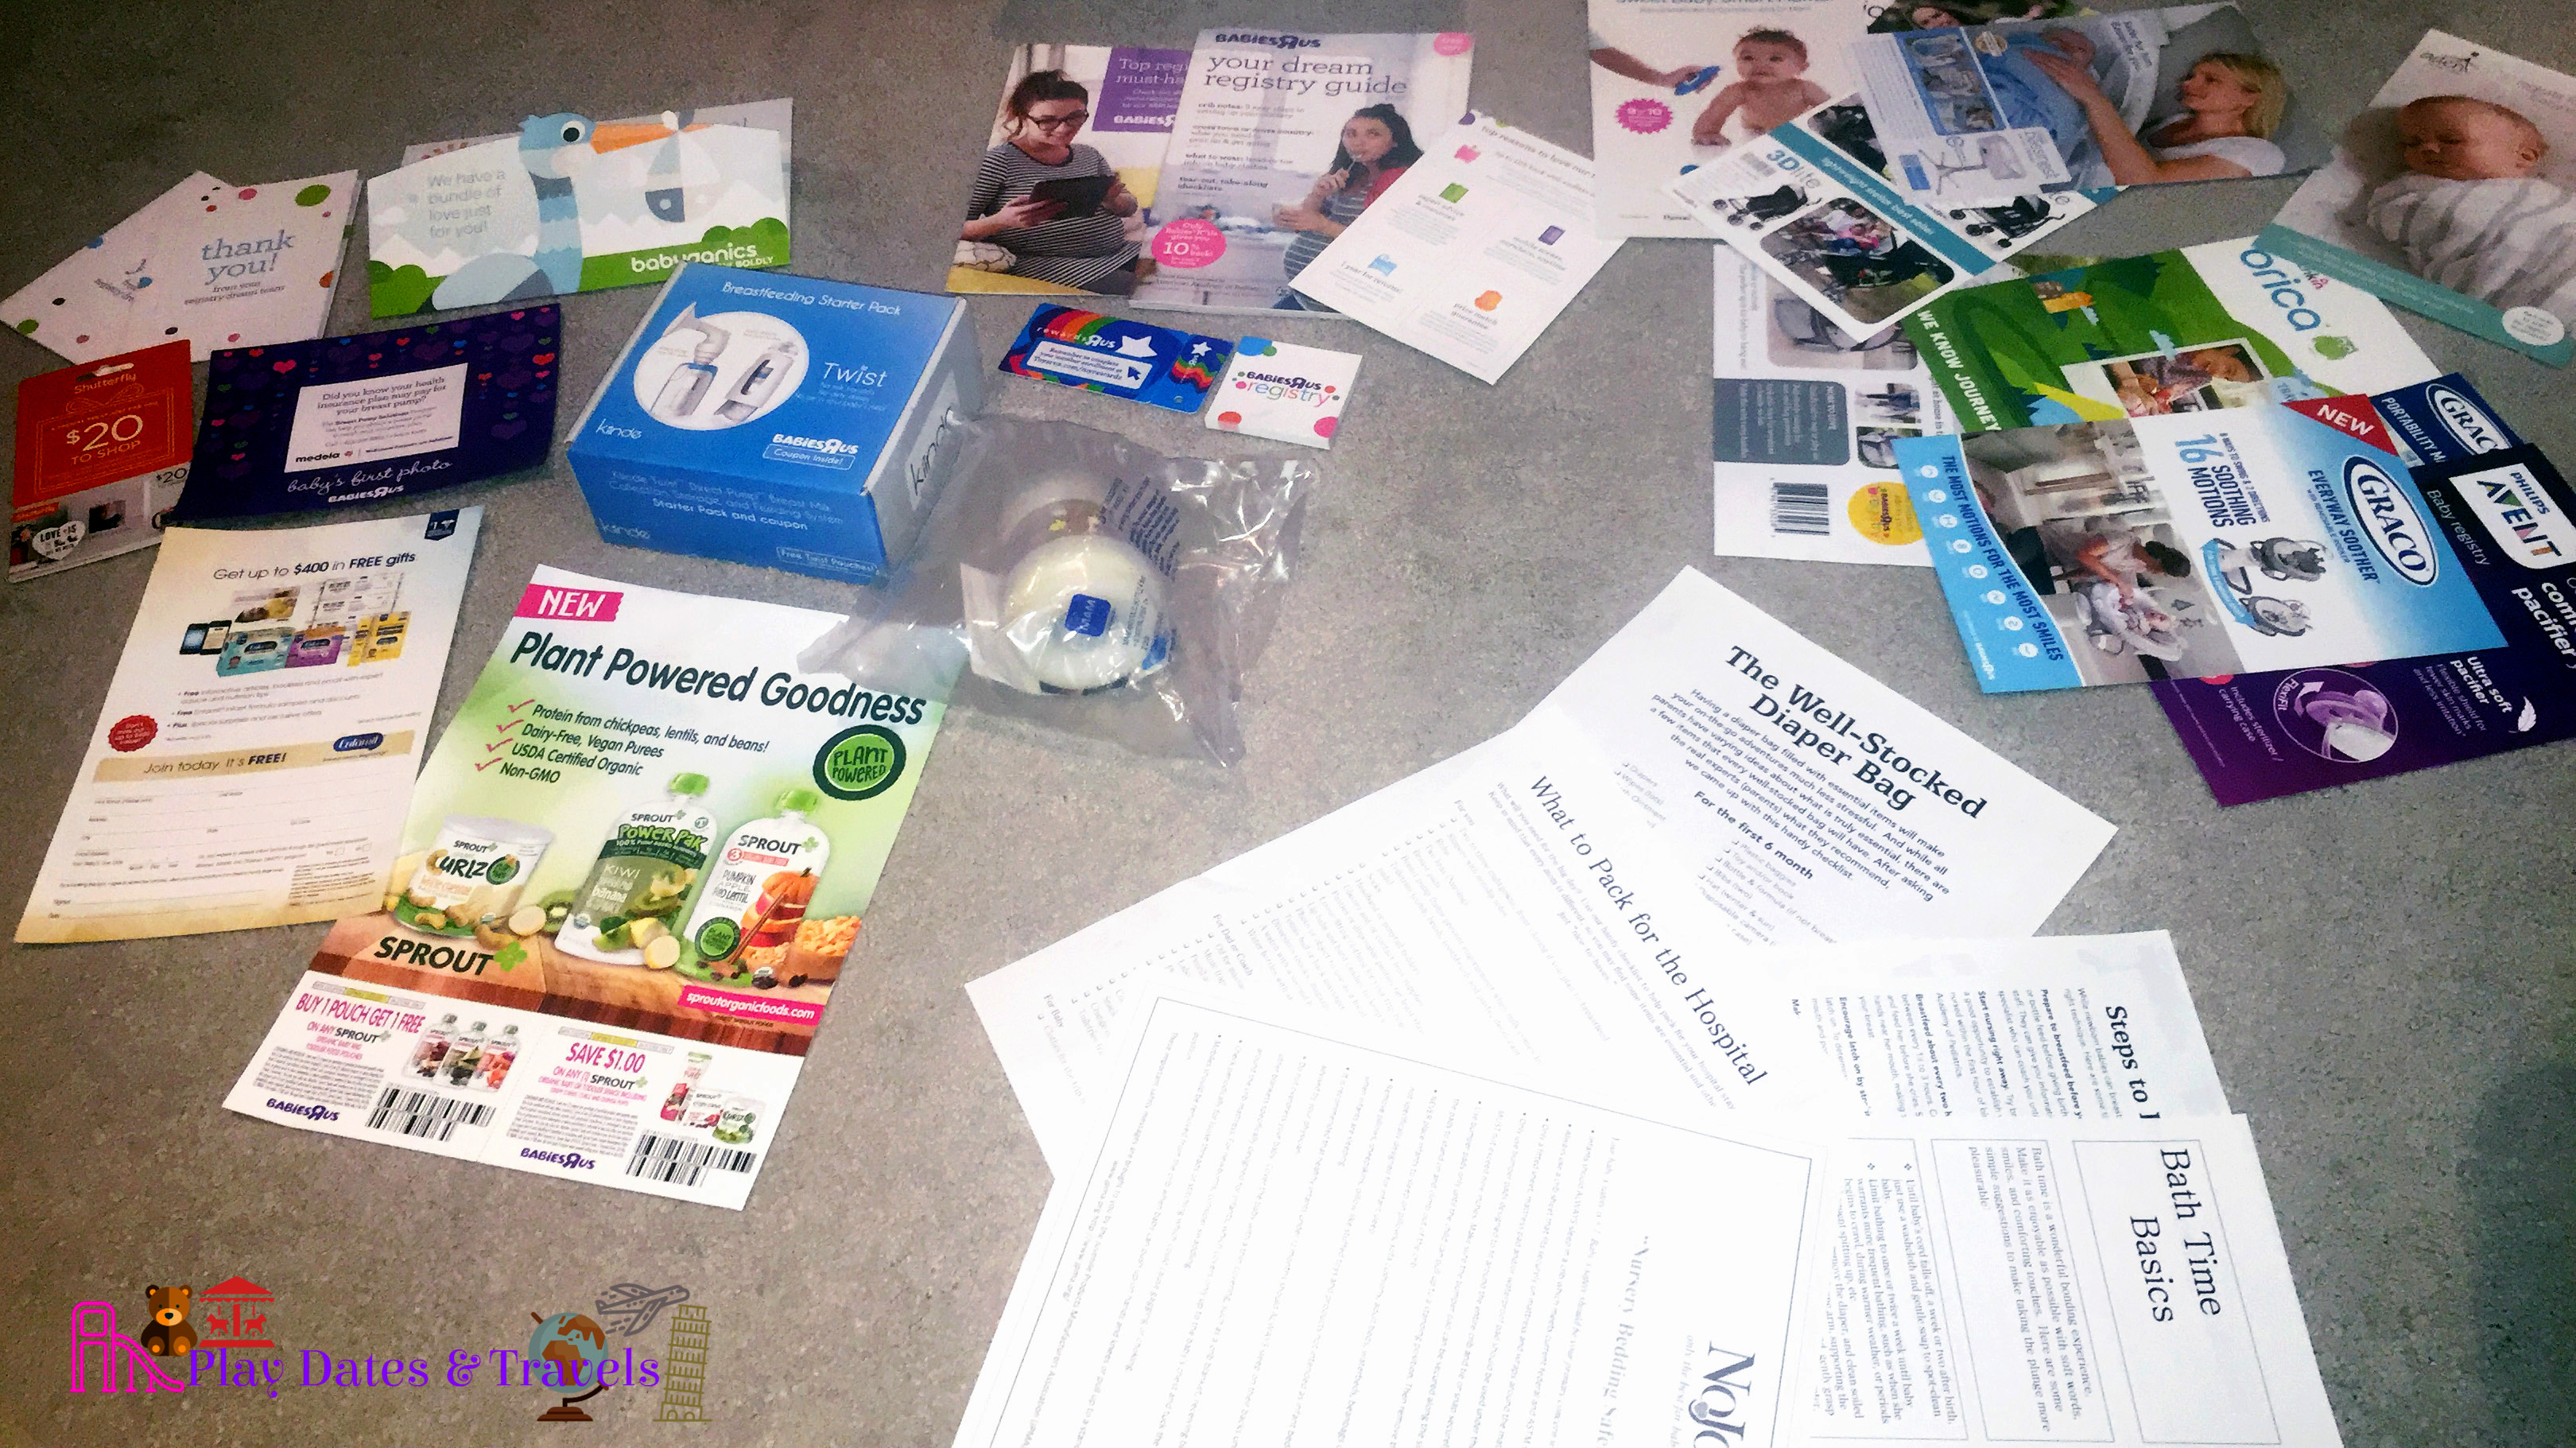
The Noobie Box I received also included a number of curated offers and coupons including an ad to create a universal registry with Babylist.com (which also gives users a 10% completion discount as a perk of registering with them), a guide on how to breastfeed from Lansinoh complete with tips, an ad for a babymoov Dream Belt pregnancy pillow to assist mothers-to-be with sleeping more comfortably, a coupon for $1 off a future WaterWipes purchase good from now until the end of this year, a 20% coupon from Carter’s to go along with the free onesie included in the box, a pamphlet on newborn stem cell storage from Cord Blood Registry and a 20% coupon off maternity wear from Stowaway Collection, another Noobie Box partner.
Ads and coupons
VERDICT: Many of these brands, besides the more mainstream ones like Cord Blood Registry, Babylist.com and Lansinoh, I was unfamiliar with so it was nice to receive some new and different products in the mail that I may have previously been unaware of. I thoroughly enjoyed what came in the box and for any moms-to-be who are located in one of their 12 designated states – or are like me and love receiving baby products and have someone they know who lives in one of the specified areas who is willing to ship the box to you – I definitely recommend receiving this free pregnancy box as the shipping at just $6.95 is fairly nominal and you do receive a good bang for your buck given the onesie included alone. (Hopefully they don’t change that offer in the future as it brings such a nice touch to this expectant mother box.)
Let me know in the comments if you would have gone through hoops like I did to receive this box and/or if there are other companies that offer something similar. Also stay tuned for the final part of this free registry bag/free pregnancy box series that will conclude with the items I received in my Destination Maternity in-store bag as well as my free welcome box for Prime members from Amazon.
UPDATED OCTOBER 12, 2017: Mickey To Your Door sent me a replacement box in the mail to make up for the one item arriving broken in my Tink box. Check out what new Disney contents I received in my make-up box in this new video upload below.
ORIGINAL POST:
The last few posts have focused on registry bags and while I do plan to continue that series and show what came in a few more “free boxes” for pregnant women, I wanted to switch gears today and focus on another phenomenon altogether: Disney subscription boxes! It recently came to my attention that there are companies that will personally shop for you at either Disney World in Florida or Disneyland in California and send items to subscribers on a monthly or bi-monthly basis. Disney has at least SIX official collectible subscriptions that I’ve found ranging from a “Disney princess”-themed box aimed at young children sold by Pley to Disney Park Packs sold on Shop Disney (formerly DisneyStore.com) which contain coin and pin collections with handpicked items from the parks as well as a new tsum tsum and/or ornament subscription service, a Funko collectibles subscription called the Disney Treasures Box and even the Countdown to Fun box, a one-time box sold on both Shop Disney and and the Shop Disney Parks app filled with six surprise boxes to countdown the time before your next Disney World vacation. Phew-ee! And THAT is only the OFFICIAL Disney subscription services that are currently available.
There’s also an official Star Wars collectibles plan for Star Wars lovers, two officially licensed Marvel products plans and at least 12 different companies I have found as of this writing which are unofficial Disney Parks subscription services that specialize in providing mystery boxes each month containing either items directly purchased from the parks or selected from Disney licensed merchants. I am working on a comparison post outlining the benefits of each of these different companies but to kick this off, I recently subscribed to one of the unofficial plans called Mickey To Your Door.
From what I’ve gathered, Mickey To Your Door (not to be confused with Magic at Your Door, another unofficial subscription service) is one of the newer and perhaps lesser known companies judging by the lack of YouTube videos dedicated to its unboxing of products. However, they are one of the few companies that pretty much guarantee you will receive at least 100% of the value of the box you are paying for and which also specializes in products handpicked directly from Walt Disney World (so you are guaranteed mostly all theme park products!). Some other subscription services state that their boxes contain a mix of theme park products and officially licensed items with a promise of just one or two items from Disney Parks, which honestly means you could get something sold at Target or even Dollar Tree as long as it an “officially licensed” Disney item and they would count that toward your product total. I was not interested in receiving licensed products I could potentially find easily on my own so specifically looked into which services would provide those hard-to-ship items shopped directly from the theme parks…and that is when Mickey To Your Door entered my radar.
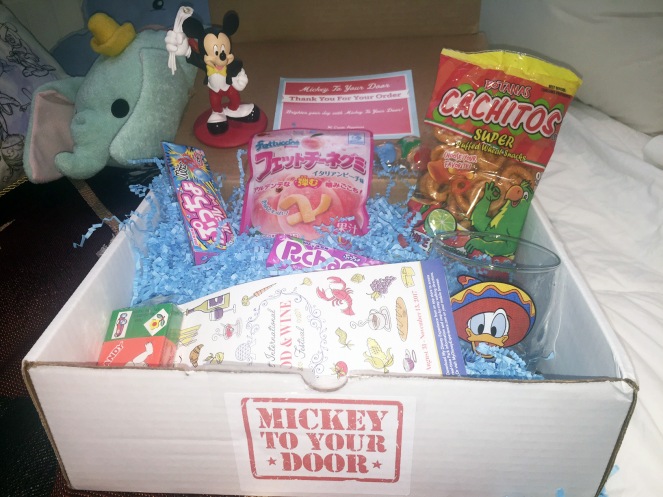
Boxes from Mickey To Your Door Received October 2017
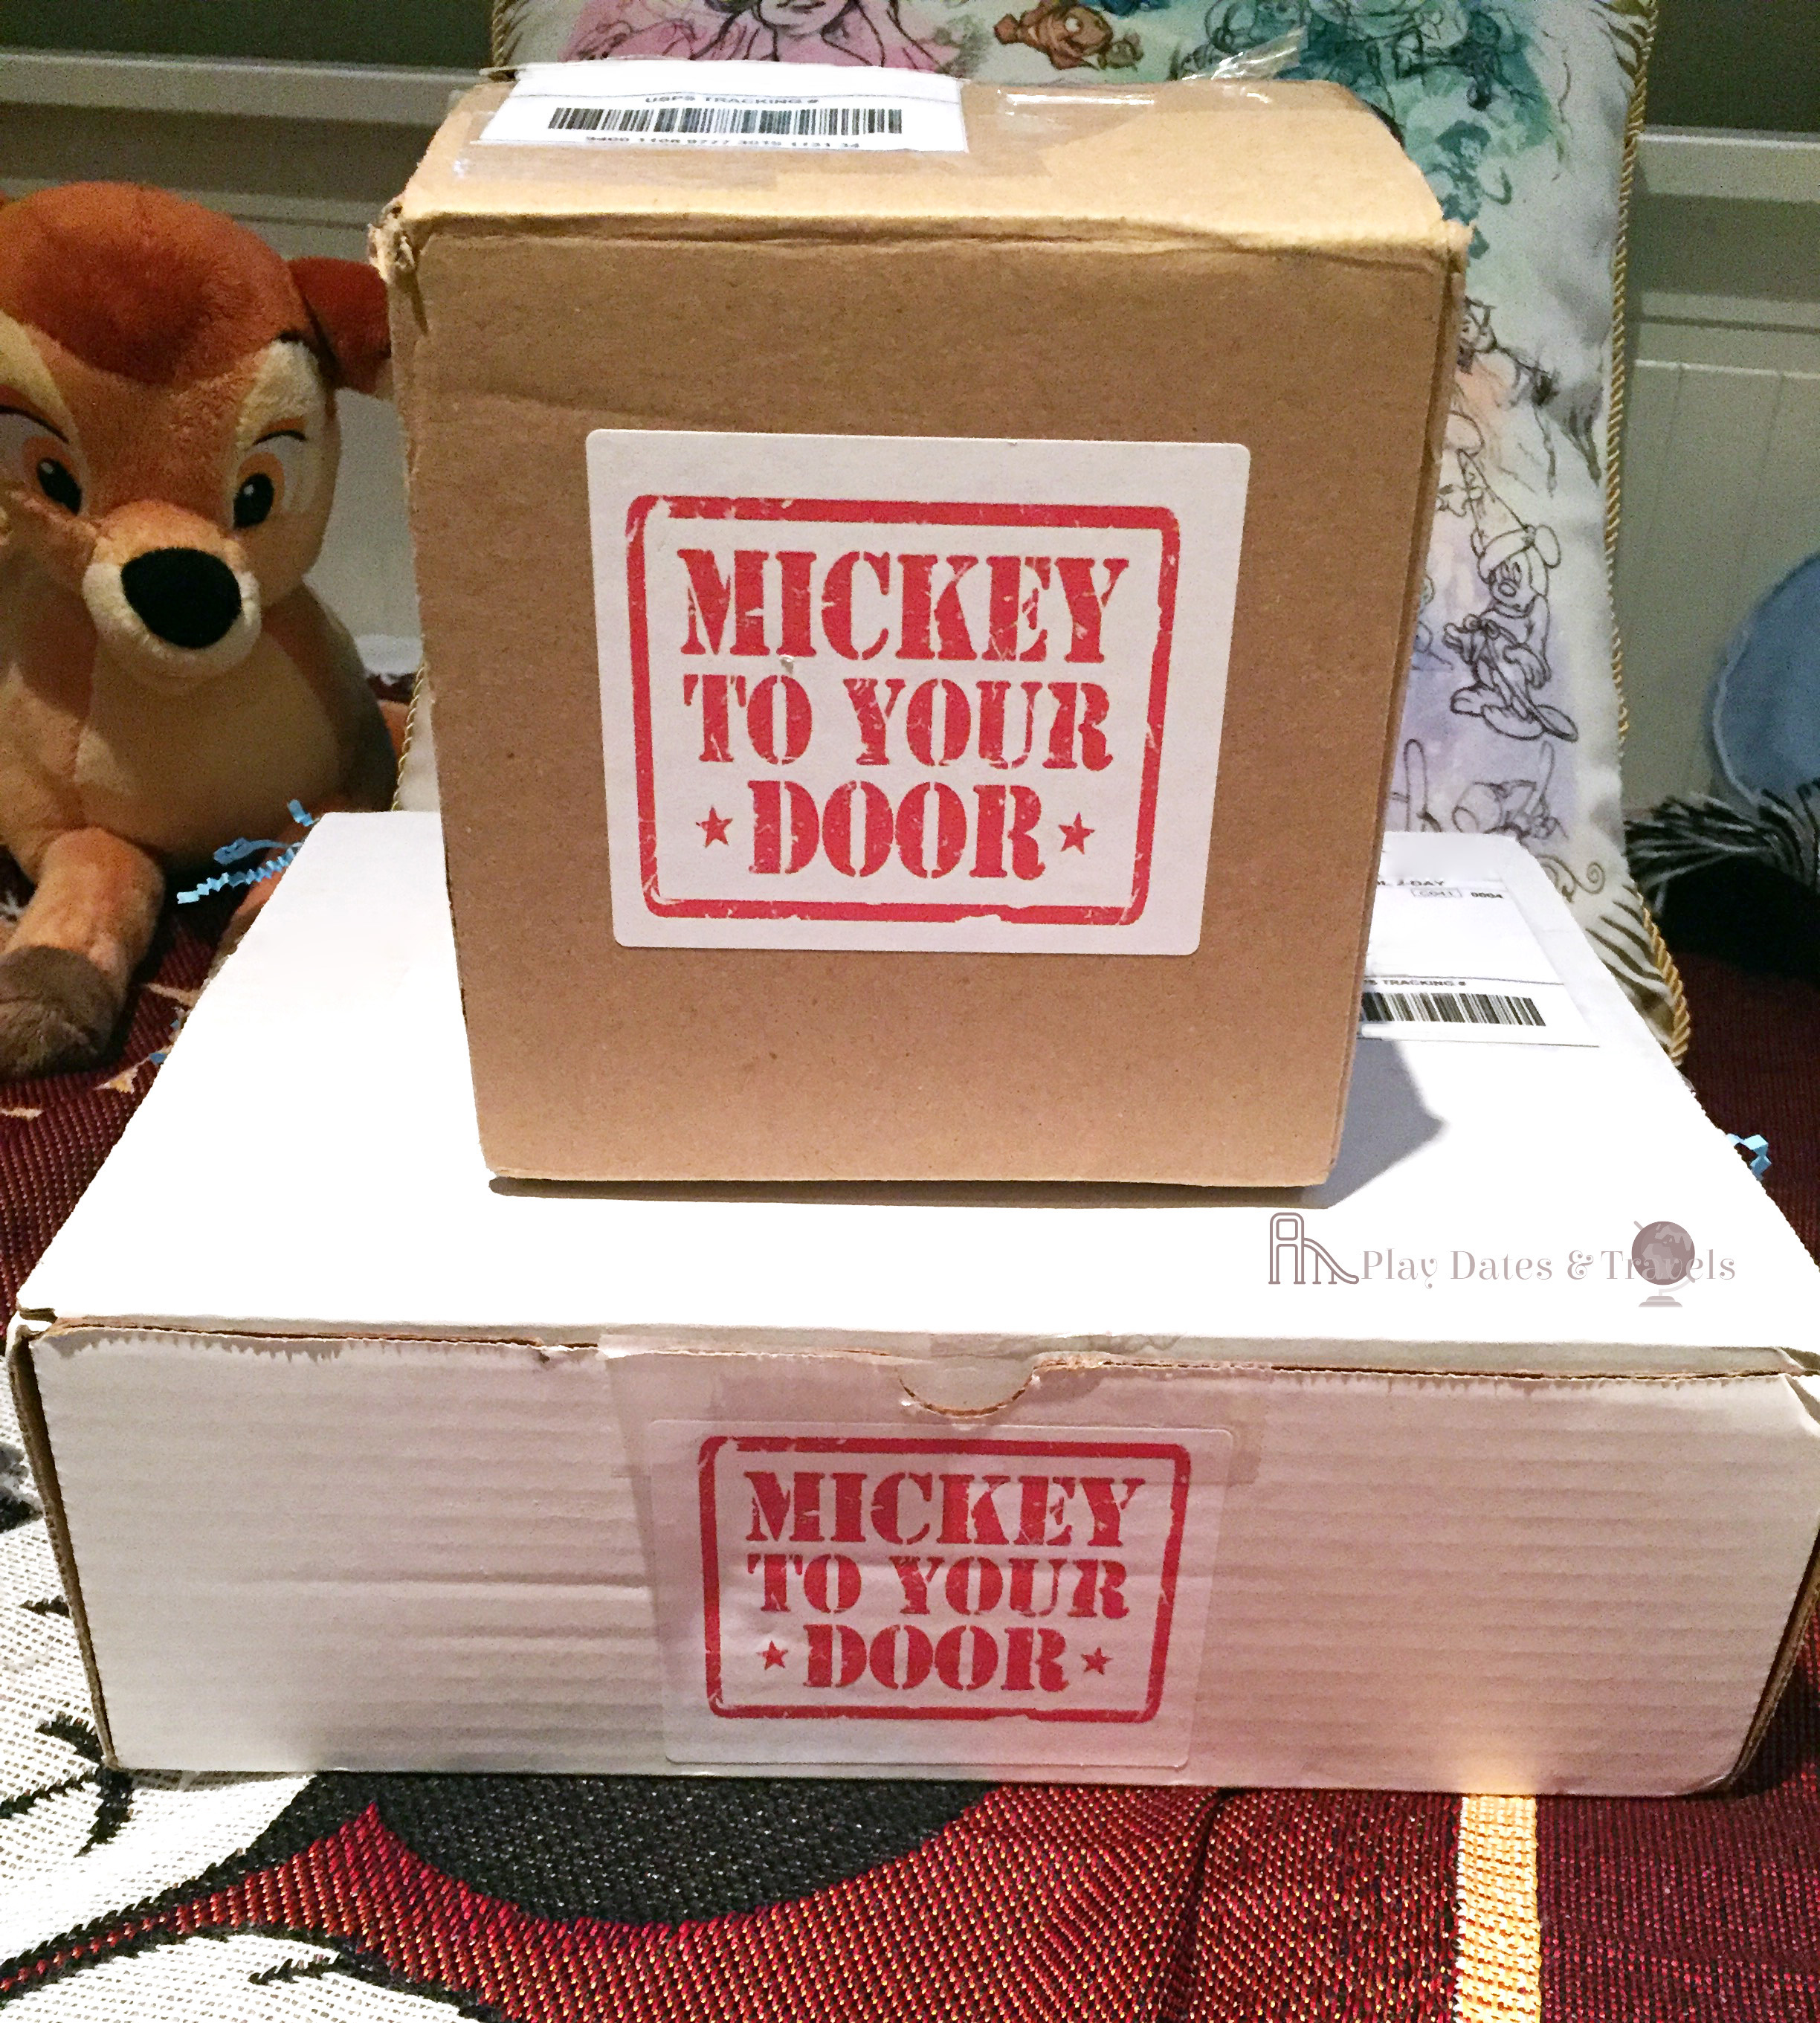
Their signature is a typically all-white or brown box with their logo stamped across the front in red lettering. Each of their boxes contains items purchased directly from the Walt Disney World resort in Florida and can be cancelled at any time, though they do allow you to purchase their regular monthly subscription boxes one time if purchased as a gift. Additionally, they sell special one-time boxes on their website valued between $35 and $75 plus shipping.
Of all the subscription services I found, Mickey To Your Door offers the CHEAPEST monthly subscription box at just $12 (the smaller box pictured below) and that box includes free shipping in the U.S. This was a new box offered beginning the month of September 2017 so I could not resist signing up to try it out!
Posing with the new Tink box from Mickey To Your Door
There are currently eight different boxes you can subscribe to, in addition to the two one-time boxes, including three pin trading boxes starting at $8, one snacks box priced at $35 and four mystery boxes with an assortment of souvenirs and Disney Parks snacks. These boxes can be customized by specifying in advance what age group this box is targeted for (whether child or adult) as well as gender (unless you prefer to keep items gender neutral). The smallest mystery box – the Tink box – cannot be customized but is also the box guaranteed to save you the most by only costing $12 a month. The next lowest priced mystery box is their Wishes box, priced at $25 with a guarantee of up to 3 items – but notice with the wording, you could still just receive only 2 items valued at a total of $25. So with that said, I thought opting for the Tink box with a guarantee of one OR two items might give me the most bang for my buck for receiving a few Disney Parks items (vs. paying $25) and would be a cheap introduction to try this new service.
Combination of what arrived in my Tink box as well as World Showcase Snacks Box from Epcot – primarily goodies selected from among the Japan and Mexico pavilions as well as Mickey Mouse balloon figurine (unfortunately which arrived broken)
Here is a video review and unboxing of both the $12 Tink box as well as their World Showcase Snacks box, which guaranteed up to 10 treats and snacks plucked from around the world in Epcot’s World Showcase for $35 plus shipping. With 11 countries to choose from I thought this would be an excellent way to see what treats were sent to me from “around the world” as well as loved the concept of this box, given all the items were guaranteed to come from Epcot, my favorite Disney park.
Let me know what you thought of what I received in my first-ever Disney subscription boxes. Were they worth it? Worth trying again? I would love to hear any thoughts on these or other Disney subscription boxes as overall I LOVE the concept of receiving a dose of Disney Parks in the mail for those times when you can’t get yourself physically to the parks, and I can see myself trying these again come Christmas time 🙂
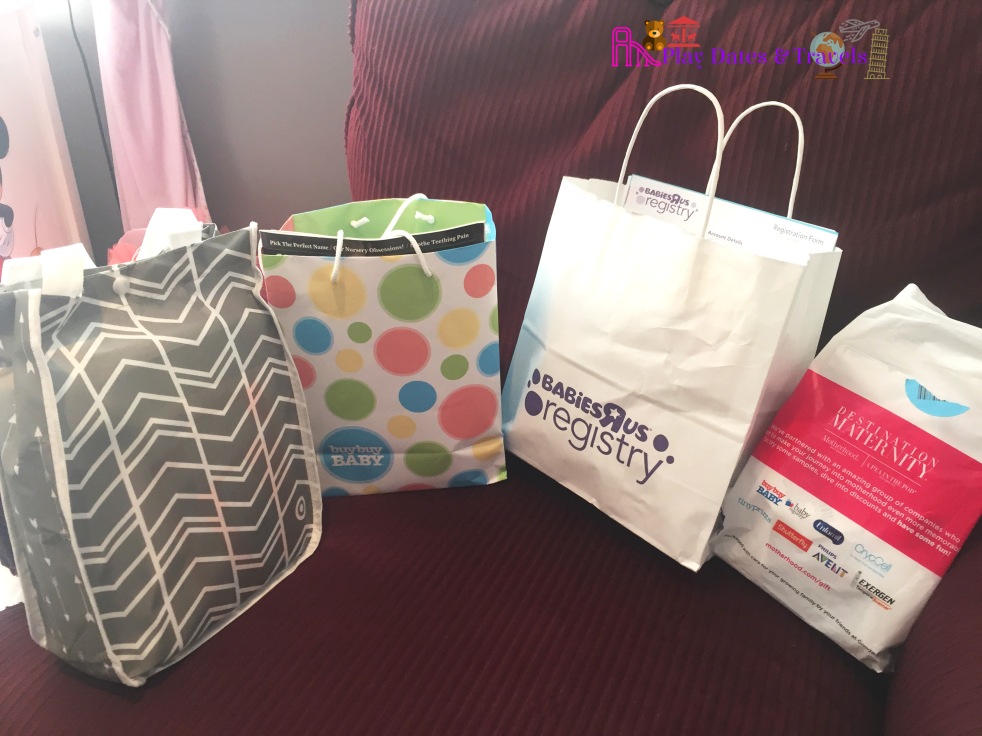
A few days ago I posted Part One to this series on what comes in your registry goody bag, and I wanted to pick up where I left off, showing the inside of the free baby registry gift bags I received from a few more stores. The stores that I am aware of where you can pick up a free in-store goody bag include Target (which was highlighted in Part One of this series), Babies “R” Us and Buy Buy Baby. I go into detail on the pros and cons of each baby registry program in another recent post titled “13 Reasons Why You Should Create a Baby Registry” – if you missed that post and want to view my helpful side-by-side comparison chart of all the registry program perks then click this link.
Free gift bags received during the month of September just for signing up for a baby registry – pictured are bags from Target, Buy Buy Baby, Babies “R” Us and Motherhood Maternity
I would have mentioned another national store known for giving a free in-store gift was Giggle (which gave a $50 gift card upon signing up in their store and registering for at least 25 items) but I just received a few emails last week that all of their retail stores are closing and upon checking out their website, it appears that the website has also been SHUT DOWN so they are no more! This news comes on the heels of Babies “R” Us filing for bankruptcy so hopefully that doesn’t mean too many changes are underway to their own in store registry program as Babies “R” Us’ program has always been one of my favorites, but of course time will tell.
All that said, I went ahead and filmed a video for each of my registry bags that I picked up in September so if you are interested feel free to watch those video links or view the images I will post below. Also note that with any registry program, the contents you will find in your bag can change from month to month so there is no guarantee anyone will receive all these same products — but this is just to give an idea of what generally comes in each store’s bag and what you can expect.
What Came in My Babies “R” Us Registry Bag
Inside of my Babies “R” Us free registry bag from early September
Of all the free registry bags I received last month, Babies “R” Us was by far the most informational in terms of providing additional resources for new parents. A typical bag from them includes a thank you card with a $5 off coupon on a purchase of $25 or more (with some restrictions including diapers and wipes), but in my registry bag I actually received two of those coupon cards along with a ton of fliers/guides meant to help a new mom and/or dad prepare for baby’s arrival such as a list of what to pack for the hospital, nursery bedding safety tips, steps to achieve breastfeeding success, what to stock in your diaper bag and baby bath time basics. I also received print-out announcement cards in a thick card stock that I could conceivably hand out to friends and family, letting them know I registered at Babies “R” Us – though I feel these days, people generally just include a link to their online registry and leave it at that as the “official announcement.” Aside from these guides and cards, a typical Babies “R” Us free registry gift bag also includes a number of coupons, advertisements, free sample products, baby registry guide book with checklists divided into must-haves and good-to-haves and a reminder card on the “top reasons to love” their registry with a brief mention of some of their registry perks including the chance to receive up to 10% back on all registry purchases through their endless earnings, access to their employees and other “expert” resources, an on-the-go app to keep abreast of your registry at all times, a price match guarantee where the store will match competitor’s prices as well as their own cheaper online prices and an extended one year return policy on all registry items.
Full view of everything in my bagA closer look at the products and main registry guide included inside
Products I received:
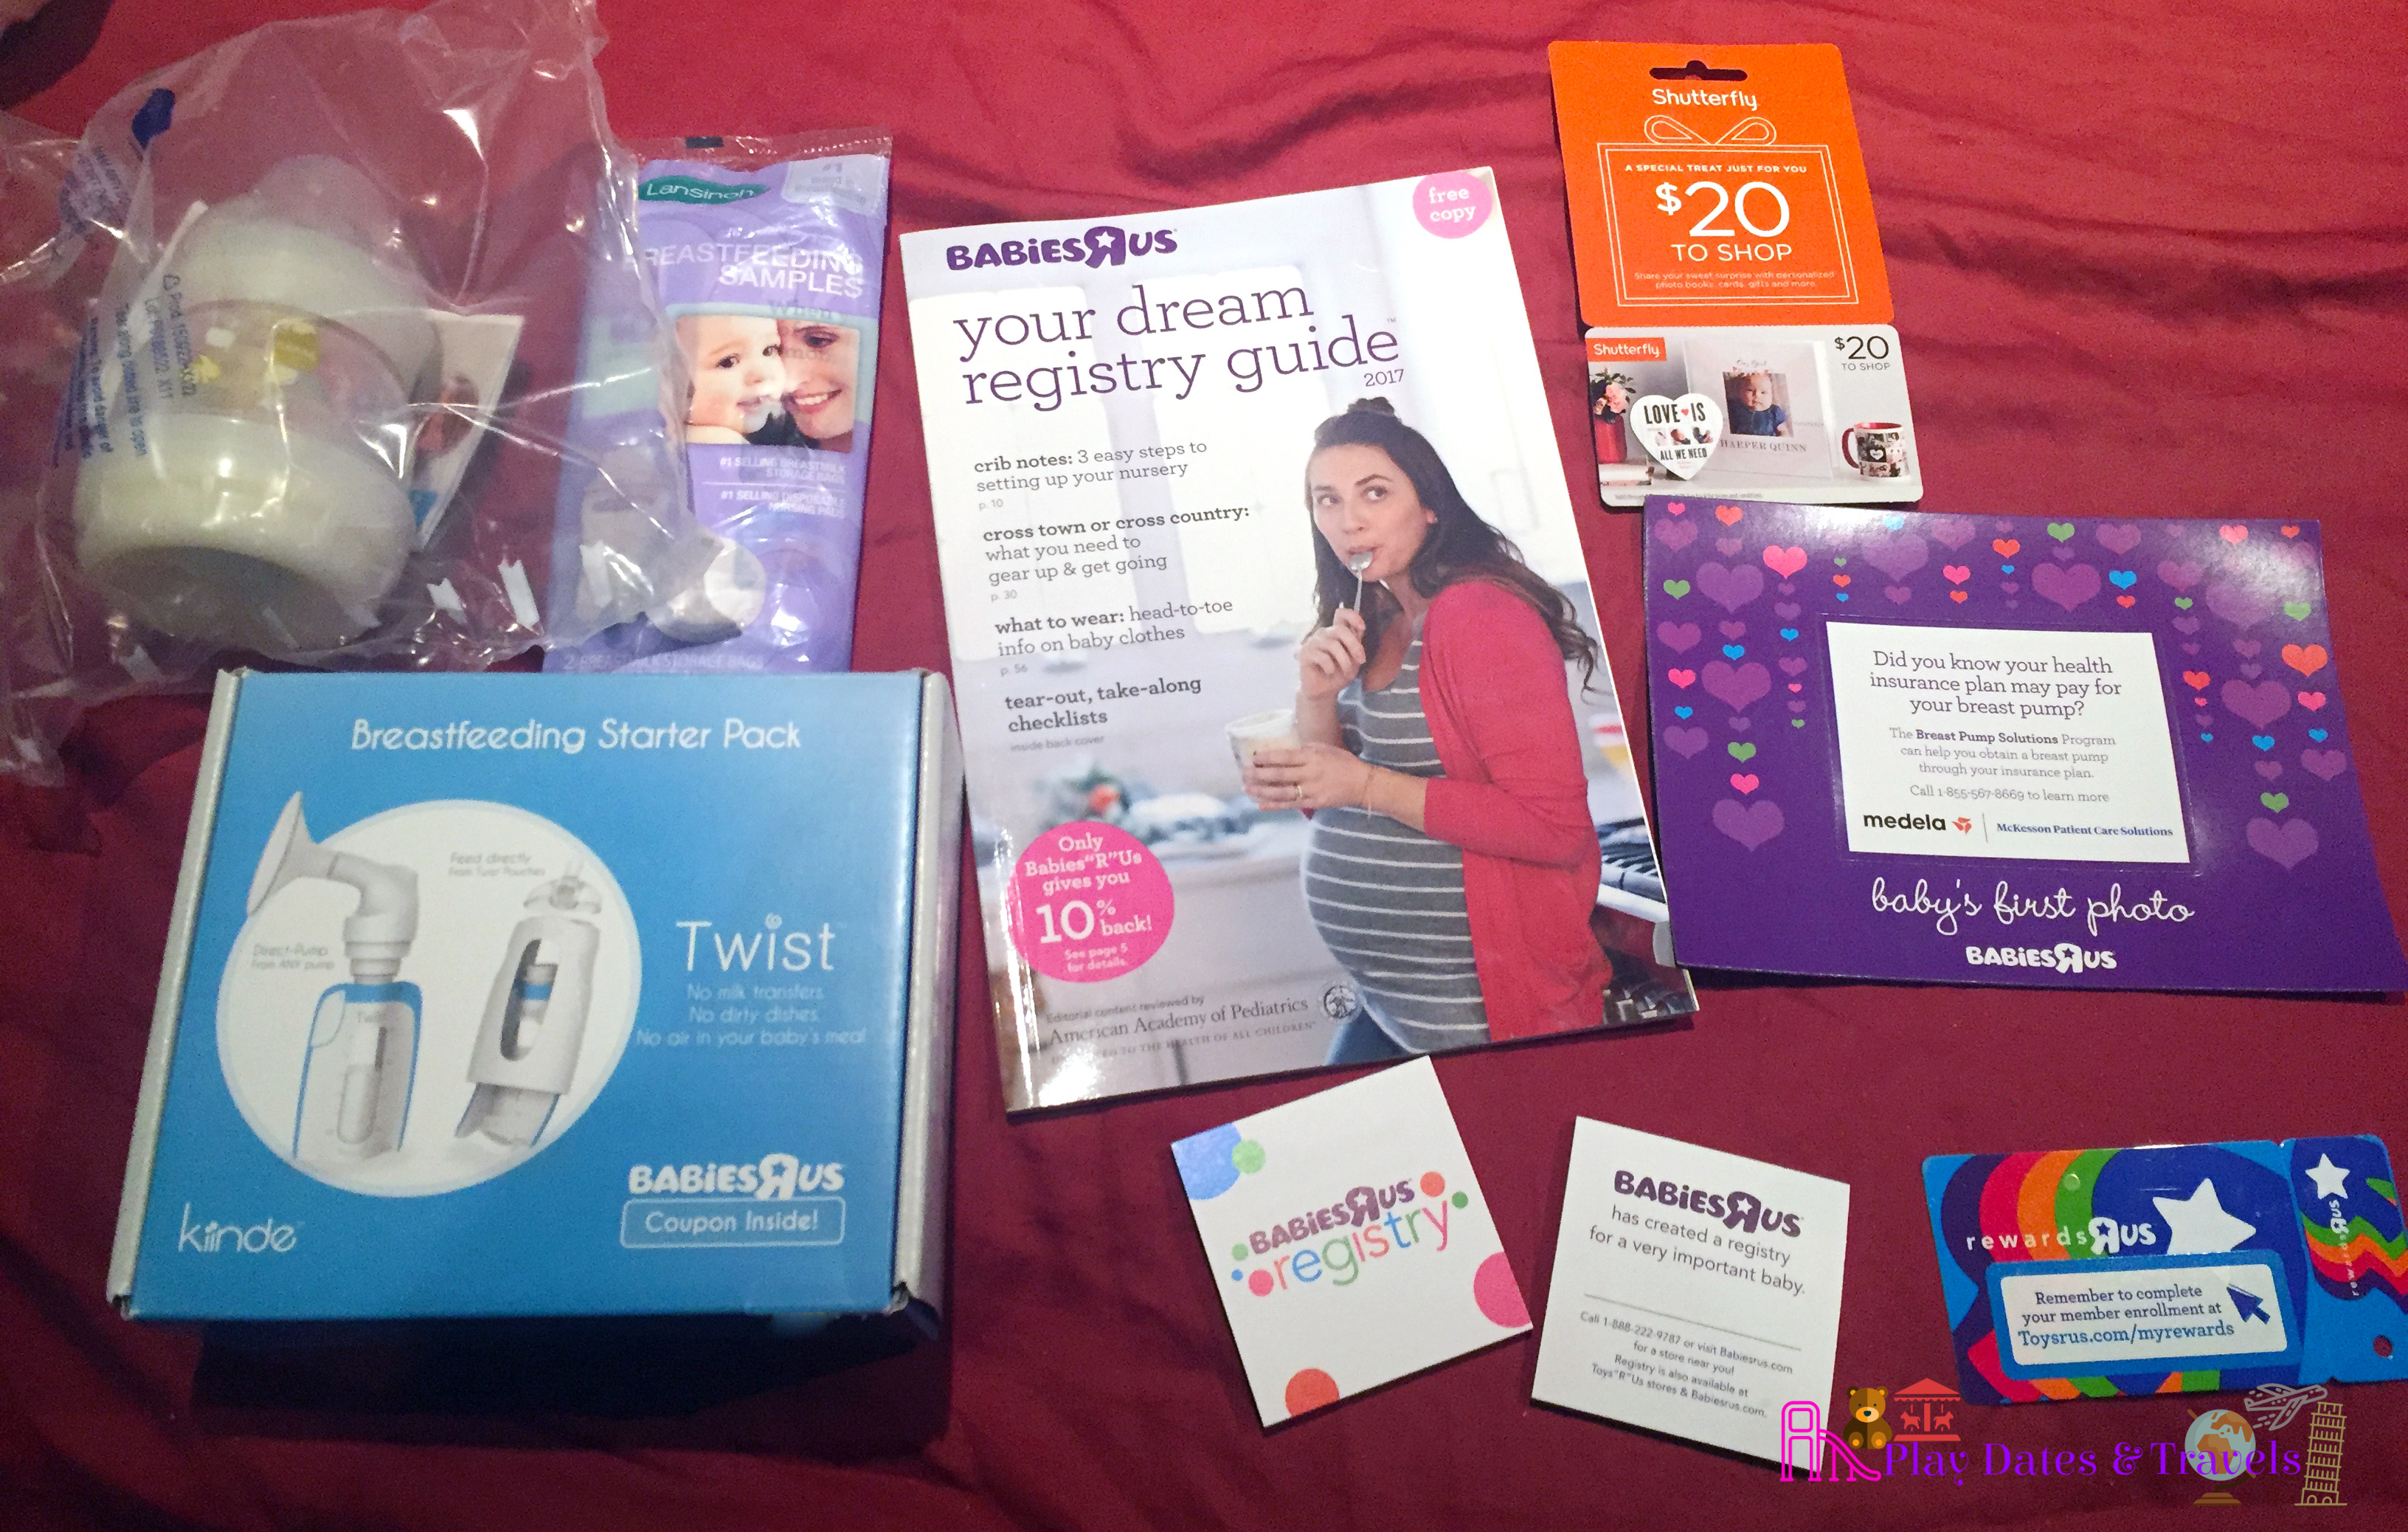
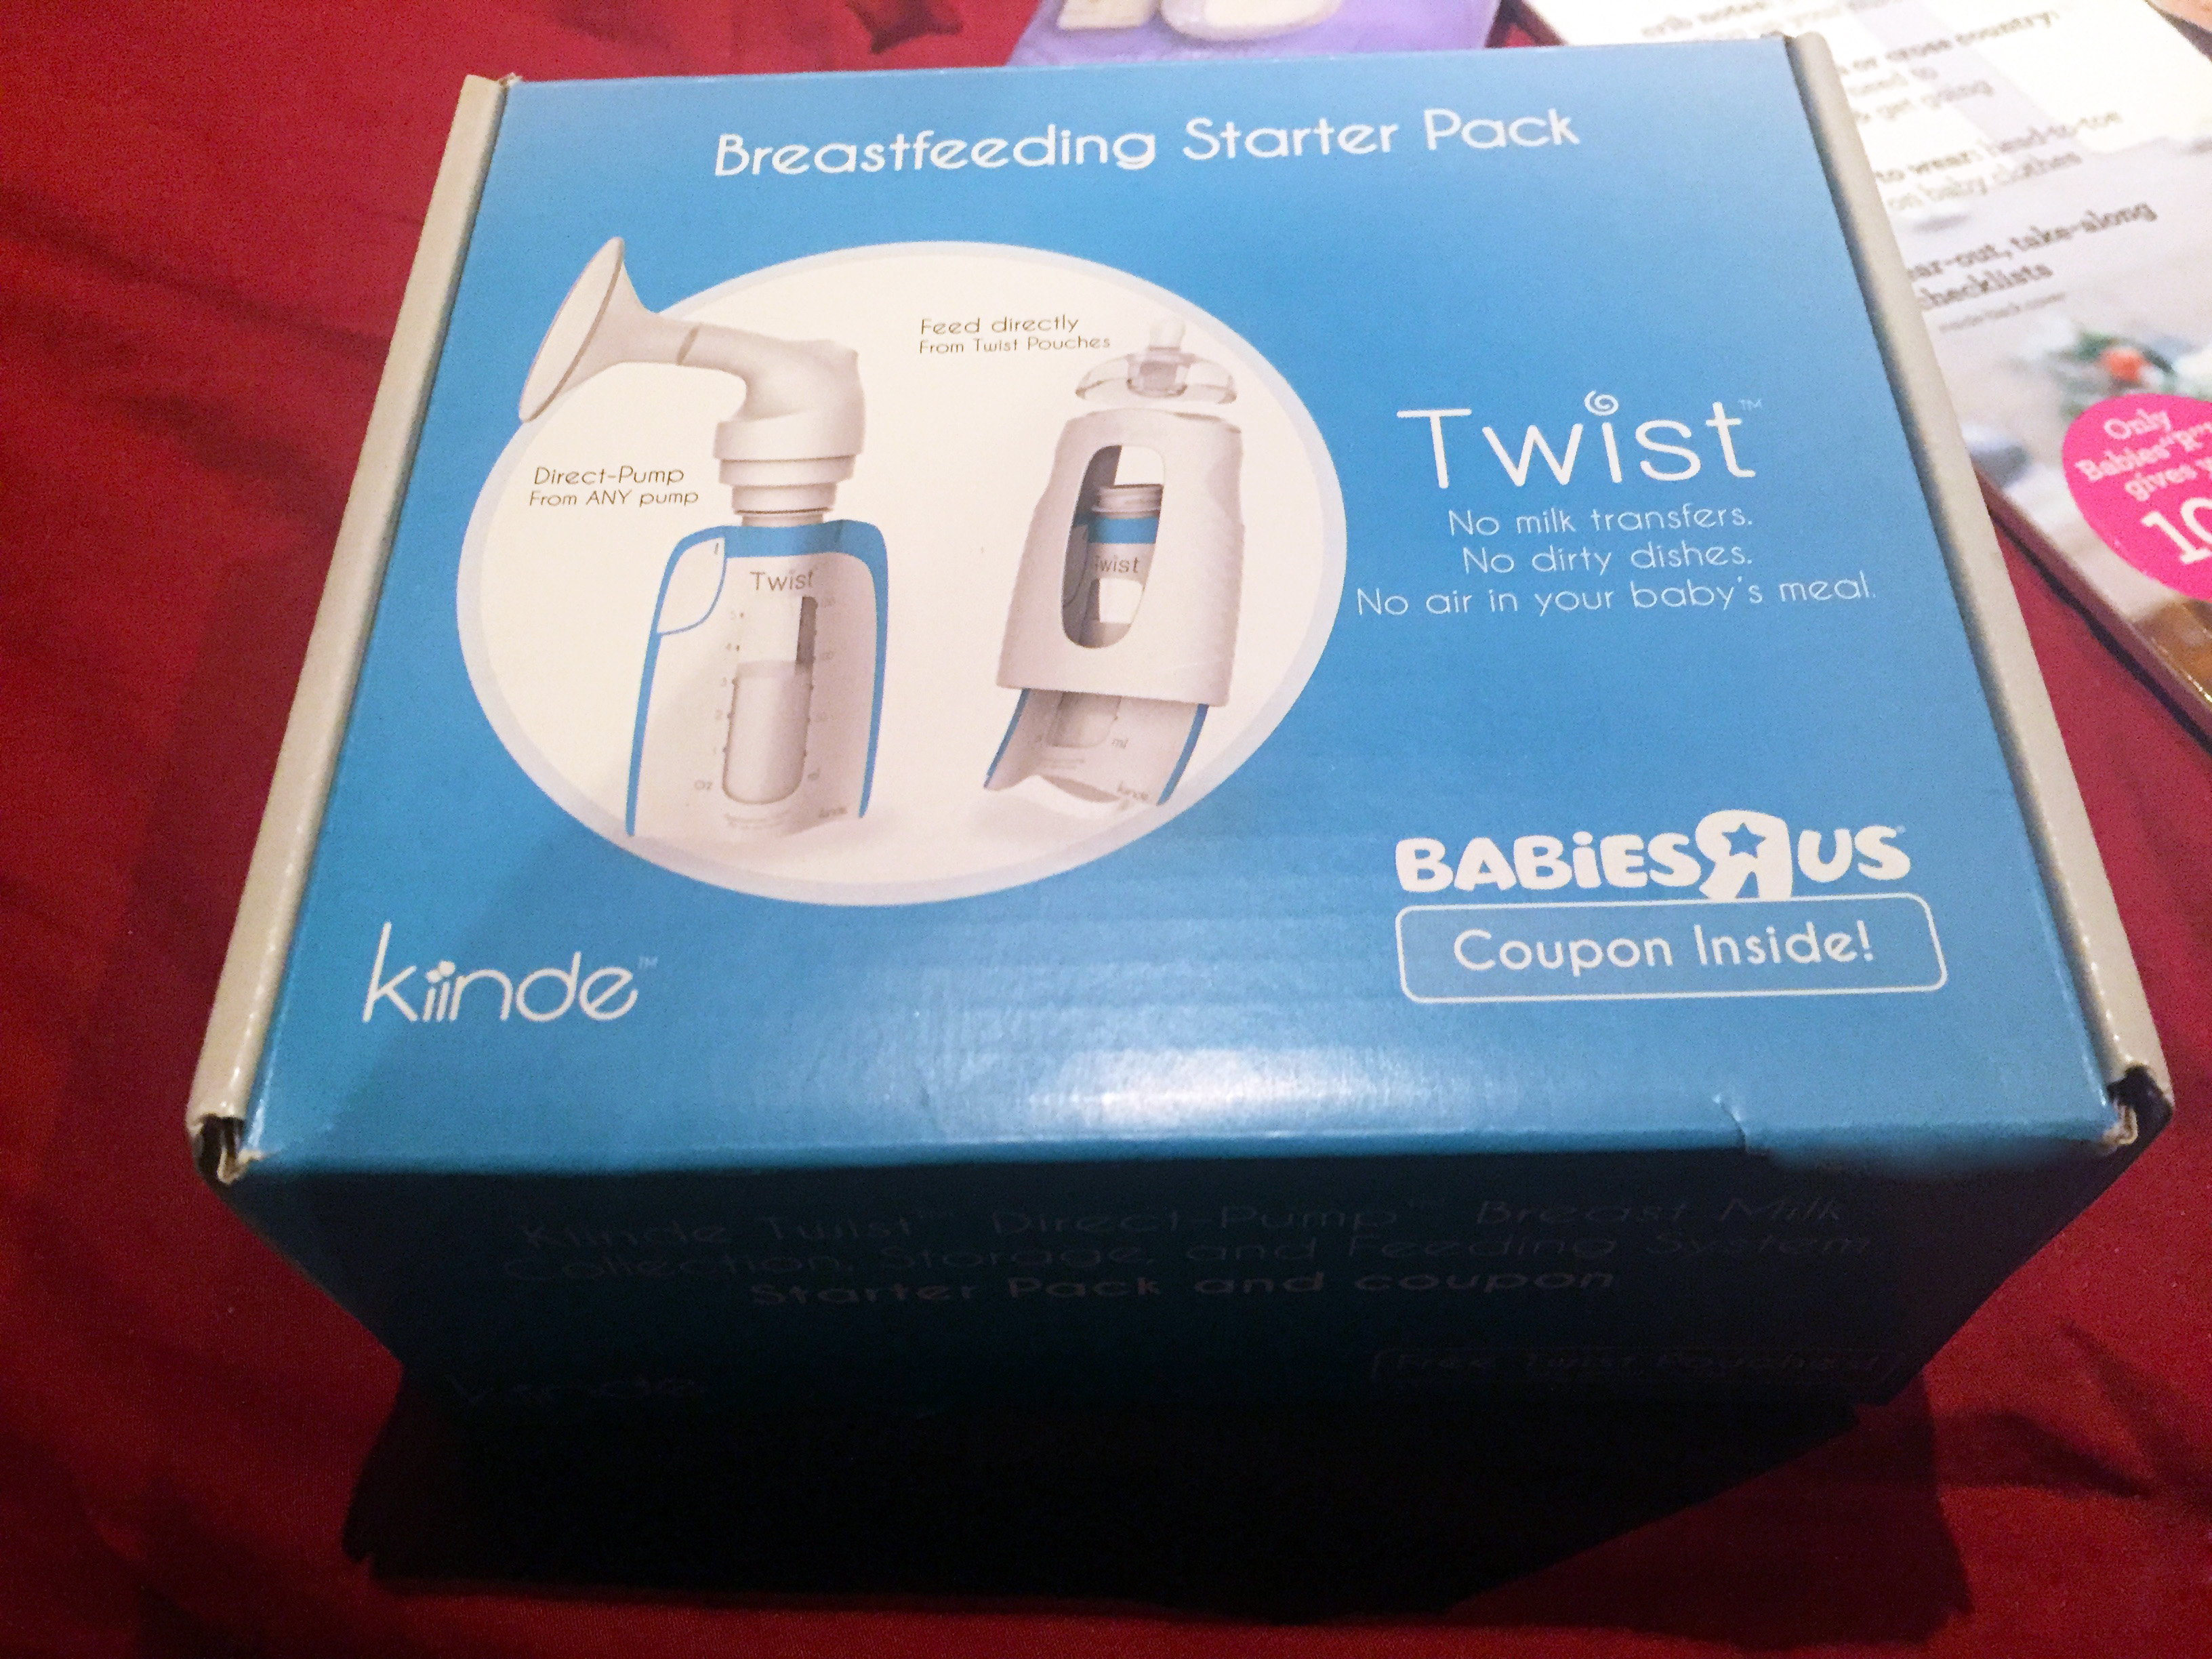
A $20 gift card from Shutterfly
One Kinde Twist Breastfeeding Starter Pack with a direct-pump breast milk collection, storage and feeding system for your baby included with instructions, a 25% off coupon toward a future Kinde system purchase at Babies “R” Us and information on how to register the product online to receive a 40-pack of twist pouches for free (with $6 paid shipping)
Kinde Twist breastfeeding starter pack box
A 4.5 ounce newborn baby bottle from Mam and pacifier (I mention in my YouTube video that the bottle is only 4 ounces but upon opening the sample product, I discovered it included a free pacifier inside along with a card indicating the bottle is actually 4.5 ounces)
A baby’s first photo magnet from Babies “R” Us with a message reminding registrants that most health insurance companies will pay for moms to receive a free breast pump
A Lansinoh breastfeeding sample pack with 2 breastmilk storage bags and 2 disposable nursing pads
One new Toys “R” Us Rewards card to join their free in-store rewards program
In addition to the above products my bag included a coupon toward a Babyganics Essentials gift set (an introduction to their product line including hand sanitizer, wipes, lotion, baby shampoo, bubble bath and bottle soap) to save $10, two additional coupons from Sprout to use toward their organic baby food pouches, a sign-up card for Enfamil Family Beginnings program to receive free formula discounts and join their email list as well as 11 ads for other products sold at Babies “R” Us stores ranging from Kinsa ear thermometers to Graco, Brica, Halo Bassinest, Aden + Anais and Philips Avent bottles and pacifiers.
UPDATE: I went back to my local store in mid-September requesting another thank you card with $5 coupon as the two I received in my first free registry bag expired 8/31/2017 before I even had a chance to use them (I picked up my bag the second week of September). The store gave me a new registry bag which unfortunately still had the expired coupon though they did tell me to come back later in the month when their thank you cards should be updated. However, I can tell you that the items I received in my new Babies “R” Us registry bag differed somewhat from my first bag in that I received more products (plus no informational guides in this one) and those new items are posted below:
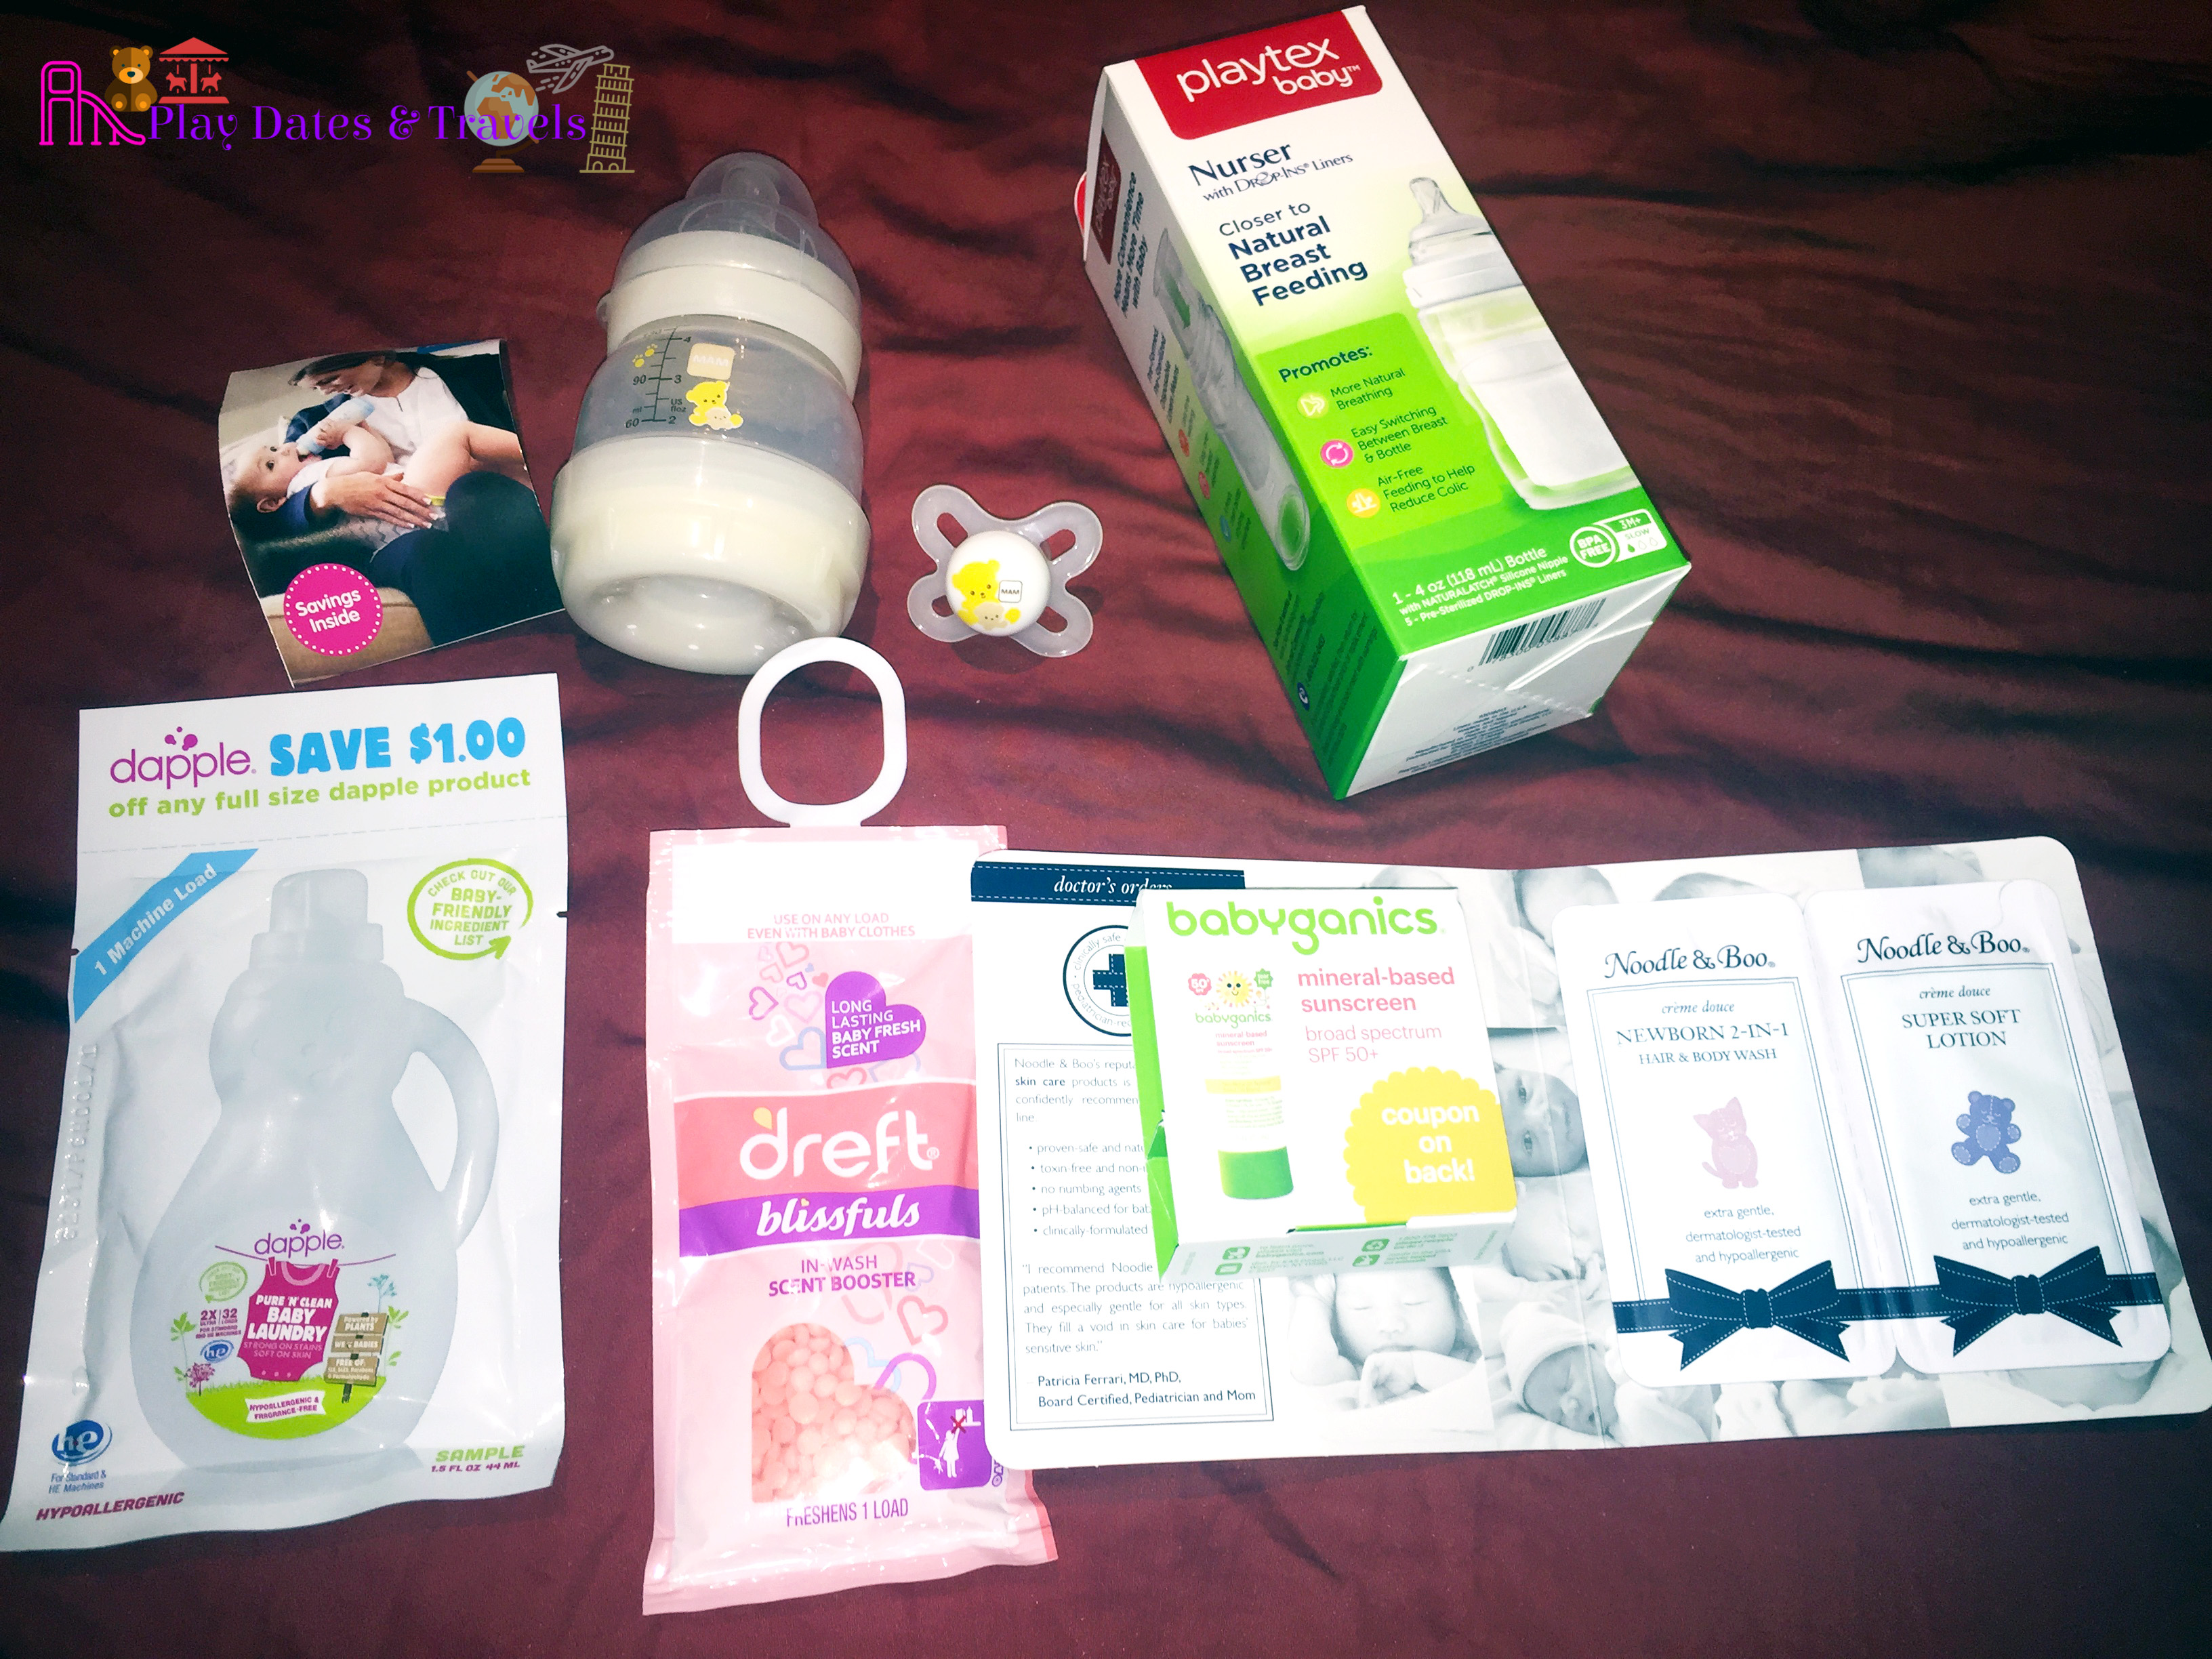
Products included inside my duplicate Babies “R” Us bag including two different bottles, a pacifier, baby laundry detergent, scent booster, sunscreen and lotion samples
a Noodle & Boo sample kit with newborn 2-in-1 hair and body wash and super soft lotion
one sample load of Dapple baby laundry and coupon toward $1 off any full size Dapple product
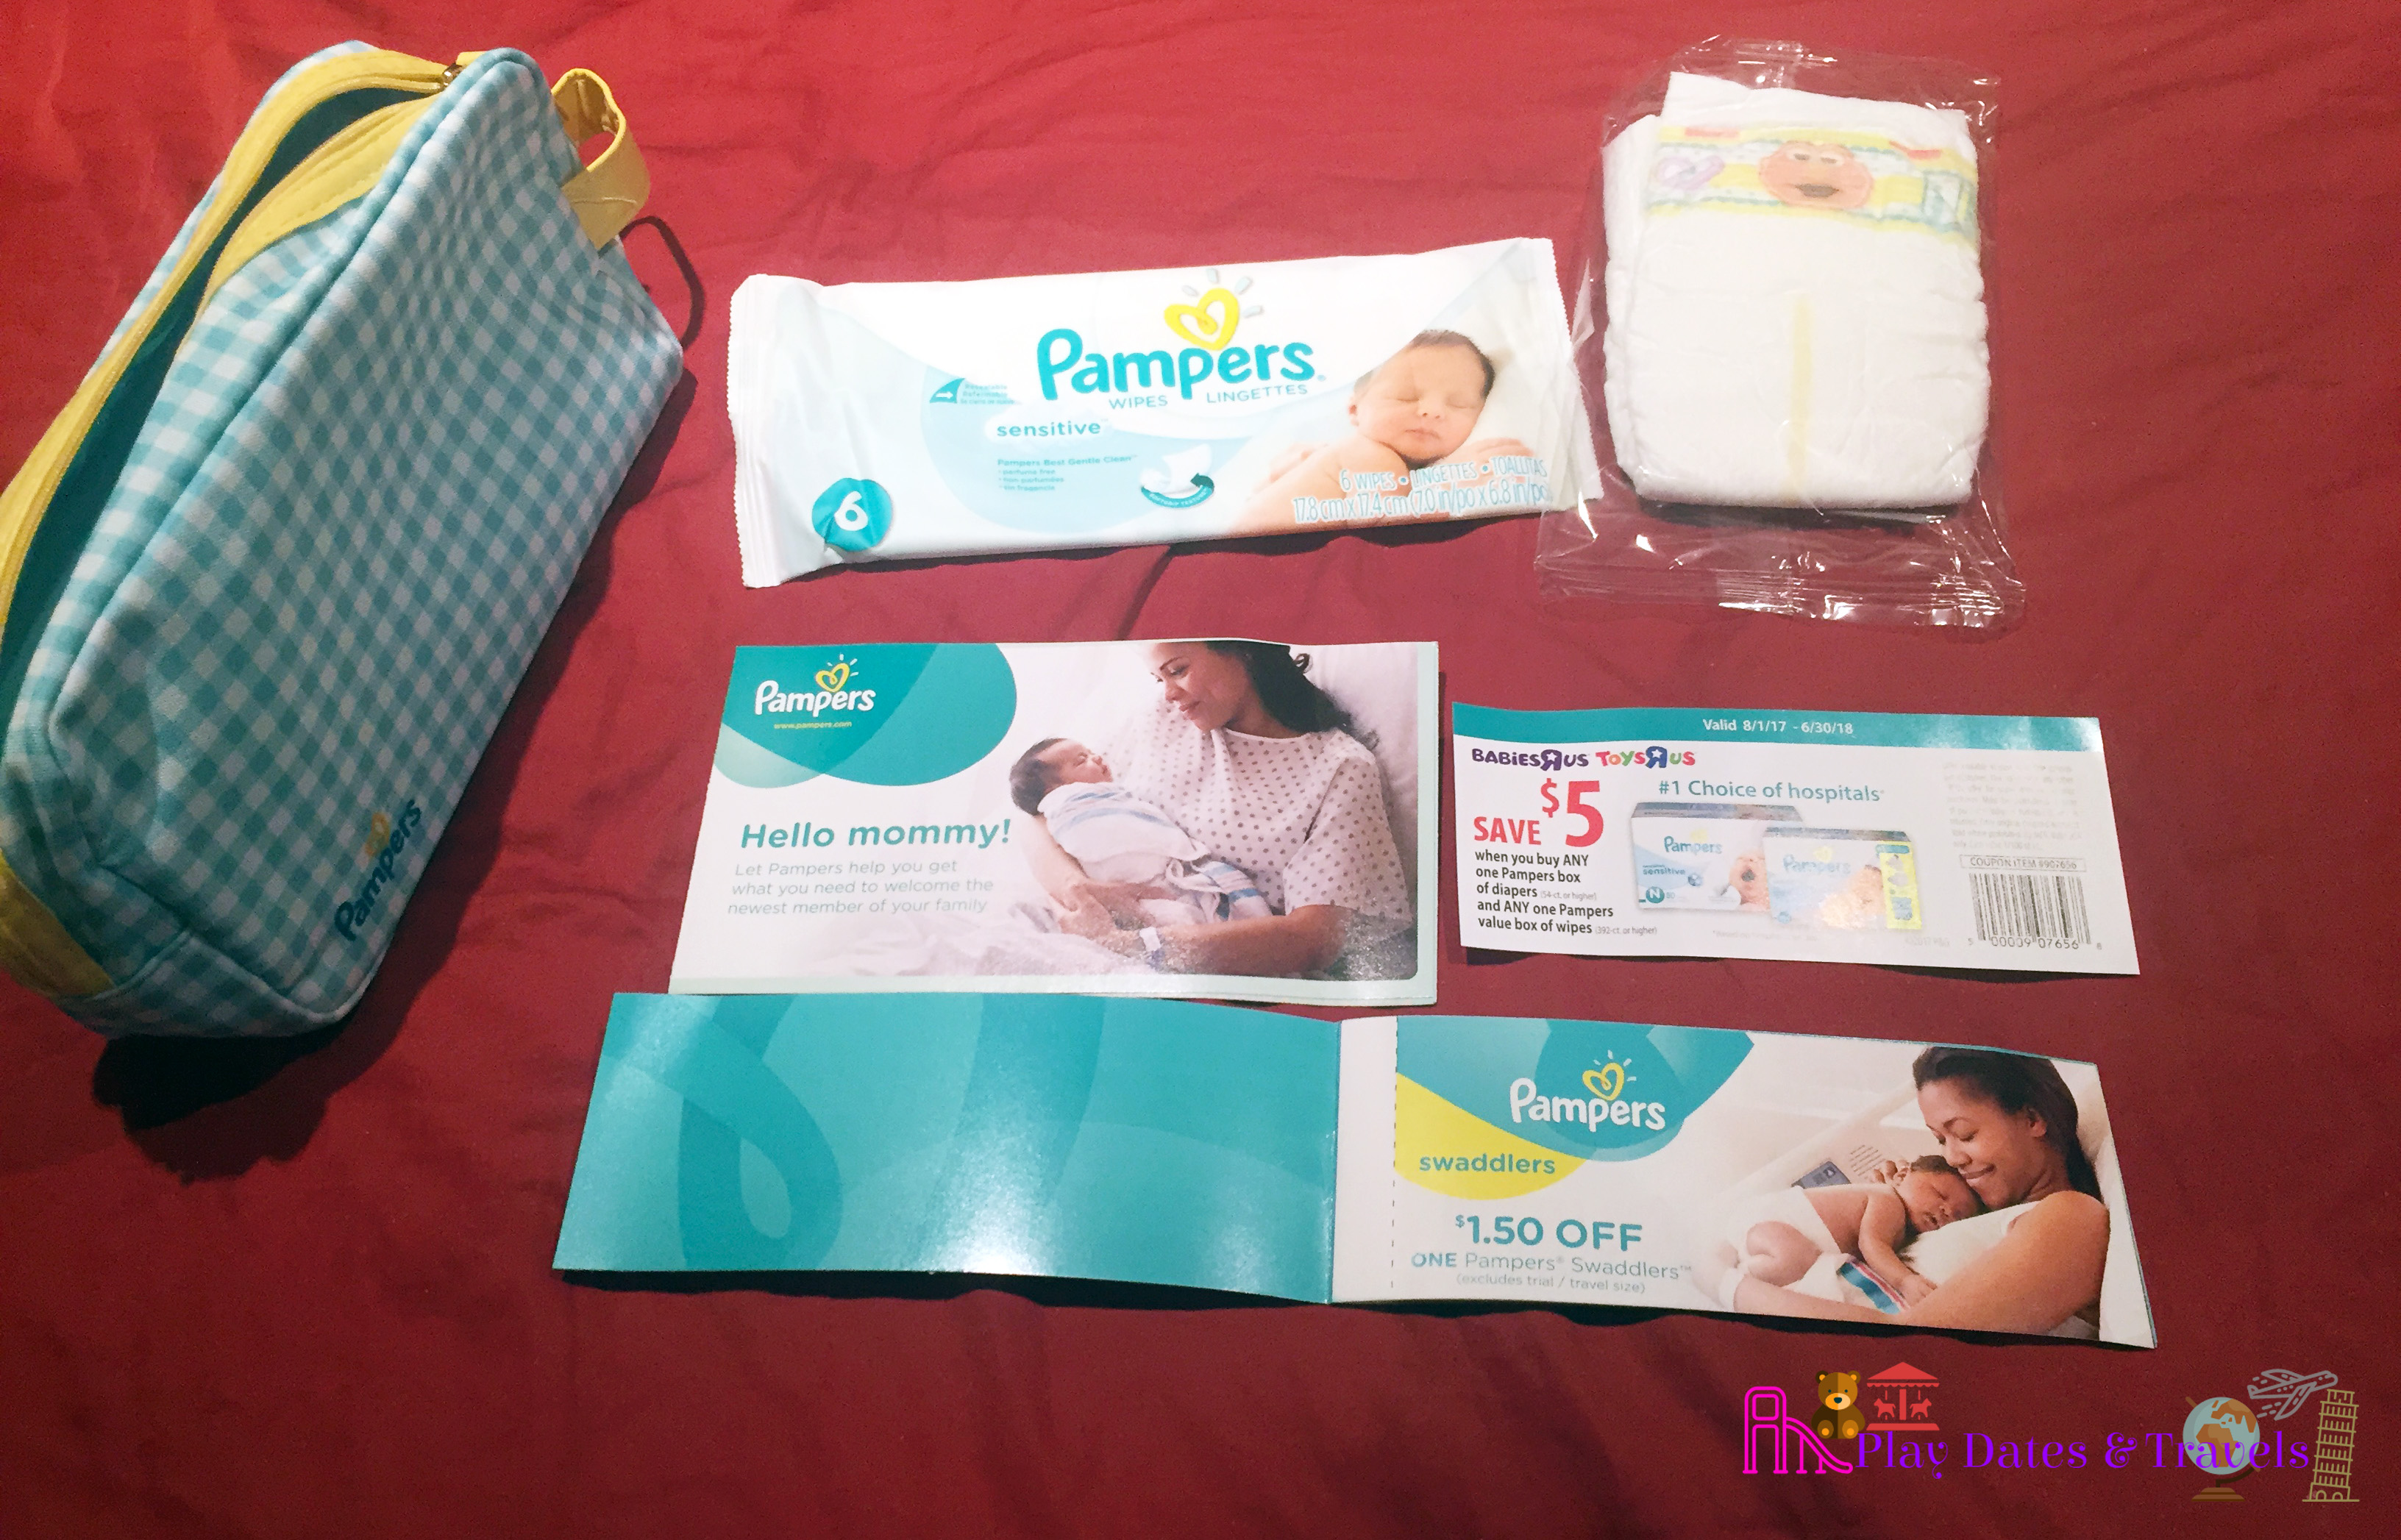
an updated, larger-sizedPampers registry gift totewith striped design including the standard newborn diaper and six-pack of wipes found in their older kits but also a special $5 coupon when you buy a box of Pampers diapers with a value box of wipes (392 count or higher) and free book of five additional coupons including a $1.50 off coupon on one Pampers Swaddlers diapers, a $1 off Pampers wipes kit, $2 off Vicks VapoRub, $2 off one Dreft liquid laundry detergent and $1 off one Crest toothpaste
one 4 ounce Playtex Baby Nurser bottle together with 5 pre-sterilized DROP-INS liners
one 4.5 ounce Mam newborn anti-colic bottle with one starter newborn pacifier
one sample of Dreft Blissfuls in-wash scent booster for a long lasting baby fresh scent
one sample of Babyganics mineral-based sunscreen (50+ SPF) with a $1 off coupon
A look inside the updated Pampers registry gift tote with new striped design and more coupons
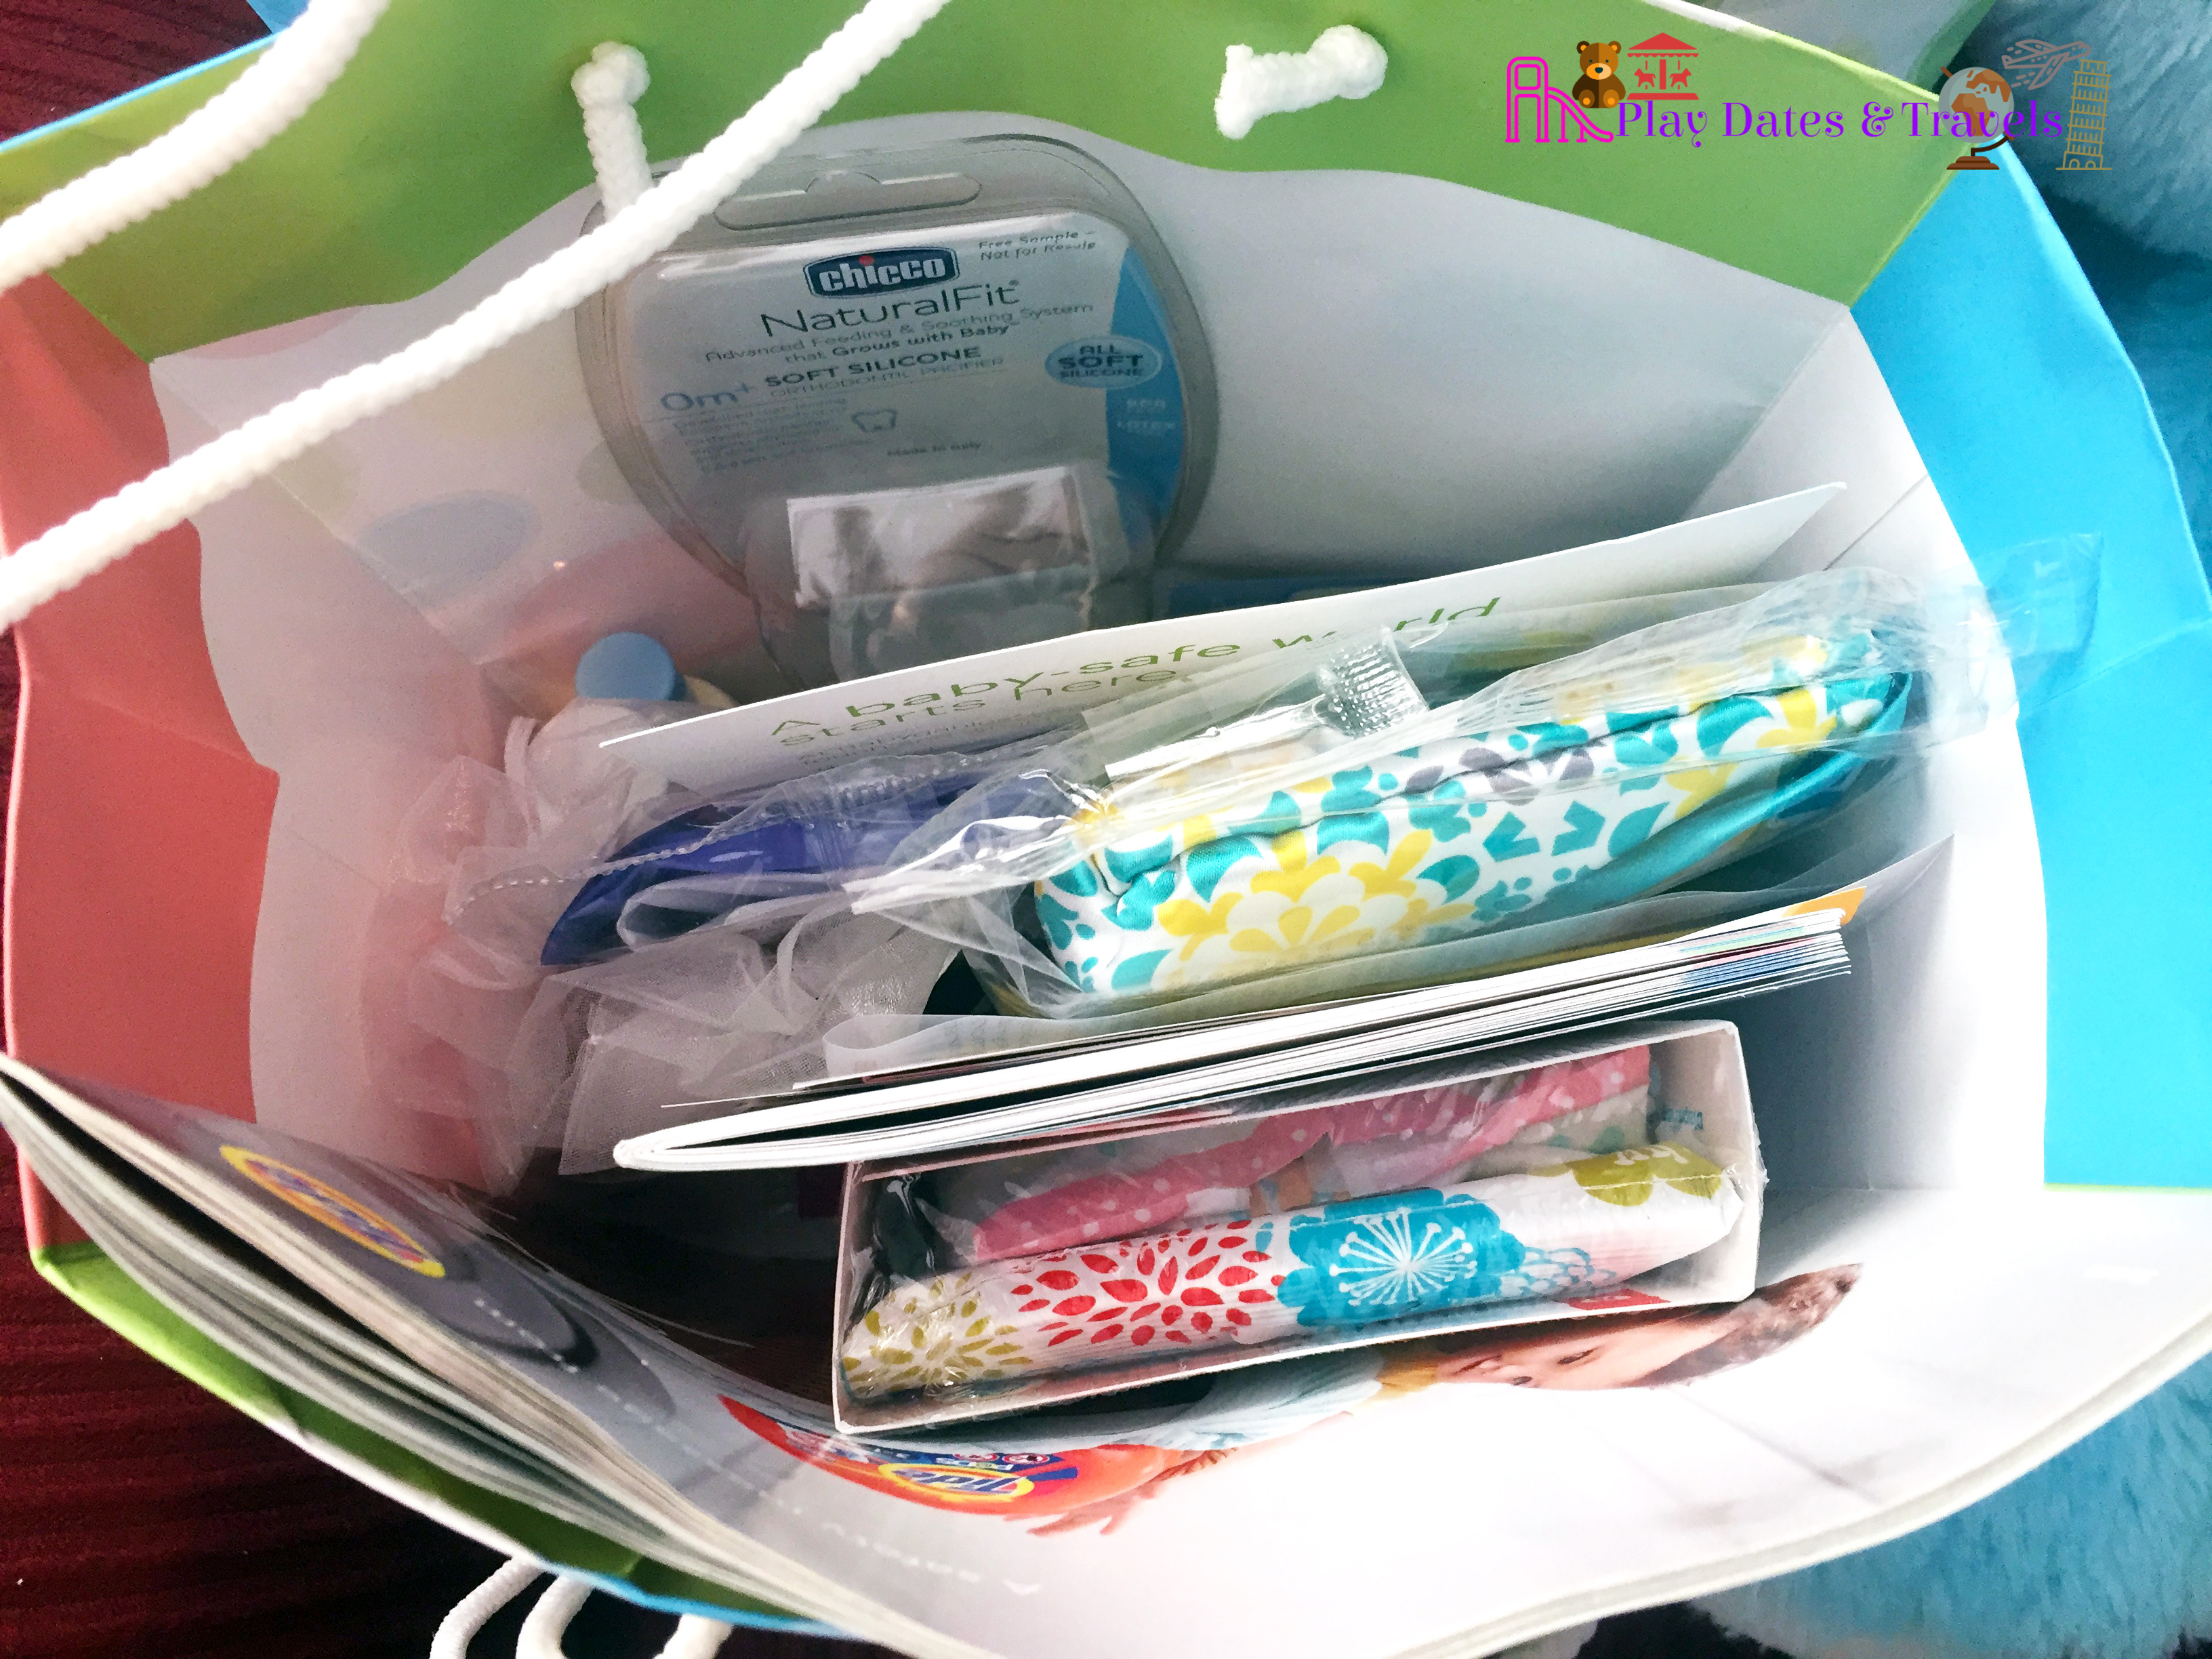
What Came in My Buy Buy Baby Registry Bag
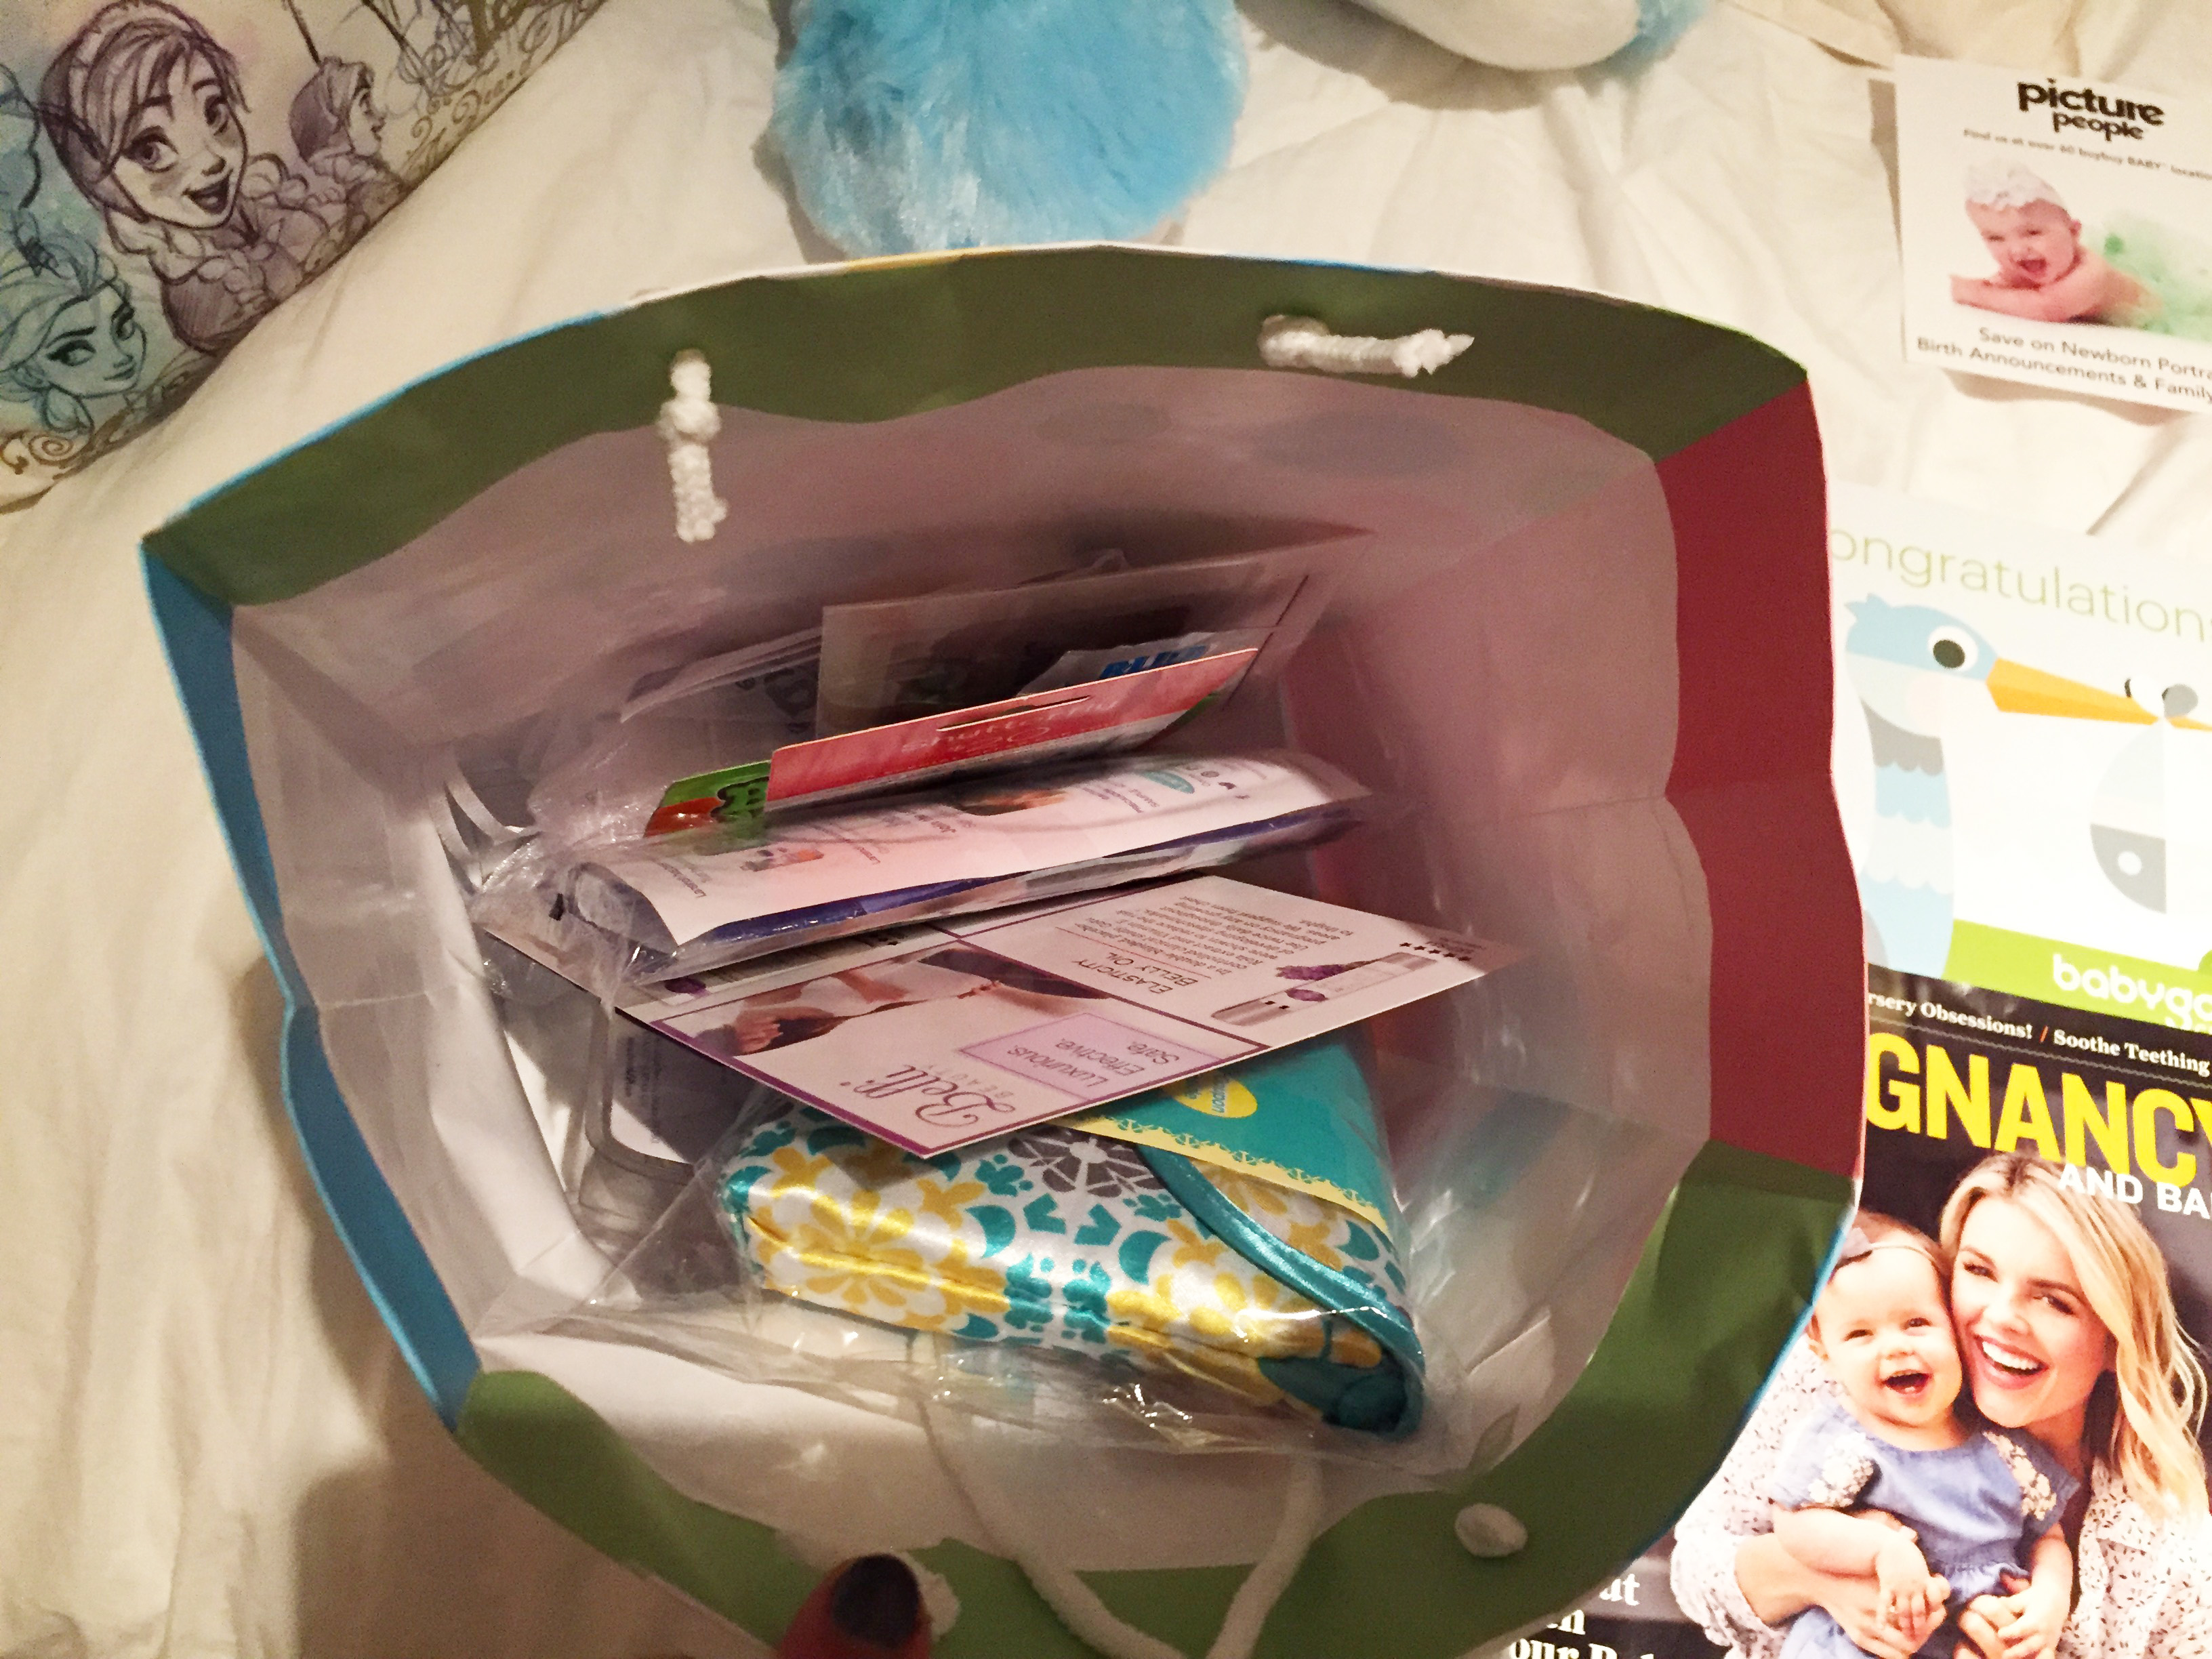
As with Babies “R” Us I received two goody bags from Buy Buy Baby — I will go more into that later. I have found that in the past, their goody bags tended to give you a LOT of products to try but perhaps not as big of a sample as you might get with other companies (for instance, they give a lot of single-use lotion and detergent samples vs. individual travel size bottles you might find with other companies like Target). In 2014, I recall the one big-ticket item I received from them was a full sample can of baby formula but I noticed that none of the registries gave out formula to me this year, and when I called two formula companies inquiring about samples, they mentioned that they’ve done away with the frequency of giving out samples lately as there has been a recent promotional push toward breastfeeding in general. Interesting. However, this year each bag contained between 11 to 13 sample products and a good number of them were actually travel size bottles lending themselves to more than just a one-time use! They also have one of the most comprehensive free baby books included in their registry bags with various product suggestions on what to put on your registry, a registry checklist and even a section for you to draw in your nursery’s room dimensions to help plan and design your perfect nursery (I show this page in more detail in my duplicate registry bag video).
First registry bag received from Buy Buy Baby – first impression, heavy on the single-use itemsDuplicate registry bag received from Buy Buy Baby
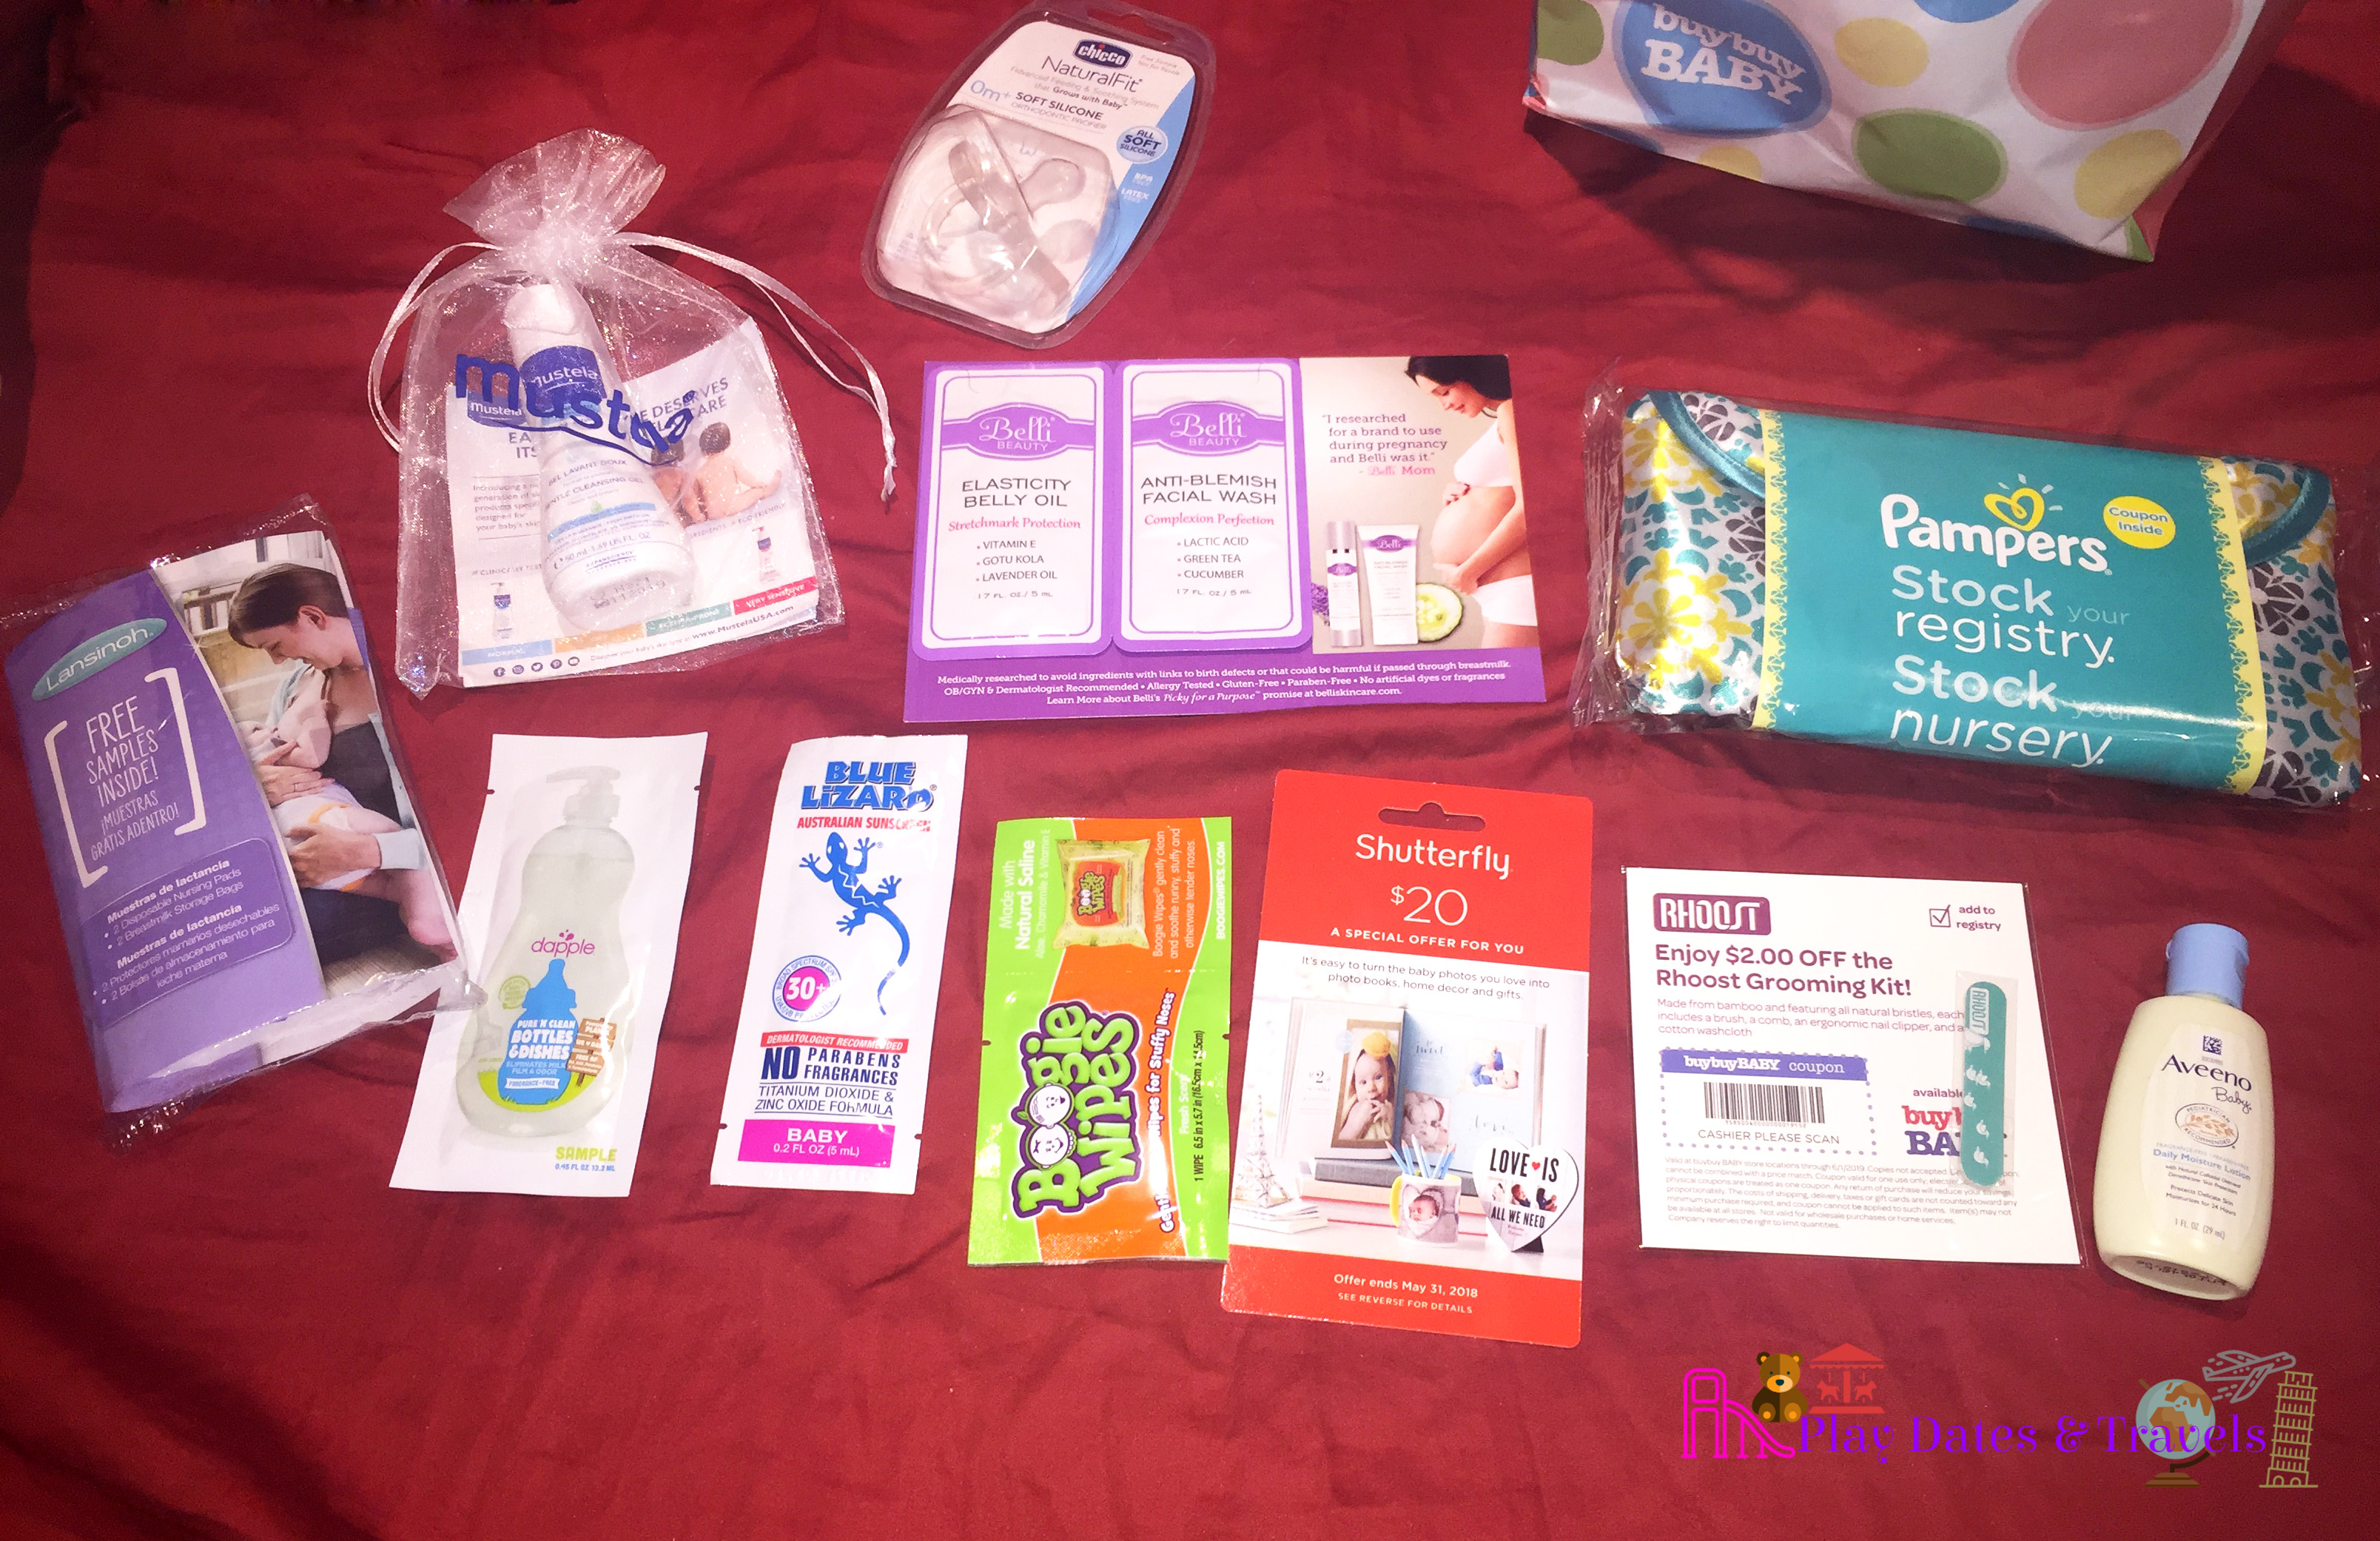
Here’s a list of the products and coupons I received in my first bag:
One Chicco NaturalFit soft silicone orthodontic pacifier good from 0+ months
the same Lansinoh breastfeeding sample pack that came in my Target and Babies “R” Us bags
two samples from Belli Beauty including belly oil and anti-blemish facial wash
one travel size bottle of Aveeno Baby daily moisture lotion
one Pampers sample tote with a pack of 6 baby wipes and one newborn Swaddler diaper
one $20 Shutterfly gift card
a sample natural saline wipe from Boogie Wipes with a 50 cents coupon
one sample of Blue Lizard Australian sunscreen for babies (30+ SPF)
one sample bottle of Mustela gentle cleansing gel along with coupon to save $10 toward a purchase of $40 or more of Mustela products
one sample of Dapple bottles and dishes liquid with $1 off coupon
one baby nail file from Rhoost along with a $2 off coupon toward a Rhoost grooming kit
Products included inside the first Buy Buy Baby bag
Coupons:
one Buy Buy Baby $5 off coupon off a purchase of $15 or more (some exclusions apply)
three coupons toward Picture People, located in over 60 Buy Buy Baby locations where you can receive a free maternity portrait same day, spend $20 for 25 birth announcements or receive 20% off your portraits
a save $10 coupon from Babyganics toward their Essentials Gift Set (basically the same coupon from Babies “R” us but their version is worded slightly differently)
save $1 coupon from Aveeno Baby
three coupons for Philips Avent to save either $3 on a multi-pack of bottles, 50 cents on a trainer cup or 10% off a bottle warmer or steam sterilizer
one $2 coupon toward a Lansinoh mOmma bottle
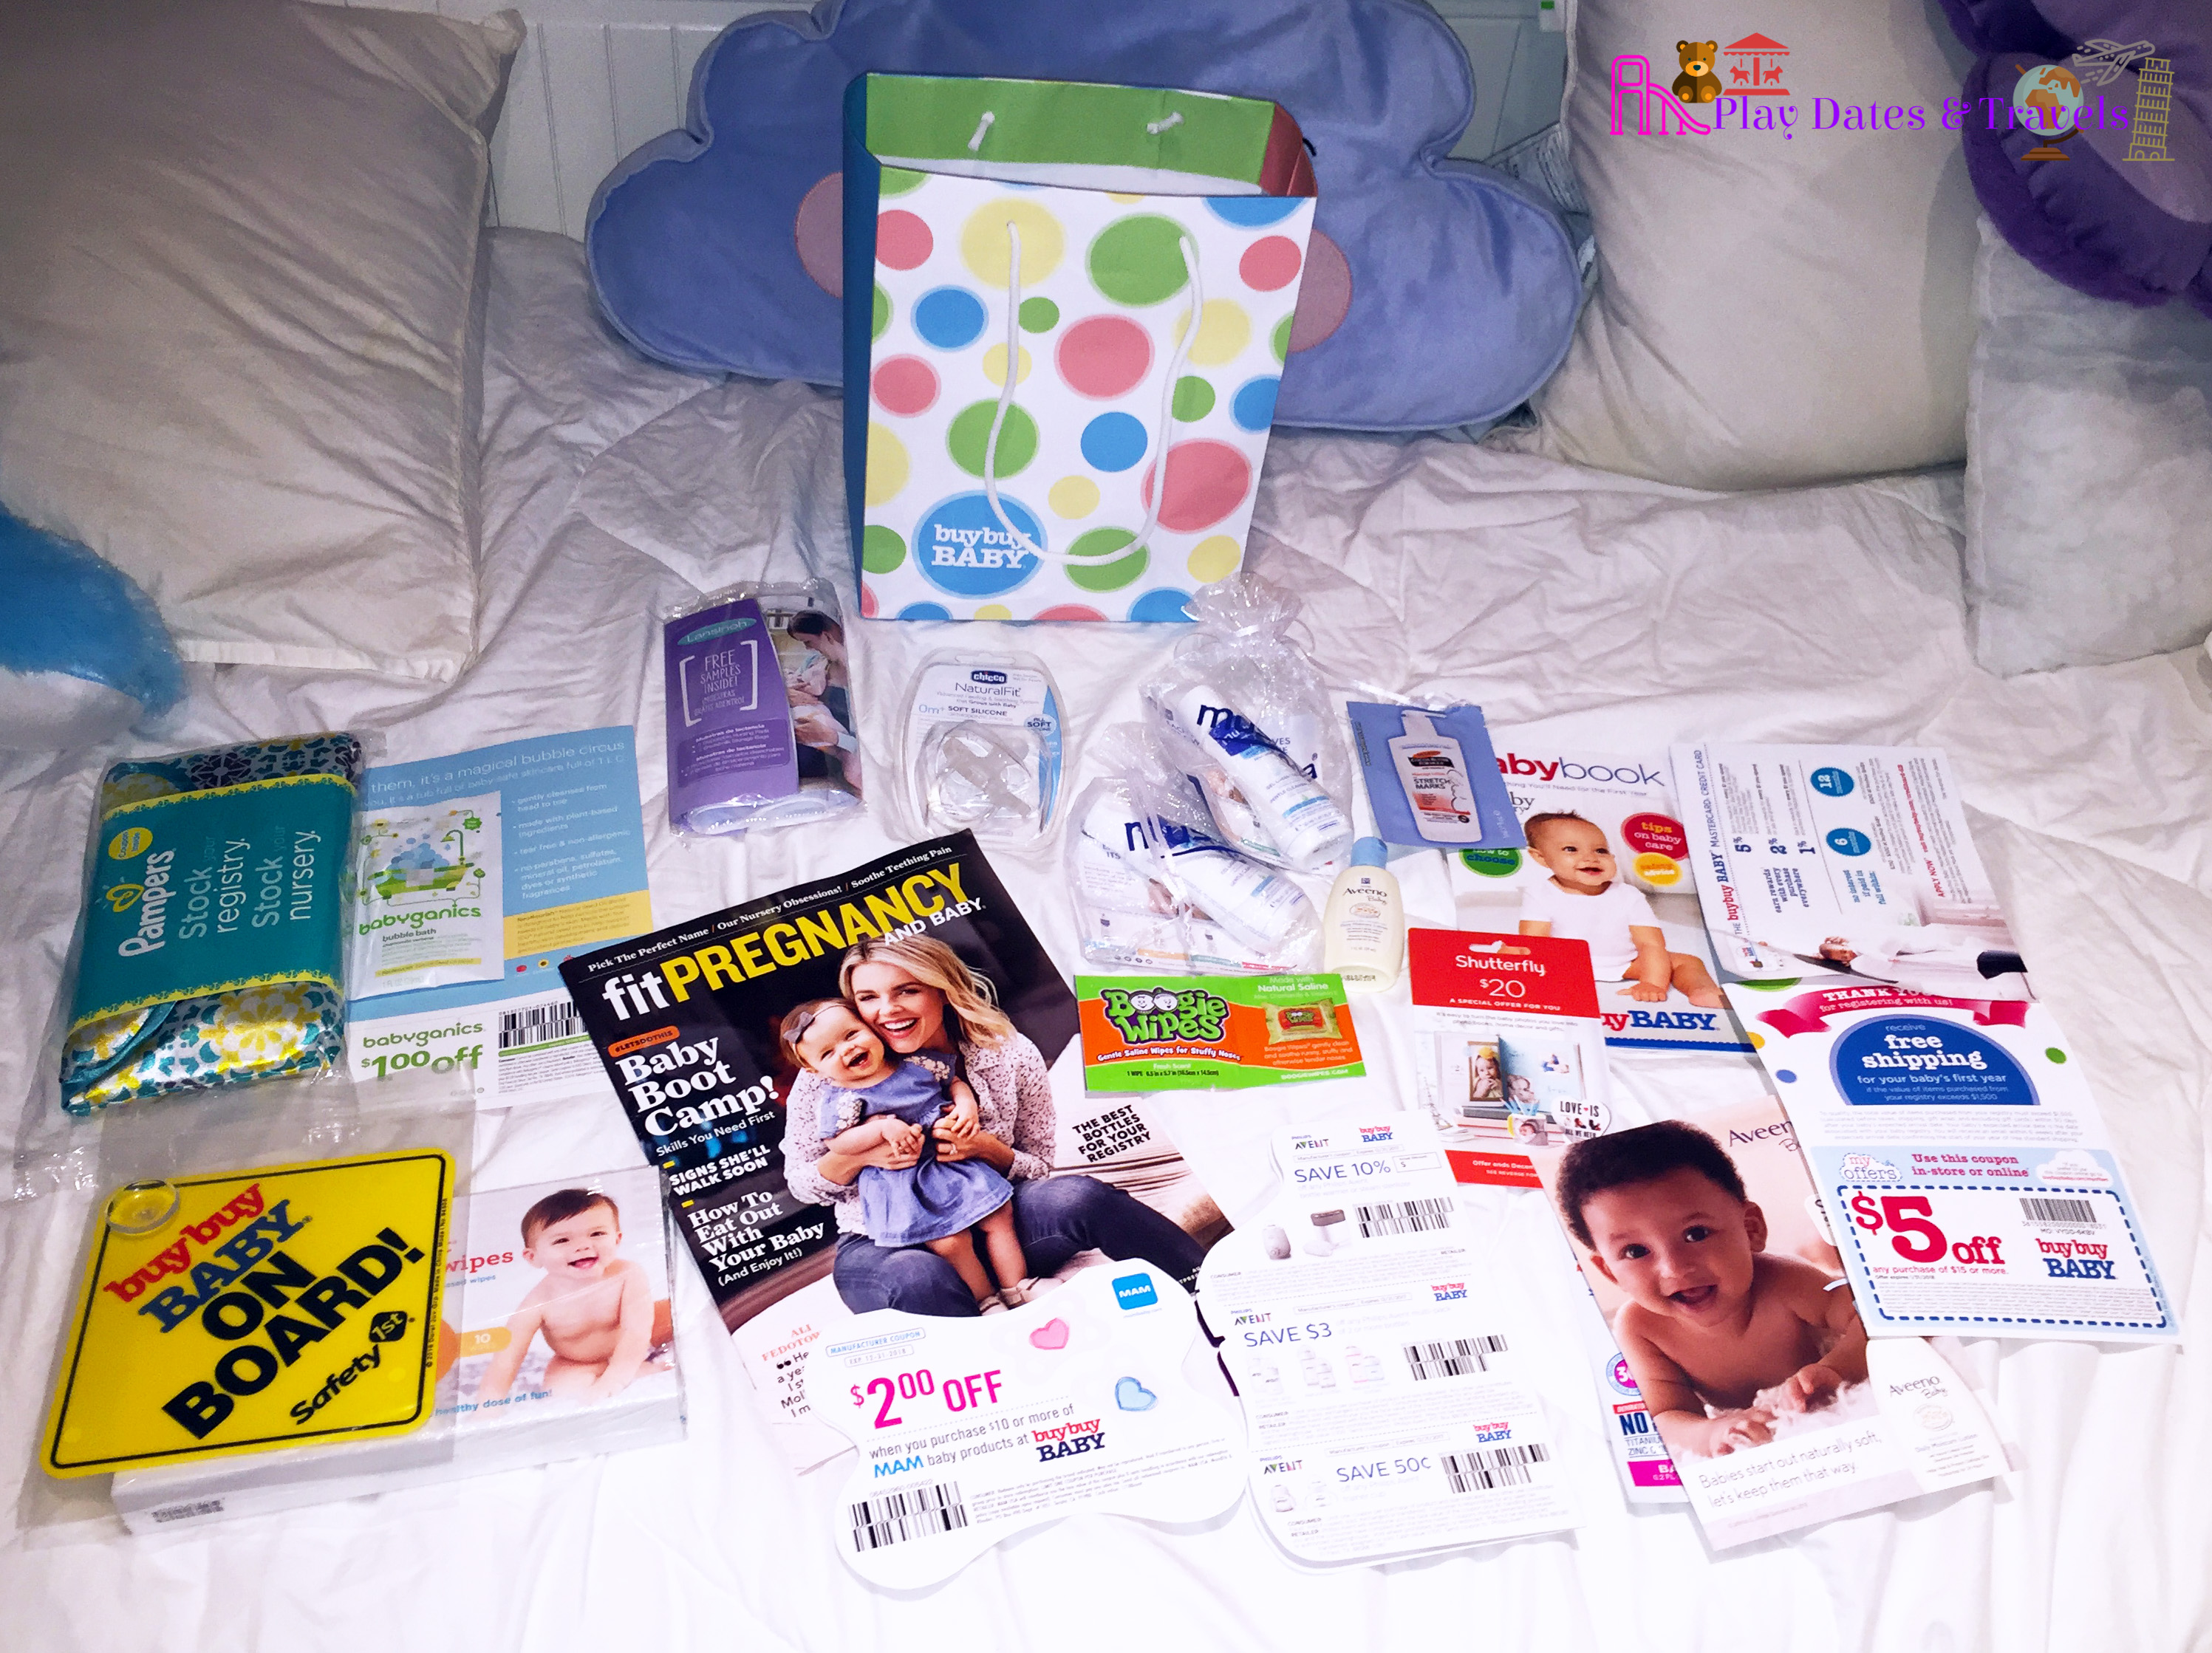
View of the contents inside my second registry bag from Buy Buy Baby
I actually ended up visiting another Buy Buy Baby location in my area on a hot September day and requested a bottle of water. While talking to the store associate she asked if I had registered already, noticing my belly and when I replied yes, I think she must have figured I had registered online so she gave me a duplicate registry bag.
The products in both my bags were pretty similar but there were a few differences, such as:
in addition to the Pampers sample tote with newborn diaper and wipes pack, I also received a second diaper kit from The Honest Companywith 2 diapers and 10 plant-based wipes meant for a baby between 8-14 pounds
one sample of Palmer’s Cocoa Butter Formula massage lotion for stretch marks
one free Baby on Board sign from Safety 1st and Buy Buy Baby to put in your car
one sample of Babyganics bubble bath with $1 off coupon toward any Babyganics purchase of $4.99 or more
not one but two Mustela gentle cleansing gel bottles with their respective coupon
and lastly, a $2 off coupon toward $10 or more of Mam baby products
Inside the Honest Diapers and Wipes pack
Each Buy Buy Baby bag also included one free copy of Fit Pregnancy and Baby magazine in addition to an ad inviting you to join their credit card program.
Stay tuned for the last part of this registry bag series where I will disclose what came in my bag from Motherhood Maternity (their bag works a little different in that you don’t actually register but join their email list when you make an in-store purchase) as well as special pregnancy boxes from Amazon and a company called Noobie, which require either a registry purchase or shipping payment so not 100% free technically.
For now, feel free to leave a comment if you registered elsewhere and received a registry gift bag or if your bag’s contents differ dramatically from what I received from these stores in September. I find it fun to compare from store to store and judging from my last baby, I am sure most of these products will be used quickly as I learn what products work best for my new baby!
Free gift bags received during the month of September just for signing up for a baby registry – pictured are bags from Target, Buy Buy Baby, Babies “R” Us and Motherhood Maternity
Earlier this month I included a post on the top 13 baby registries where parents can register to receive baby gifts for their newborn (or for any special occasion such as first birthday, Christmas wish list etc.). If you haven’t had a chance to check out that post, here is the link which includes a comprehensive, side-by-side comparison chart weighing the pros and cons of each registry. There are many registries to choose from, but given one of the best perks of being pregnant is the free swag that comes with it, I wanted to dedicate a special post on which registry programs you can count on to receive a free gift. This post will be the first in a series where I post what came in my goody bag from some of the top baby retailers. All of my registry goody bags were picked up during the month of September, but just remember, that each retailer’s free sample products and coupons are likely to change from month to month, or even store to store. I will go into that in more detail with both Buy Buy Baby and Babies “R” Us – two of the biggest baby registry programs.
But first – to kick off this series – let’s start with what came in my free Target registry bag. I put together a video highlighting the unveiling of my Target registry bag and will create additional videos for my other registry bags as well. Feel free to click on the video below and/or view the coverage directly on my newly created Play Dates & Travels YouTube channel:
What Comes in Target’s Free Registry Gift Bag
The first glance inside my Target registry bag received September 2017
Target’s free bag was my favorite goody bag of all the in-store bags I received this month, simply because they provided the most sample products without excess fluff (i.e. shameless product ads). I received a total of 11 product samples!! This is much more than I received in the past from them when I registered for my first baby (in 2014, I received five products including a Philips Avent bottle, Mam pacifier, Aquaphor lotion, Lansinoh breastfeeding kit and Huggies sampler pack with 2 newborn diapers and one pack of baby wipes). In 2015, when I was registering for my daughter’s first birthday wish list, I recorded a video of my different registry bags and received 6 total items from Target compared to 7 from Babies “R” Us and 14 from Buy Buy Baby (I hit the jackpot with that bag – what happened to all those samples this year?!!). That video is available on YouTube or copied below if anyone wants to see how the Target bag has changed over the years.
Target’s free bag still comes in a reusable tote, but since 2014-2015, where I received a green and white recyclable bag, it appears Target has updated their registry bag’s design. The bag is now gray and white and comes with carry straps and a button snap enclosure, making it even more convenient to reuse.
Contents inside my Target bag from September 2017
As I mentioned earlier, Target upped their product count this year with 11 free sample products and their website suggests the bag is valued at $50. Laid out in the photo above (and below) is everything that was included.
What I Received:
One large 8 ounce bottle from Dr. Brown’s – one of their Options bottles, it is marketed as the first convertible bottle that can be used with or without the vent system that defines the Dr. Brown’s bottle line. Most free bottles given by baby registries tend to be the newborn size so this bottle was unique in that it allots up to 8 ounces and retails for about $6.99.
One congratulations for registering at Target pamphlet with one buy one, get one free coupon on a Starbucks beverage (only valid at an in-store Starbucks location) and two coupons toward maternity apparel sold at Target as well as certain nursing bra brands including Gilligan & O’Malley, Basics by Bravado Designs and Medela – each coupon was redeemable for 10% off. The pamphlet also included a quick reminder of some of the top perks of creating a registry at Target including a 15% completion discount to complete your registry received eight weeks prior to your event date, free shipping for you and your gift givers over $25 (online now says the threshold is $35 however) and easy returns for up to one year after your event date to return or exchange items from your registry.
I also received four different lotions – massage lotion from Palmer’s Cocoa Butter Formula for alleviating stretch marks (along with a save $1 coupon on future Palmer’s products), one sample size of Aquaphor Baby Advanced Therapy lotion for dry, irritated skin and the reduction of diaper rash (packaged together with a $1.50 coupon), a small sample size bottle of Johnson’s head-to-toe baby lotion and one bottle of Mustela gentle cleansing gel meant for use during bath time. This last product also came packaged together with a coupon offer to receive a free $5 Target gift card with the purchase of any Mustela products worth $30 or more.
One travel carry case from Pampers along with one newborn diaper, a pack of six baby wipes, a $1.50 coupon to be used toward any Pampers Swaddlers diapers purchase and invitation card to join the Pampers Rewards program
A yellow newborn pacifier from Mam
One sample size laundry detergent triple-concentrated and fragrance-free load from Babyganics (along with $2 manufacturer’s coupon toward any Babyganics purchase of $4.99 or more)
A small travel pack of 20 unscented baby wipes from Target’s up & up brand (and save 75 cents coupon)
A Lansinoh breastfeeding sample pack with two disposable nursing pads (for preventing leaks) and two breastmilk storage bags. I used several different brands of breastmilk storage containers with my first baby and these were by far my favorite so I am happy to have new samples on hand for the next baby!
As an extra bonus, I found an extendable cloth measuring tape from Munchkin good for measuring baby as he or she grows or even taking mom’s own changing body measurements! I thought that was a unique sample to include as it is more versatile and can be used beyond the newborn stages.
As I received this free Pampers pack in virtually every baby registry bag I received, here is a close-up of what comes inside:
1 newborn Pampers Swaddlers diaper and one pack of 6 Pampers Sensitive baby wipes, along with a coupon for $1.50 savings and one free Pampers code to join their rewards program and trade in points for baby products and gifts
I have enjoyed being a member of Pampers rewards program over the years as you can redeem your points toward free gifts. Sadly, they recently did away with their popular Grow On program which gave members free bonus gifts every three months, on top of the regular rewards, but you can still find a large line of baby products available on their website that can be purchased with your points. Case in point? The Melissa & Doug Band-in-a-Box set that I recently reviewed in my favorite baby toys from the first year of their life post was redeemed 100% with Pampers points, saving me the trouble of paying its retail cost of $25. (The only problem is, you constantly have to remember to manually enter your codes online – to help with this, my husband likes to remove the stickers with the codes and places them on the edge of my computer monitor as a reminder before we throw away the plastic wrapping and boxes!)
As for what a Lansinoh breastmilk storage bag looks like up close, here is a photo I took from an old sample I had, which included two of the storage bags. They have a section to mark the date that the milk sample is collected as well as room to mark how many ounces you are storing in each bag.
Breastmilk storage bags from Lansinoh
As you can see, the sample products from this one registry bag were more than generous, and the best part is unlike some of the other registry programs which include a ton of ads that may or may not be useful depending on your needs, the bag was filled with products useful to a new mom as well as relevant coupons toward the products presented in the bag. The only other additional contents in my registry bag were two more coupons that could be redeemed solely at Target including $5 off a Boppy Total Body pillow and 20% off baby apparel from Target brand Cat & Jack. Every one of the coupons found in my bag are also valid for a long period of time – I registered in September 2017, yet every coupon is good through June 30, 2018.
I will say this – even though Target was my favorite in-store bag for the sheer number of convenient and thoughtful baby samples provided, it was also the biggest pain to secure. I recall in 2014, when I registered for my first child, my local store forgot to give me my free bag so I had to make two trips in store. This time around, I walked purposefully to the customer service desk after beginning my registry online but my local store — and another one nearby — were both completely out of stock and the employees warned me that when their free gift bag goes out of stock, it takes a while for the store to replenish. So keep that in mind – luckily there are so many Target stores around that all I needed to do was visit a third store before I found a location with a bag in stock. Kind of a pain, but I felt it was worth the hassle once I finally took a peek inside.
Leave a comment to let me know if you also registered at Target and received something altogether different in your gift bag as it is always fun to compare! Also stay tuned for part two of this series where I will describe what came in my registry bags from Buy Buy Baby and Babies “R” Us.
Epcot’s Voices of Liberty show in the American Pavilion, taken when I was approximately five years old
My sister and I (I’m the younger one) pose together with Pluto in what looks to be Epcot’s Mexico pavilion – I am around 3 yrs old
My sister and I (at age 4) pose with Minnie Mouse at WDW
My sister and I (age 5 and 7) in Epcot park
Here’s a well known secret – I am a HUGE Disney fan and have been my entire life (since age 3 or so when my parents first took me to Walt Disney World in Florida – not counting the time they took my sister and me when I was in the womb, ha). As an adult, that fact has not changed but perhaps only intensified because now I can go when I choose! Friend trips, family trips, solo trips – I really don’t need much of an excuse for someone to convince me as I count Disney World among my favorite places to visit across the globe. As a Disney-lifer, I pride myself on making new discoveries and continuing to explore the parks inside and out as there is so much to see and do, and something seemingly new offered every year. I recently was able to cross off two of my top bucket list items in Florida – the first was visiting the parks around New Year’s Eve so I could experience the mayhem and thrilling fireworks that they typically show on TV firsthand (woohoo!) and the second was fulfilling a lifelong Disney dream to attend a private VIP tour!! How was I able to accomplish this? By discovering the group VIP tours now offered to the masses and attending an Ultimate Day of Thrills VIP tour!
Our tour guide riding behind us on Rock ‘n’ Roller Coaster
If you’ve ever been to the parks, you’ve probably noticed official looking guides walking by with a small group in tow, wearing crisp blue pants, a red and blue plaid vest and/or suspenders over white shirt, a shiny gold pin and cast member name tag. These are Disney’s official VIP tour guides and they have the ability to lead their small group to the front of the line and get on rides in what seems to be an instant – and then of course the natural reaction is to quickly glance-over who they are accompanying to see if one of them is a celebrity. Sometimes that may be the case, but more often when I’ve checked them out, these people appear to be ordinary everyday folk, leaving you wondering if they either are in fact related to a celebrity, know someone very high up at Disney or just have a ton of money to spend.
Disney VIP Tour pass
For anyone unfamiliar, a private Disney VIP tour (what they call their Premium Tours) doesn’t come cheap. You and up to 10 guests of your choosing can pay a flat rate of $400 to $600 per hour for your group (the higher rate applies in what Disney designates as their peak seasons or around holidays), which wouldn’t be too bad if, say, you wanted to give this perk a spin for just an hour or two. However, to book a private VIP tour you have to be willing to pay that $400-$600 hourly rate for a minimum of 7 consecutive hours and that 10 person count includes every person in your party, even infants. That means those parties who you see on these tours have spent at least between $2,800 to $4,200, depending on the time of year you are visiting – not including the actual cost of their individual ticket as admission is added on top of any tour you take at either Walt Disney World or Disneyland. Anyone paying for this privilege has the option to extend the tour well past the 7 hour minimum mark, but then that is extra money you’re paying every hour, not including tip (as the guides are one of the only entities in the parks that are ALLOWED to accept tips given their job is to personally customize your plans and make sure your day is fully maximized to your liking).
Remember when I said earlier that I was able to take a VIP tour myself? Well, I can certainly tell you that spending upwards of $2,800 for a single day in the parks just wasn’t a part of my budget. But, in recent years, I began noticing that Disney has started to offer “magical extras” in the form of various incentives that you can buy to make your trip even more special, and one of the offerings that appealed to me just happens to be a less expensive version of their coveted VIP tours.
Overview of the Ultimate Tours at Walt Disney World
If you check out Disney World’s tour services webpage, listed just under the private VIP tours are three other VIP tour options in what Disney refers to on their phone line as the “Ultimate” series. This includes a 7 hour tour of their top thrill rides and which includes a lunch called The Ultimate Day of Thrills, a 4 hour tour of up to 10 classic Magic Kingdom rides called The Ultimate Disney Classics VIP tour (with each attraction chosen having no height requirements, making it appropriate for all ages to enjoy – even your under 3-year-old who is thankfully able to participate in these tours for free), or a 4 hour tour of Animal Kingdom park at night that they just began offering as of July 2017 called The Ultimate Nights of Adventure (this one includes snacks, a specialty beverage and access to 5 expedited rides and their new evening show, Rivers of Light). All of these Ultimate tours are group guided tours, which unlike the fully customizable private VIP experience where you choose what you want to do in what order, includes a pre-established itinerary that you can opt to do with the same knowledgeable VIP tour guides for a much lower cost. Both the Ultimate Day of Thrills and Disney Classics tours are held only on Tuesdays, Fridays and Sundays, while the Animal Kingdom tour is held on Thursdays and Saturday-Sunday. The Ultimate Day of Thrills tour is currently the only offering within their VIP tour packages that requires a park hopper ticket as it visits three out of the four main parks (excluding water parks and other Disney extras).
Ultimate Day of Thrills VIP Tour Description from May 2016 Source: http://bit.ly/2xqEjBK
When I first began planning my December Disney trip ahead of the 180 day mark, which is generally the earliest that guests can book advanced dining reservations and/or popular tours at Disney that are subject to sell out, I knew that our New Year’s trip would be one of the busiest times of the year and that line waits would most likely be excruciatingly long (think 2-3 hours). I had all but resigned myself to the fact that this trip would simply be about walking around, taking in the park decor and enjoying the atmosphere while eating good food…and then I learned about the Ultimate Day of Thrills VIP tour. Seeing as the price would be discounted for Disney Visa credit card holders by 15% (and I had just decided to apply for this card), paying $254 (or $270.67 post-tax) sounded very attractive for a guarantee of going on all my favorite rides with minimal wait times at one of the most crowded times of the year. Hey! It was already a super expensive time of year so I didn’t feel as badly about splurging a little extra to ensure this vacation would exceed our expectations. As an additional bonus, my daughter, who was under 3 years old, would be allowed to join us on the tour for free as the parks only begin charging for children ages 3 and up (same as with regular park admission), so it would just be an additional cost for my husband and I.
Given my excitement and knowing this would likely be a one-time splurge, my family was all set for taking this tour and I immediately got to planning the rest of our trip around it. This means at exactly the 180 days ahead mark, I not only booked this trip before it sold out for my date (which it eventually did) but also pre-booked a few dining reservations including requesting an outdoor patio seat at one of the Epcot restaurants which would allow us to have upfront seats for the fireworks display. Come the 60 day ahead mark, which is the earliest Disney hotel guests can book their Fastpass+ reservations in advance, I made sure to choose our attractions on each day based around our dining plans and also chose to book my 3 allotted Fastpass+ for the day of our tour at Animal Kingdom to ensure we would get on the rides we would not get to on the tour, given that our day was scheduled to end in that park around 3:30pm. Phew! As you can see, a trip to Disney World these days requires a lot of pre-planning which I understand isn’t for everyone, but if you navigate it far enough in advance you can usually manage to squeeze in most of what you want to do by just giving it some extra thought. The most relaxing vacation you’ve ever taken this may not be, but one that is sure to be packed with excitement and keep Disneyphiles like me completely satisfied. (The alternative again would be completing splurging for a VIP tour and then you don’t have to worry about planning anything as they do it all for you and act as unlimited human Fastpass+ – but then, given it was New Year’s, I’d be spending closer to $4,000 – no thank you.)
Changes to the Itinerary
Imagine my surprise when closer to my trip, around early December, I randomly re-visited the Disney World VIP tours page and saw that they had made a couple of changes to the itinerary! Those changes have remained in effect until today and include the following:
The 12 rides once listed had been reduced down to 10 rides as part of the tour itinerary (meaning two less rides would be on the tour though the cost remained the same)
The tour no longer visits Animal Kingdom at all, and instead visits Epcot mid-day before ending the day in Hollywood Studios (meaning all my Fastpass+ selections in Animal Kingdom for after the tour would be affected as we would now end the tour in another park entirely)
The table service lunch at the Hollywood Brown Derby, one of their few signature restaurants on property, has been changed to a quick service lunch at Epcot’s Sunshine Seasons (I had really been looking forward to the Derby as I had never been there before)
This meant that all my hard work of planning my day around my dining plans the days before and then specifically picking rides at Animal Kingdom for the day of were now for nought. With my trip in just a few short weeks I was concerned that all the best Fastpass+ times had already been snagged and I’d be left with slim pickings should I change my plans this last minute. Well, Disney came to the rescue and then some! When I realized the tour had significantly changed from what I paid for back in July some six months prior, I reached out to VIP tour services who put me in touch with an agent in charge. He explained that they had actually been spending the latter half of the past month contacting everyone who had booked the tour months in advance before the recent changes took effect, and offering everyone two anytime Fastpass+ credits that could be used toward any rides on the day of your choosing; they simply hadn’t gotten around to calling me yet. That solved the lack of 2 extra rides now included on the tour but I mentioned that the table service restaurant – specifically eating at the Hollywood Brown Derby — was something we had been looking forward to for this special trip, and in what I love about DIsney World, he endeavored to make it right. I was personally introduced by phone to the woman who would be one of our tour guides that day and promised that during the tour she would “magically” whisk our party away from the rest of the group to enjoy the lunch we had been promised. With this in mind, we looked forward to the tour with renewed confidence.
What Happened the Day of the VIP Tour
FIRST STOP – MAGIC KINGDOM
The morning of our tour we arrived 15 minutes ahead of the official check-in time at Tomorrowland Terrace, the start point in Magic Kingdom for the Ultimate Day of Thrills tour. As we were early, there was only a small handful of families gathered about the room (by calling ahead we had learned over 40 people were booked that day for our tour so our large group would be split in half), but the staff encouraged us to grab a snack and check in. A table had been set with various snacks and beverages including granola bars, water bottles, juice, coffee and tea. When we went up to the VIP tour guides with clipboards in hand and mentioned our name, our assigned tour guide greeted us (the one I had spoken to previously on the phone) and took us over to the side, handing out our VIP tour lanyards and offering us the opportunity to visit the bathroom or get started on our tour. We mentioned we were all set and so at approximately 8:17am (ahead of the 8:30 official start time) our tour began!
The tour involved brisk walking, which was fine by my husband and me as we are fast walkers and had come prepared in comfortable shoes, and walking expediently was a great way to get across the park more quickly. Luckily for us, my parents, who live in Florida, had offered to drive up for the day and spend time with their granddaughter so we did not have to worry about lugging along her stroller and switching off rides that she could not yet go on – which meant my husband and I got to relax and enjoy the tour as the ride-loving thrillseekers that we are. By 8:25am, still ahead of the official tour start time, we climbed aboard our first ride – Pirates of the Caribbean. Given the early hour of the day, our boat was entirely empty save for our tour guide, my husband and I. By 8:40am, we made it to our second ride – Splash Mountain. Our tour guide conveniently stepped aside and allowed us to ride by ourselves so she wouldn’t get her uniform wet – but not before suggesting where in the boat we should sit if we wanted to avoid the downpour of water (not front row and left is best)! Just after 9am, we were just getting off our third ride of the morning – Big Thunder Mountain Railroad – when it dawned on me that the rest of our group wasn’t joining us and I turned to my husband and said, “Are we going to do this entire tour on our own?!”
Outside of Haunted Mansion with no lines in sight and where, according to our tour guide, the top of the roof is lined with chess pieces as Disney legend has it the Imagineers who built the building were fond of playing chessBlack carriage hearse led by an invisible ghost horse
We were then escorted to Haunted Mansion where our guide gave us excellent trivia on the ride’s exterior and explained that the best spot to be the first onto the ride when you enter the stretching room is actually just under the girl with the parasol as that is where the door opens (I had never figured that out so really appreciated this tip).
While we paid for the group VIP tour, we ended up getting a pseudo-private VIP tour for the same reduced cost.
Enjoying our ride on the Seven Dwarfs Mine Train
After the ride we were given a bathroom break by “it’s a small world,” before heading to the Fastpass+ line for Seven Dwarfs Mine Train, one of the park’s newer roller coasters, where our tour guide gave us another very useful tip we never knew about – if you rock from side to side during the ride in unison and everyone in your car participates, you can actually make the roller coaster car swing from side to side throughout the ride – that was SO COOL. Also cool was the fact that this was the first ride we saw the VIP treatment in action. By this point of the morning lines had started to form and the standby line was in full swing. When we approached the cast member toward the part of the line where the Fastpass merges with standby, our guide leaned over and told the cast member to please allow our party to get on the next train as we were on a tight schedule, and the cast member swiftly obliged. This was the first ride of the day where we had to wait at all and only a few minutes at that, as our tour guide made sure we moved from ride to ride with precision. As ride lovers, my husband and I nearly melted with glee.
Following Seven Dwarfs, we next rode Space Mountain with very minimal wait (probably closer to a 10 minute wait on this one as there is just no getting around their long cues).
My husband and I about to get on Space Mountain
Our last ride in this park was Buzz Lightyear’s Space Ranger Spin, which our tour guide told us was included due to us making great time (despite this one appearing on the original itinerary so my guess is it’s only included on more expedient mornings).
Image taken from my Disney photo book of us on the ride during our tourOur tour guide was nice enough to take this shot for us in front of Cinderella’s Castle before we left the park
At this point, she informed us that our time at Magic Kingdom had come to an end and we were taken into a backstage area not normally allowed to the public (and thus sadly, no photos were allowed) before she had us climb into a private vehicle. In the car, we were given ice cold water bottles which was incredibly refreshing after a morning walking from place to place, as was the van’s refreshing air conditioning, and she took us straight over to Epcot.
SECOND STOP – EPCOT
As we drove in a cast member entrance, we saw the back of the iconic World Showcase buildings I had grown up enjoying. It was like looking at a soundstage, which I guess for all intents and purposes is what theme parks are – you just never know it! She whisked past Test Track (sadly not part of this tour as she indicated the lines are too long given there is a whole interactive design aspect to the ride), taking us directly near a side entrance to Soarin’ where she once again offered us the opportunity to take a bathroom break. Our entrance took us right to the start of the line cue and it was there that she pointed out Sunshine Seasons, the regularly scheduled lunch stop for this tour.
After Soarin’, that was it for the scheduled attractions in Epcot – yup, just one ride and lunch are included there – so we climbed back in the vehicle one last time and she made sure we retrieved our bags and water bottles as we would not be returning to the car. Just before we entered Hollywood Studios another cast member came out and scanned our MagicBands (which serve as park tickets at Disney World) so this is exactly why a park hopper ticket is required for this tour as they do check.
LAST TOUR STOP – HOLLYWOOD STUDIOS
We entered the park again from a side cast member entrance, this one near Rock ‘n’ Roller Coaster, which she mentioned would normally occur at this point of the tour, but given the Fastpass+ line was a little long and looked like it would exceed a half hour wait, we would circle back and do that later. Instead, she took us straight to Tower of Terror which had a much shorter wait.
Getting our money shot in front of the Twilight Zone Tower of Terror ride, one of our favorite rides in the park!
After this ride, we walked over to the Hollywood Brown Derby for lunch. We were given the regular menu and told that we were allowed to order a beverage (lemonade, coffee, tea, water or soft drink), appetizer and entree apiece – I chose the oyster brie soup and lamb duo while my husband selected the jumbo lump crab cakes and charred filet of beef. While a little heavy, the portions weren’t too big so we were able to manage it. But supposedly this was another reason Disney decided to scratch this part of the tour as some families had complained a full meal after all the rides was a bit heavy – for us, we enjoy a sit down meal so this was an extra bonus and great to finally see the interiors of this iconic restaurant. The food, however, we thought was a bit meh.
Hollywood Brown Derby menu
Oyster brie soup at the Hollywood Brown Derby during our tour
Lamb duo at the Hollywood Brown Derby during our tour
The charred filet of beef with mashed potatoes and veggies
To give our stomachs some time to rest, we next visited Toy Story Mania – below is our blurry selfie we took just before the ride.
Blurry Toy Story Mania photo from my phone
After that, we went on Star Tours, followed by our final ride on Rock ‘n’ Roller Coaster, where the line had indeed gone down giving us a minimal wait. My husband and I recited the pre-show lines to each other under our breaths as we’ve ridden this ride so many times (my other park ride favorite) and waited a few extra minutes to ride in the front row, accompanied by our tour guide (this really must be the best job in the parks)! It was at this point we were given a choice of taking the vehicle back to Magic Kingdom if we wanted (or even to Animal Kingdom since that is where we had initially planned to end our day), but we had made pre-arrangements for a Fastpass+ to the now defunct Great Movie Ride in Hollywood Studios so opted to part ways. We then partook in extra snacks instead by way of my first Mickey pretzel (I prefer the German pretzel in Epcot) and pizza at the newly launched PizzeRizzo to see if the pizza was just as good as the old Toy Story Pizza Planet (it was exactly the same).
Grabbing the obligatory Mickey pretzel post-tour
Followed by an individual pizza at the new PizzeRizzo, replacement to the former Toy Story Pizza Planet
Ultimate Day of Thrills Tour Takeaways
Our takeaway was this: the tour was amazing! I would do this again on a future trip if I only had one or two days to enjoy the entirety of the parks as you can save on the cost of a ticket for an extra day and/or hotel lodging while really treating yourself, or I might consider doing their new Animal Kingdom offering to get in all the top attractions at Pandora! Again, note that Animal Kingdom is not included at all on the Ultimate Day of Thrills tour. You really do get your money’s worth in terms of personalized attention and access to tips and secrets about the parks, plus the private chauffeured vehicle transportation from park to park. As you can see, we did accomplish 12 Fastpass rides on this tour plus had time for up to three additional Fastpass+ afterwards! While we realize the unanticipated private tour was a bonus given we booked before the tour changes took place, we would happily do the same experience with a larger group – some day. On less popular days I’ve read reports that some families end up taking this tour nearly by themselves anyway. When we mentioned to our tour guide that we were into Disney trivia, she kept it coming for the remainder of the tour so it was great to talk to someone who was just as passionate about Disney and could give us some insider tips. You also get to keep the VIP lanyard, which I wore for the rest of the day as it shows cast members I just came off a private VIP tour! One important note: since we were so fast we never saw the regular tour group until the end of our tour when they were just getting to the park (I believe around 2:30 or so). Our tour ended around 2:48pm, ahead of the 3:30 end time we anticipated, but since we had already achieved all that was scheduled we did part ways early – so just note you can’t squeeze in extra attractions that are not part of this official tour, even if you do end early.
Tour Pricing
The thrill rides tour is $299 per person, plus tax, and requires the addition of a park hopper pass as you will be visiting three out of the four parks plus partaking in a lunch – again, the regular lunch now scheduled is at Epcot’s Sunshine Seasons, a quick service food court. For anyone interested in the other Ultimate Tours, the Animal Kingdom group guided tour is $249 per person plus tax and the Magic Kingdom group guided tour is now $199 per person, modified from what they used to call the “Ultimate Day for Young Families” which formerly went to all the same Magic Kingdom attractions listed on their website for the Classics tour, plus kid-friendly attractions in 2 other parks and included a lunch for $299 per person – here is a link to their old brochure for more info on those changes. (I believe a number of people must have complained that 7 hours and a lunch with young kids attending and minimal bathroom breaks was too much, so Disney took note and made it occur in just the one park for a shorter period of time – nixing the lunch but adding a quick park snack). These VIP tours are only offered at Walt Disney World, not Disneyland, but again you do get a slight 15% discount if you are either a Disney Vacation Club member, Annual Passholder at Disney World (annual passholders at Disneyland do not count), or Disney Visa credit card holder.
In comparison to a regular VIP tour, I can almost see why someone might be willing to splurge for the $2,800 minimum cost. It might make sense if you have money to burn or if this is your only Disney trip you are ever going to take and you want the primo experience, or if you are traveling to Disney with a large party consisting of several families together or large group of friends (or can find another random family or two willing to split costs with you). If you split the costs, that $400 to $600 hourly rate doesn’t seem half as bad since you’ll be receiving the ultimate royal treatment in exchange, which includes a private Disney vehicle picking you up at the time of your choosing from your Orlando hotel (even if it is off Disney property – goodbye overcrowded but free Disney shuttles! – note: this is one part that is different from the group Ultimate tours), being whisked through an expedited entrance line (no more long bag check lines), receiving an unlimited use of Fastpass+ without the hassle of having to pre-plan your entire itinerary like I did and ride whatever you want in whatever order you want on the day of, having the ability to go on your favorite rides repeatedly with minimal wait (15 minutes or less generally), watch your favorite shows, firework spectaculars or parades from special reserved VIP viewing areas roped off just for you, and have the opportunity to take your designated tour guide with you from park to park, thus fully maximizing your time at Disney World while everyone around you enviously stares. NOTE: many years ago I believe the VIP tour guides were able to take their private parties to special side entrances or straight to the back of the line to get right on the rides – and maybe this is still the case with some celebrities – but for the majority of those paying for the private VIP tours, this is no longer. They are only able to take each party directly into the Fastpass+ line at character greetings, shows and rides, BUT the good news is that nearly 90% of the available entertainment, including character meet and greets if that is your priority as well as all the biggest thrill rides, at Disney World is all Fastpass+ so you would still be maximizing your time with them either way. If I ever did this, I would just save the non-Fastpass+ attractions for when our pre-paid 7 hour expedited window is up as those lines tend to be shorter in general anyway.
I actually called VIP services to gauge pricing and if one were to book the private VIP tours in October, with the exception of Columbus Day weekend when many schools are out and thus the parks are crowded, the price would come to $425/hour for the fall. Not too shabby.
A few tips when traveling during the holiday season:
Cast members know the parks will be crowded so if you simply visit Guest Services (either at the front of each park or within your own Disney hotel), you can check to see if they can add any additional Fastpasses for you. Maybe it was because we were staying at a moderate hotel vs. the value hotels we typically stay in (in this case, the moderate was only slightly higher than the value for this time of year so we upgraded), but the employees were exceptionally kind and helpful, noting that we had a toddler with us and trying to help us squeeze in extra character meet and greets and toddler-friendly attractions like Dumbo at Magic Kingdom to ensure that our little girl would have plenty of fun. So I definitely would pay Guest Services a visit and see what they can do despite the busy season.
New Year’s is a great time to visit for the simple fact that besides the special New Year’s celebrations held in every park (I am assuming Animal Kingdom will do something this year as they now have added nighttime hours that didn’t exist in years past), you also still can view the Christmas holiday decorations on display throughout the parks and at each resort. We spent one half day alone traveling by monorail to all the deluxe hotels as well as walking by the ones near Epcot to take it all in!
Our hotel gave us Disney buttons in advance – things that say I’m Celebrating, or Happy Anniversary!, Happy Birthday! and the like, without us having to wait until we got to the parks. This is convenient if you want to let their employees know how you’re celebrating a special occasion as they will often wish you congratulations and sometimes even give you a complimentary treat on the house! (This is not just a holiday season tip but a tip in general fyi)
Due to the extra Fastpasses and services catered to our little one, we felt like VIPs for the entire length of the trip, not just on the day we took the tour, making this a pretty special trip and giving us fond memories that will last us all a really long time!!! Would you take this VIP tour? Feel free to leave a comment below on your own personal experience or Disney bucket list items.
My daughter gives the main mouse a kiss toward the end of our trip